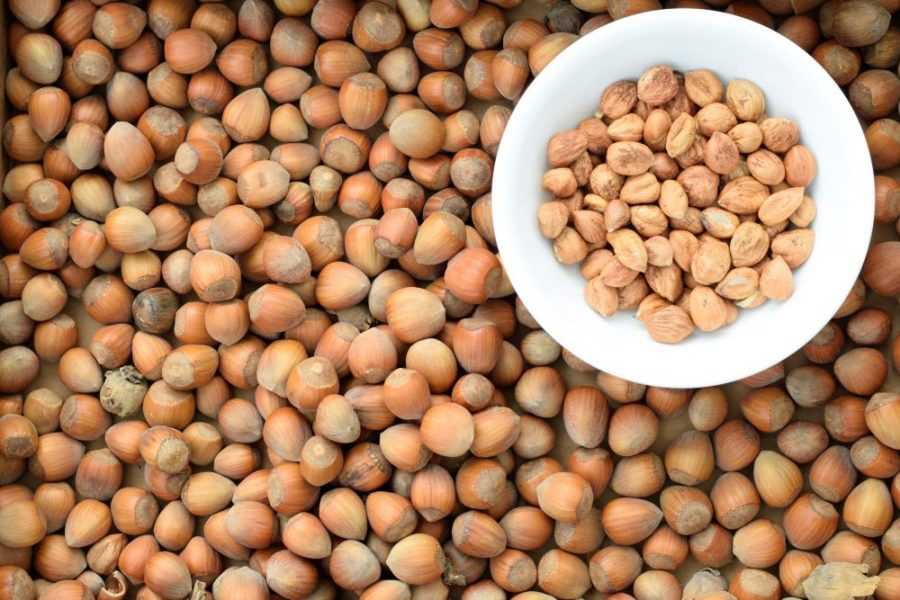
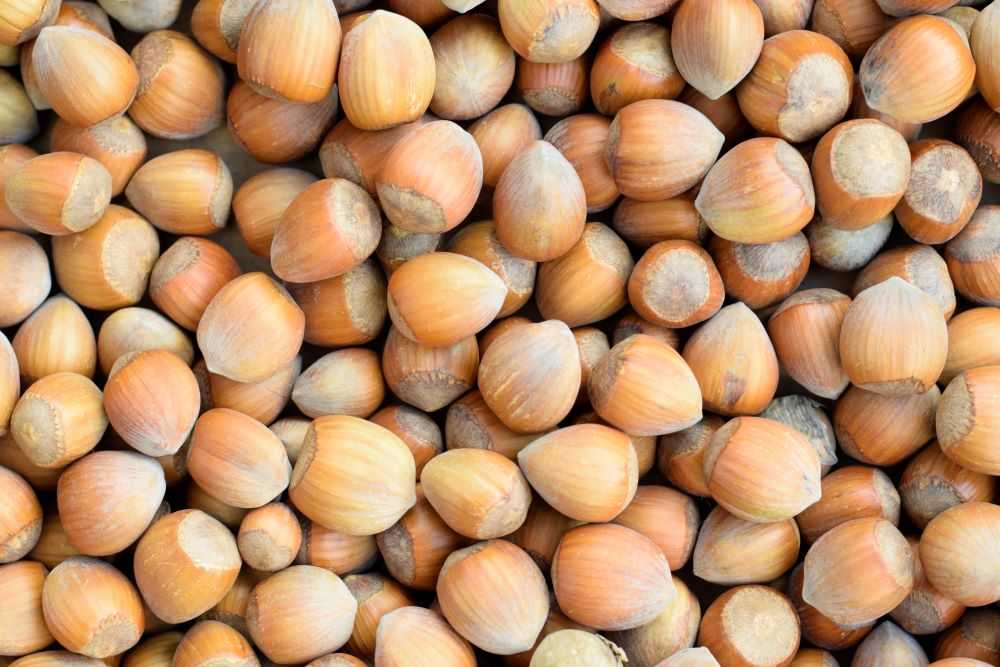
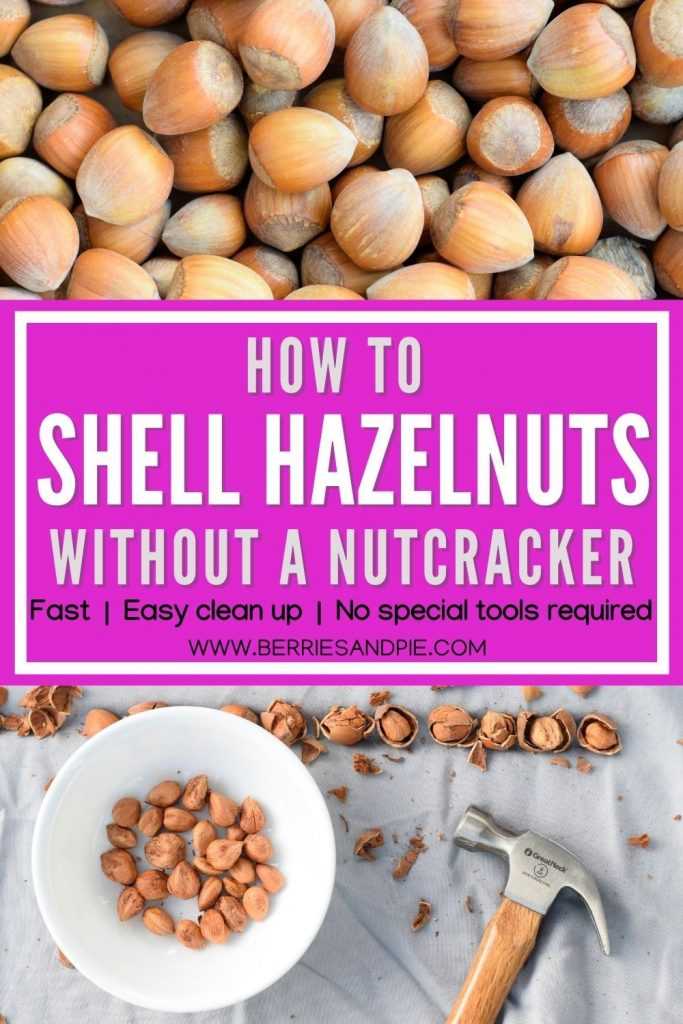
It is October now and a fresh crop of hazelnuts are popping up at farm stands and farmer’s markets. These versatile little nuts (also called filberts) are absolutely delicious roasted and can also be used in baked goods as well as savory dishes. Today I will show you the easiest way to shell hazelnuts so they are ready for roasting and using in your favorite recipes!
The BEST Way Shell Hazelnuts
While there are a few ways to crack hazelnuts, my preferred method is to use a hammer, with a few tips and tricks to make the process easier. I have been shelling and eating hazelnuts since I was a kid, and literally grew up right next to a hazelnut orchard. From my experience, using a hammer instead of a nutcracker is the absolute easiest and fastest way to shell hazelnuts.
Advantages to this method:
No special tools required
Fast
The hazelnuts won’t roll around
Easy cleanup
Fun 🙂
Now we will go through the process step-by-step. Let’s get started!
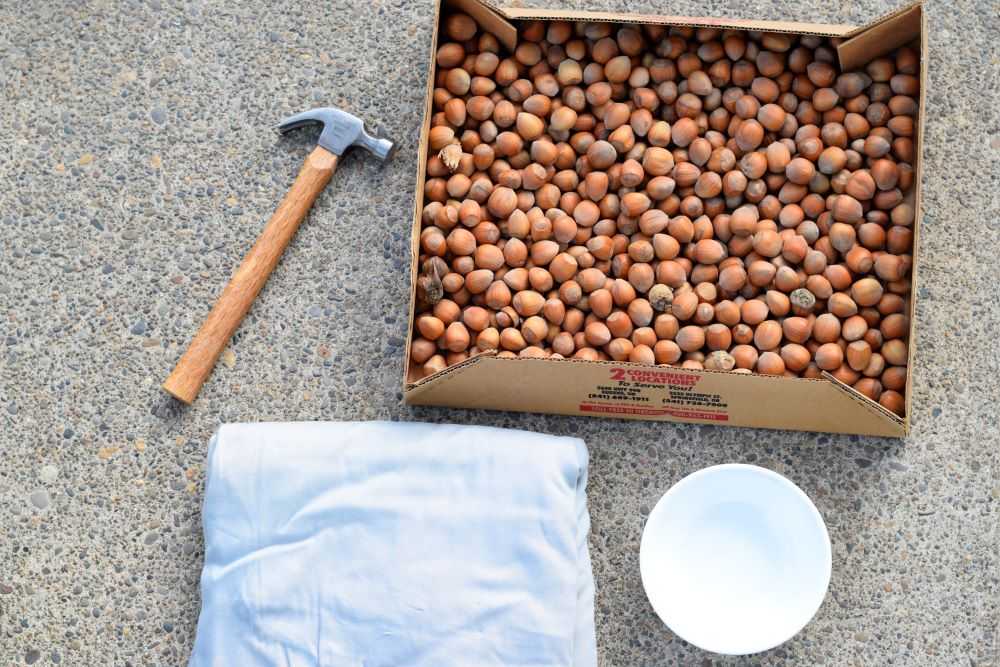
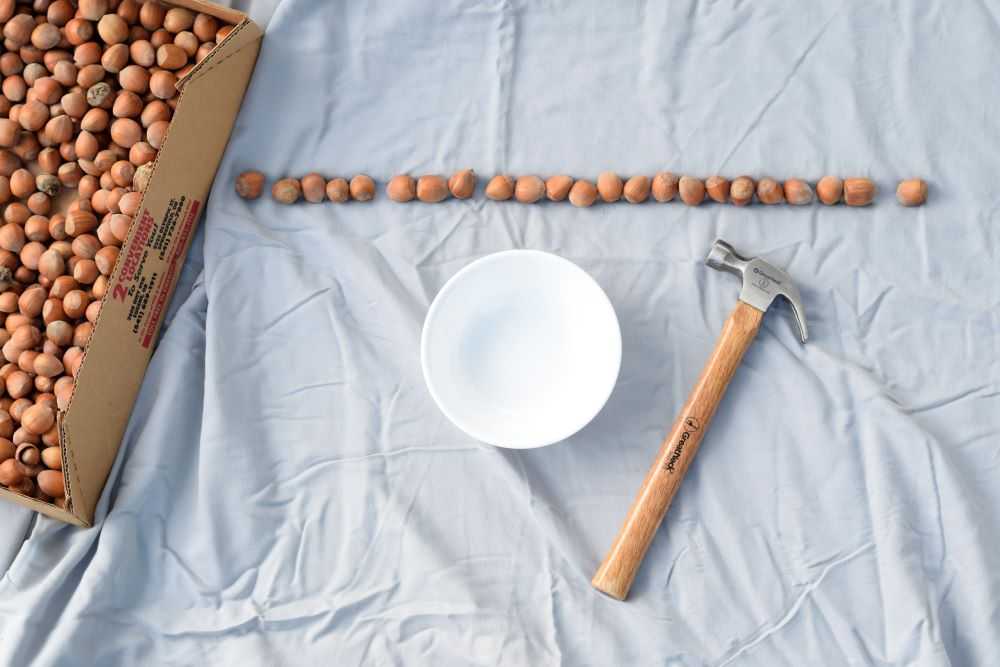
Step 1: Gather Your Materials
You only need a few materials to shell hazelnuts. Grab an old sheet or a clean rag, a hammer, and a bowl to collect the shelled nuts. You may also want to grab a pair of safety glasses in case the shells go flying!
Step 2: Find a Place to Crack the Hazelnuts
Hazelnuts crack best on a firm surface, such as concrete. Go outside and find a groove in your patio or driveway. When you crack the hazelnuts you will line them up in this groove to keep them from rolling around as you crack them.
Step 3: Place the Sheet Down and Line up the Hazelnuts
Place the old sheet down over the groove in your patio. This will make it easy to collect the shells when you are finished.
After your sheet is in place put a line of hazelnuts in the groove to get them ready to crack. You can do 10-20 at a time, which is why this method is so fast. Have them a little apart so they don’t bump each other when you go to crack them.
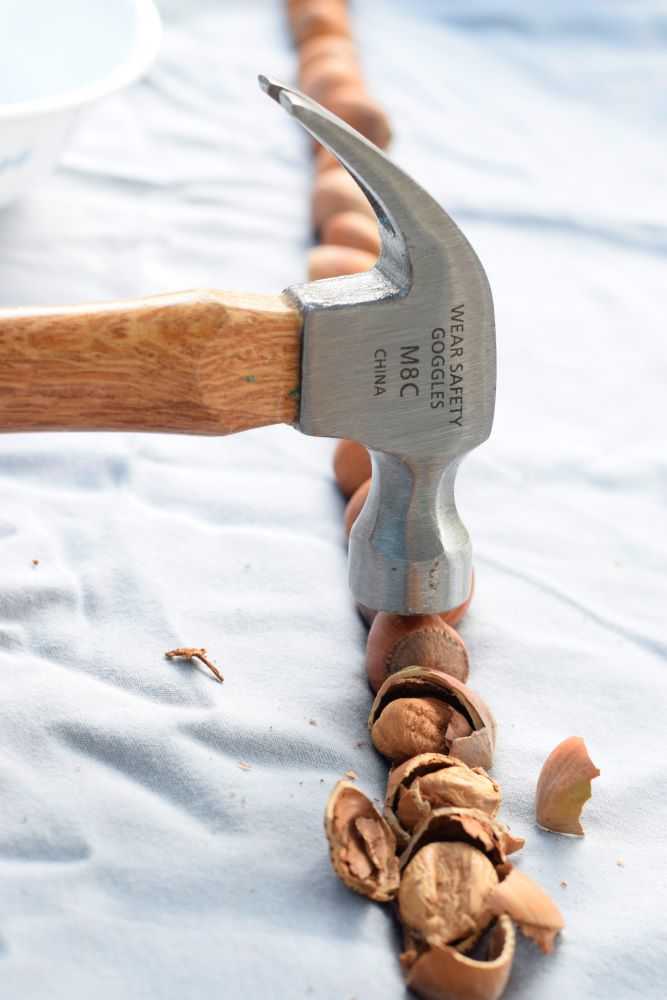
Step 4: Crack the Hazelnuts
It’s time to shell the hazelnuts! Put on your safety glasses if you are using them and then go down the line with the hammer and crack, crack, crack! One good whack is usually all it takes to break the shell enough to remove the nut inside. It takes a little practice to do this well without crushing the nut inside.
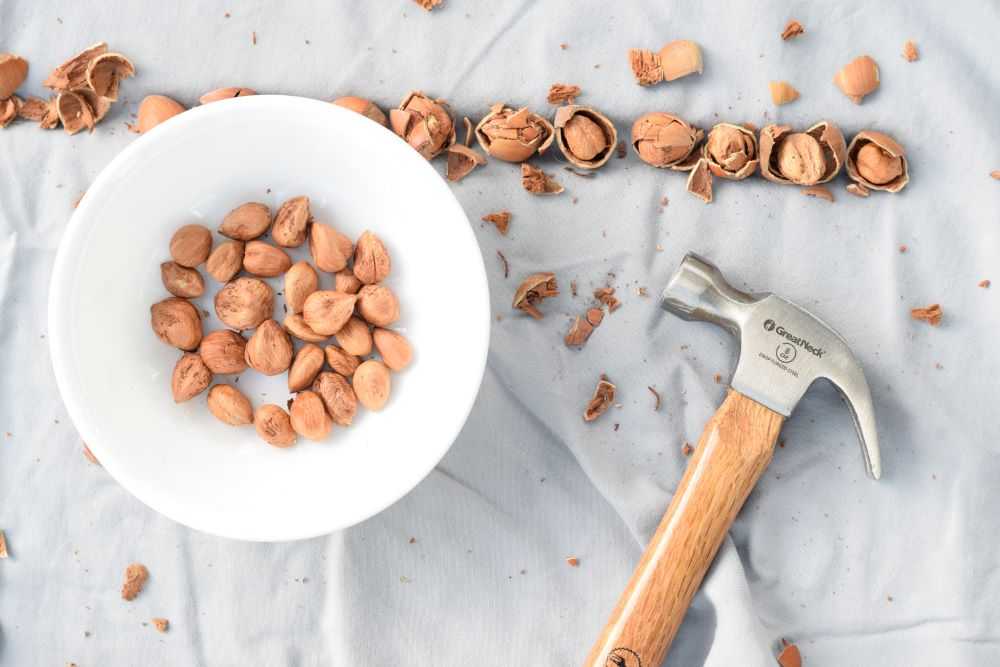
Step 5: Sort Through the Hazelnuts
After the shells are mostly cracked go down the line, pick out the nuts, and place them in your bowl. If you did not get a hazelnut cracked all the way gently tap it with your hammer so you can break the shell enough to get the nut out.
Step 6: Repeat the Process with the Remaining Hazelnuts
After your first row of hazelnuts is cracked, lift up one side of the sheet so the shells fall to the side. Then put out a new row of hazelnuts and repeat the process.
When you are finished with all of your hazelnuts, lift up the corners of the sheet and take it to the garbage to dispose of the shells. Your patio should be mostly clean and you have a bowl full of hazelnuts!
Final Thoughts
There you have it…the easiest way to a bowl full of beautiful cracked hazelnuts! You can enjoy them right now or roast them for absolutely superior flavor and crunch. Enjoy!
This slow cooker spaghetti sauce is one of our family’s favorite Tuesday night dinners. Why Tuesday night? Because I work on Tuesdays and need something easy and quick for dinner. Also, everyone loves this spaghetti sauce at our house and there are no complaints – a win!
Why is this sauce so darn good? Something almost magical happens when it cooks all day in the slow cooker. The meat becomes super tender, which actually helps make the sauce nice and thick. Also, the tomato products have a chance to caramelize a bit. This results in a sauce with amazing flavor!
Could you cook this spaghetti sauce on the stove? Probably. But it would take a long time, you would have to babysit the pot so it would not burn, and it may never develop the qualities that make this sauce so yummy. The slow cooker is the way to go, baby! Read on to learn how to make this at home.
Assemble the Ingredients
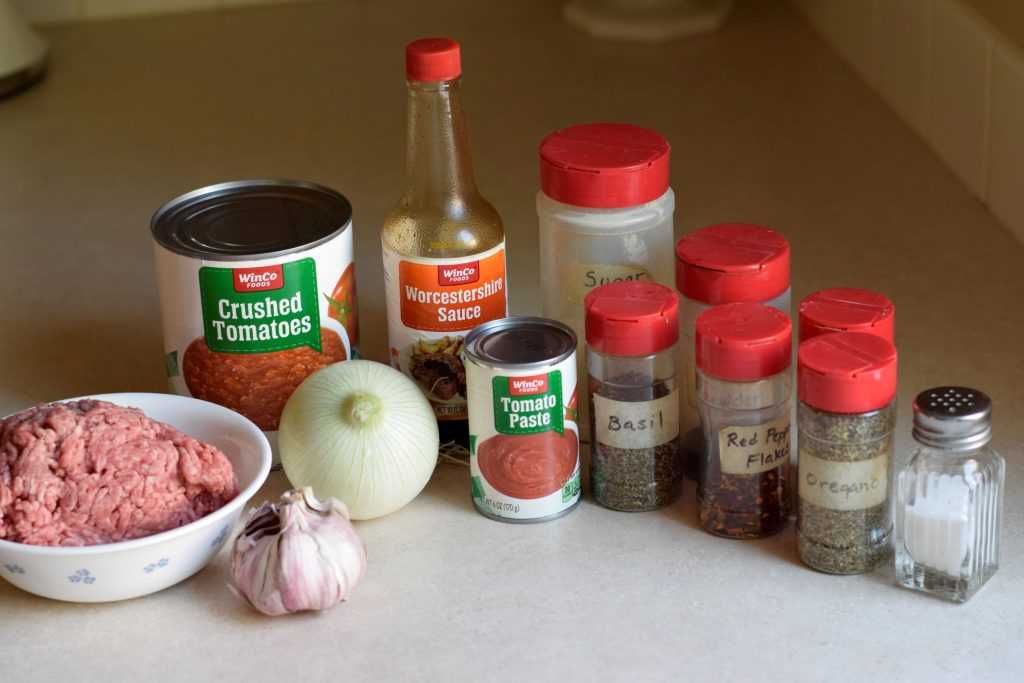
This sauce uses simple ingredients that many people already have on hand. We will go through them now:
Tomato products – This sauce uses a large 28 oz can of crushed tomatoes. Why is that, do you ask? How are crushed tomatoes different than tomato sauce? Canned tomato sauce is made from tomatoes of course. But it also contains a bunch of other seasonings in it. On the other hand, crushed tomatoes are just that—crushed tomatoes, with a bit of citric acid and salt, for flavor. I like using the crushed tomatoes because it gives me more control over what seasonings go in the sauce.
Now, since crushed tomatoes are a little thinner than regular tomato sauce, I add in a small 6 oz. can of tomato paste to help thicken the sauce. I love tomato paste and use it all of the time. Tomato paste is about as simple as it gets ingredient wise–tomatoes. The combination of the crushed tomatoes and tomato paste gives this sauce a perfect thickness.
Ground beef – This sauce contains a pound of ground beef. Try to choose the leanest ground beef possible because it will cook in the sauce and you will not be able to drain away the grease.
Onions, garlic, and mushrooms – These give the sauce great flavor. I use onions and garlic out of my garden when I have them. For the mushrooms I use a 6 oz. can of chopped canned mushrooms for two reasons. First, they are easy and I can just dump them in. Also, they have been cooked and a lot of the extra moisture is gone. Fresh mushrooms might make the sauce too watery. And did I mention that canned mushrooms are easy?
You might notice that the mushrooms are missing from the picture above. I forgot to buy them at the store—oops! The sauce was almost as delicious without them 🙂
Seasonings – This sauce contains a variety of seasonings. The sugar and salt are importance for the balance of the sauce. You can adjust these to taste. The others seasonings help to develop depth of flavor. Adjust them to what you like!
Make the Sauce
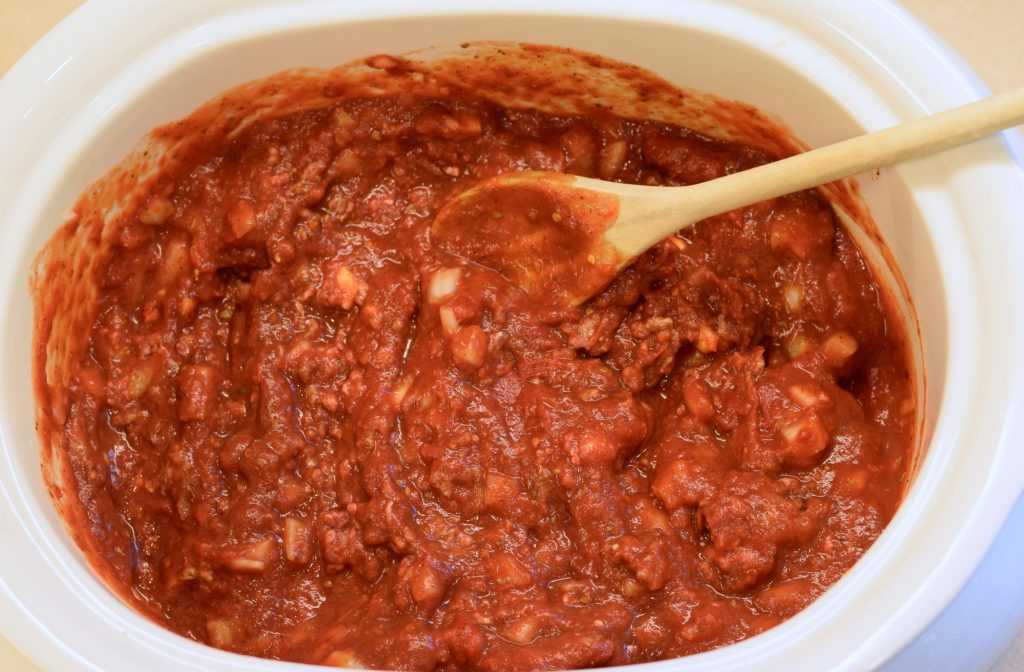
To make the sauce you dump all the ingredients in the slow cooker and stir it up. Seriously. It does not get any easier than that!
Dump the ingredients in the slow cooker and stir it up.
This sauce can be prepped ahead to save you time in the morning. To do this stir everything together the night before. Take the liner out of the slow cooker base, cover it with the lid, and refrigerate overnight. In the morning all you need to do is take it out of the fridge, pop it in the base, turn it on, and go about your day.
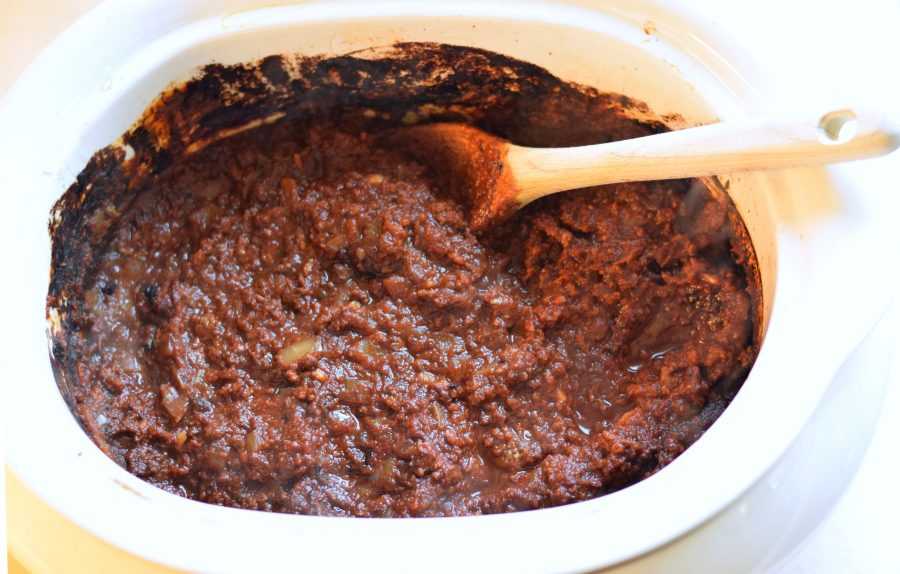
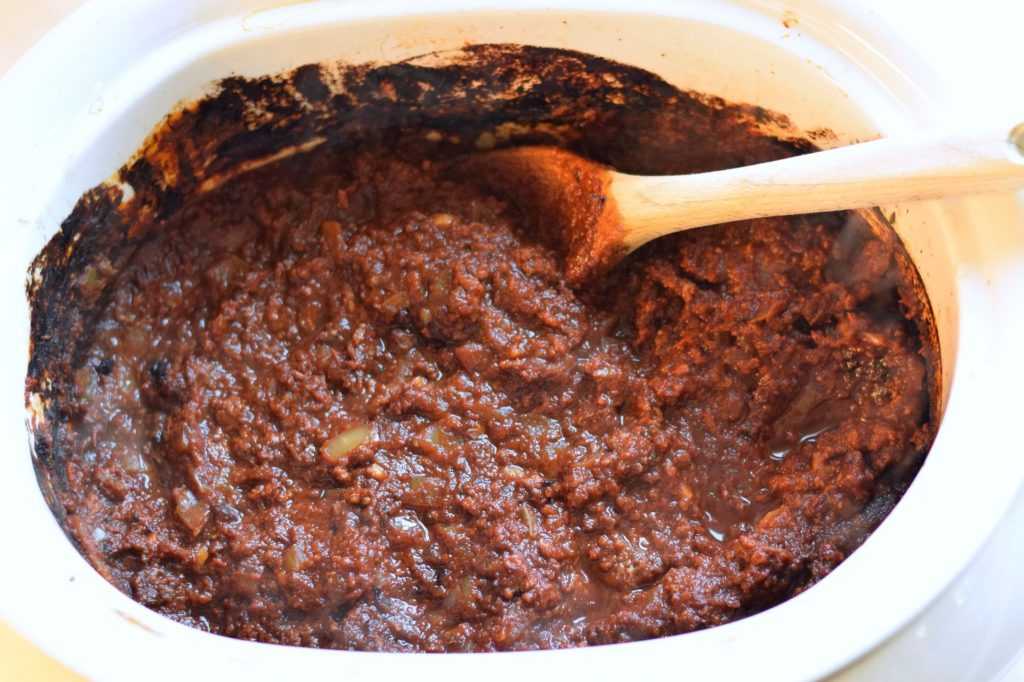
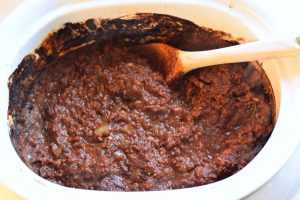
Cook the sauce on low for at least 8 hours. When I am at work it cooks for 10 hours and turns out great. The longer cooking process is necessary to help the sugars in the tomatoes caramelize and develop a deeper flavor. Do you see how the color has changed the picture below?
The sauce after cooking all day. See how the color has changed?
Serve
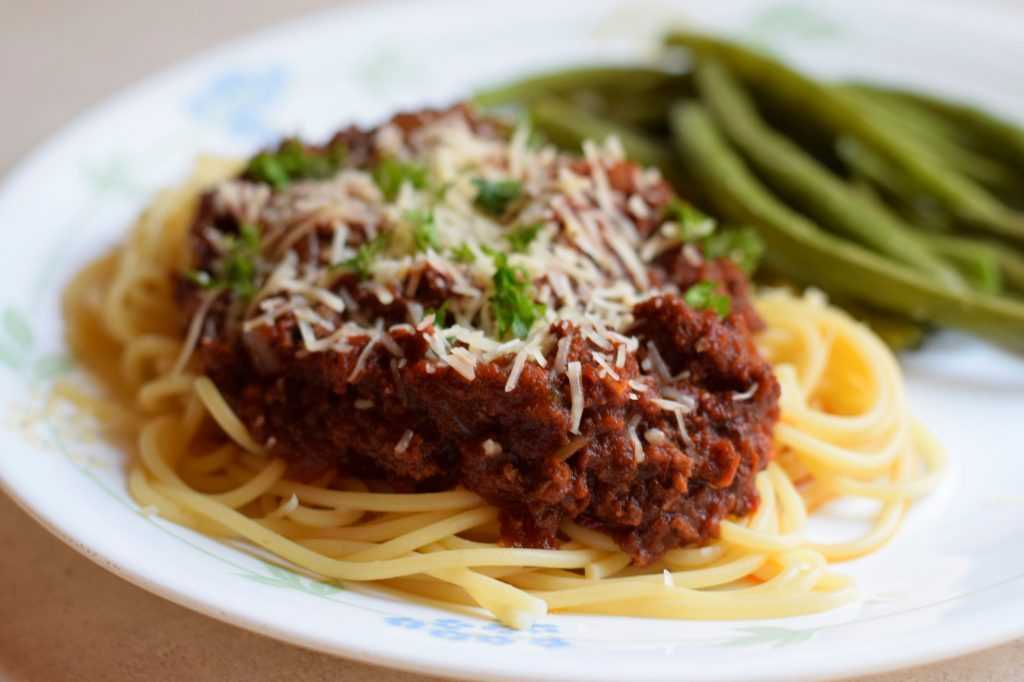
When you get home you will be greeted with the most amazing smell! Boil up some noodles, add some garlic roasted green beans (recipe here) and you have yourself a delicious meal everyone will love! Yum!
Add some roasted garlic green beans and dinner is served!
I hope you get to try this slow cooker spaghetti sauce soon. Happy Cooking!
Slow Cooker Spaghetti Sauce
Recipe by: Mandy
This spaghetti sauce takes minutes to throw together. After cooking all day the flavors blend to create one amazing sauce. It is the perfect meal for a busy weeknight!
This recipe may be assembled the night before if desired. Remove the insert from the base, cover it with the lid, and refrigerate overnight. In the morning place the insert into the slow cooker base, turn it on, and go about your day. Easy!
We all know why you go to the Olive Garden. No, it is not for the fettuccini alfredo or the endless salad. The reason you go to the Olive Garden is for the breadsticks. The soft, chewy, delicious breadsticks.
But did you know that breadsticks are easy to make at home, only require 8 ingredients, and can be ready in under two hours? Even if you have never made yeast bread before these breadsticks are very simple to make.
This post will teach you how to make soft garlic breadsticks step-by-step. Let’s get started!
Note: This article may contain affiliate links, where I earn a small commission from qualifying purchases with no additional cost to you. I only provide links to products that use personally and recommend highly.
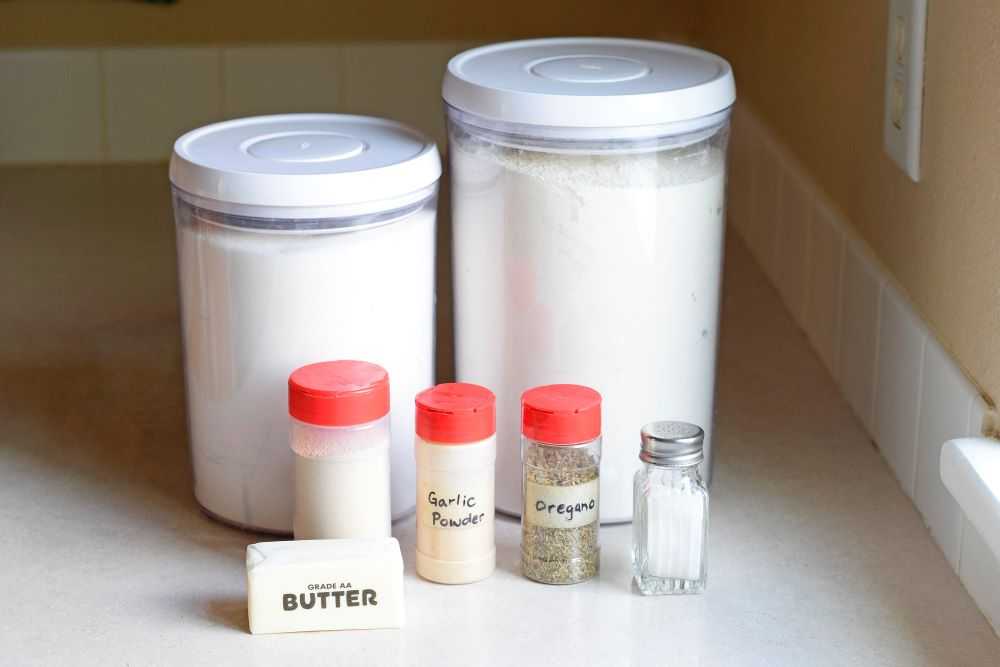
Ingredients for Soft Garlic Breadsticks
Homemade breadsticks require only 8 ingredients. We will go through them now:
Warm water – This recipe uses water as the liquid. Make sure it is around 110 degrees for the yeast to activate properly. This means that the water should feel warm but not burning hot. If you are not sure you can check the temperature with a kitchen thermometer.
Yeast – This is one of the most important ingredients! Yeast is a living organism that helps the bread to rise. In the store yeast is dormant but when warm liquid (in this recipe, water) is added it will “wake up” and start producing carbon dioxide gas. This is what creates holes in the bread and gives it its light and fluffy texture.
You can buy yeast in a strip of three single use packages or you can buy it in bulk for a very reasonable price. If you buy bulk yeast then 2 1/4 teaspoons is equivalent to one package. I usually buy “instant” or “quick rise” yeast because it helps the bread to rise faster.
Butter – This is used in the dough and also brushed on top of the breadsticks before and after they come out of the oven. I prefer salted butter but you can use whatever you prefer.
Sugar – Sugar is needed to give the bread a subtle sweetness. Also, it helps feed the yeast so the dough will rise more quickly.
Salt – Salt gives the bread some flavor. I use regular table salt.
Flour – Flour gives the structure to the dough. There are many types of flour, but for this recipe we will use regular all-purpose flour.
Garlic powder and oregano – These add flavor to the breadsticks. They are called “soft garlic breadsticks” after all!
How to Make Soft Garlic Breadsticks
Step 1: Mix the Dough
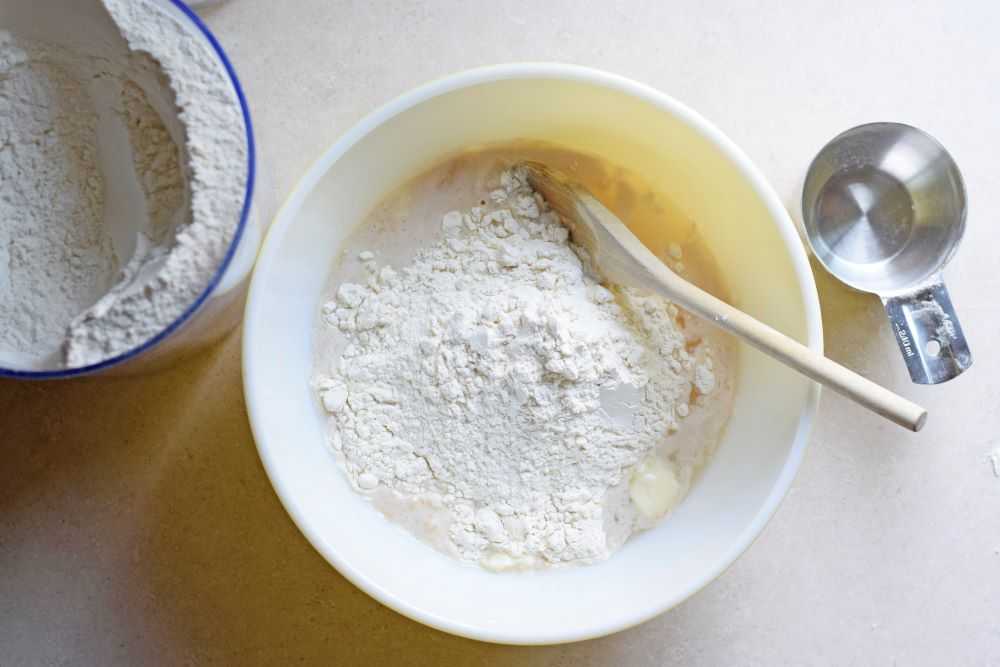
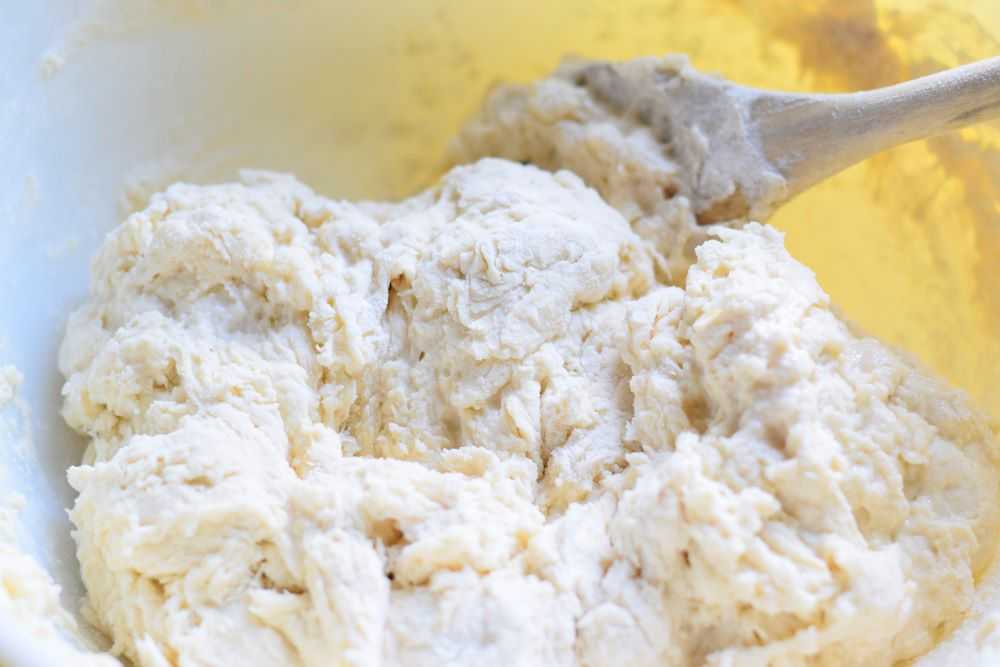
Stir the warm water, yeast, butter, sugar, and salt together in a large bowl. Add about 3 1/2 cups of the flour and mix well. Stir in enough additional flour to make a soft dough that forms a ball and pulls away from the sides of the bowl.
Stir the ingredients together in a large bowl.Add in enough flour so dough forms a ball and pulls away from the side of the bowl.
Step 2: Knead the Dough
Turn the dough out onto a lightly floured surface and knead until smooth. Kneading the dough helps develop the gluten. Gluten is a protein that gives structure to the dough. It is what makes bread elastic and chewy.
Everyone has their own way of kneading dough, and you need to find a rhythm that feels good to you. Here are the basic steps:
Push the heel of your hand into the center of the dough.
Turn the dough a quarter of a turn.
Fold the dough in half.
and repeat…
Add in more flour, a little at a time, to keep the dough from sticking. The dough is ready when it is smooth and elastic. The outside will not be as rough textured as it was, and it should spring back when you poke it gently with your finger.
At first the dough will have a rough texture.
After kneading the dough will be smoother.
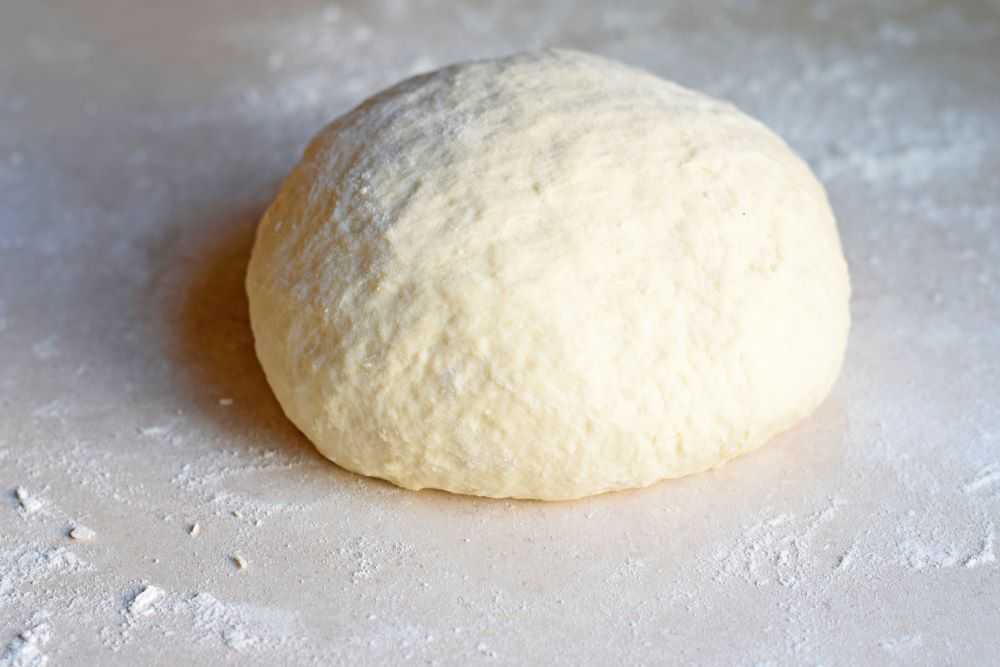
Step 3: Let the Dough Rest
After the dough is relatively smooth cover it with a clean kitchen towel and let it rest on the countertop for 15 minutes. This will help the gluten relax a bit so it will be easier to shape in the next step.
Step 4: Shape the Dough
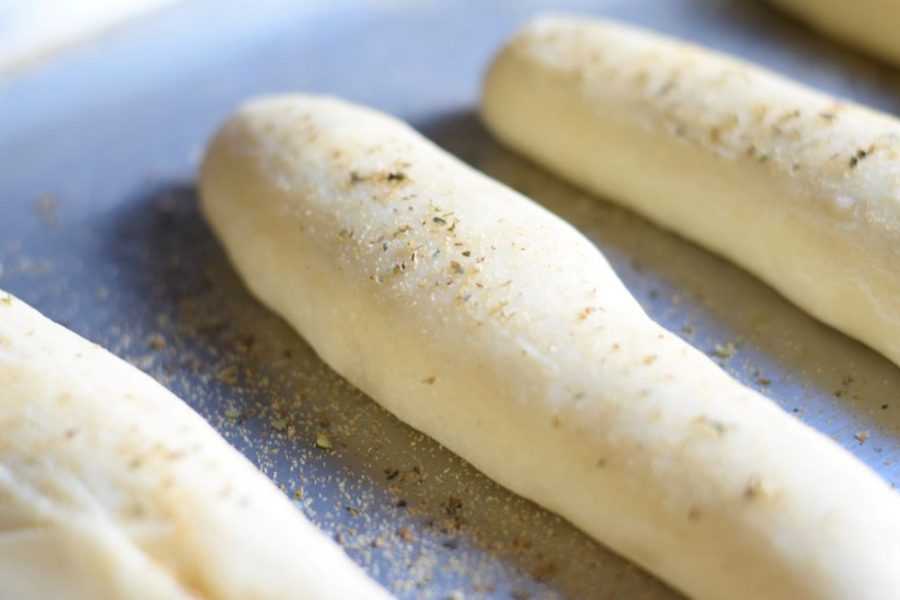
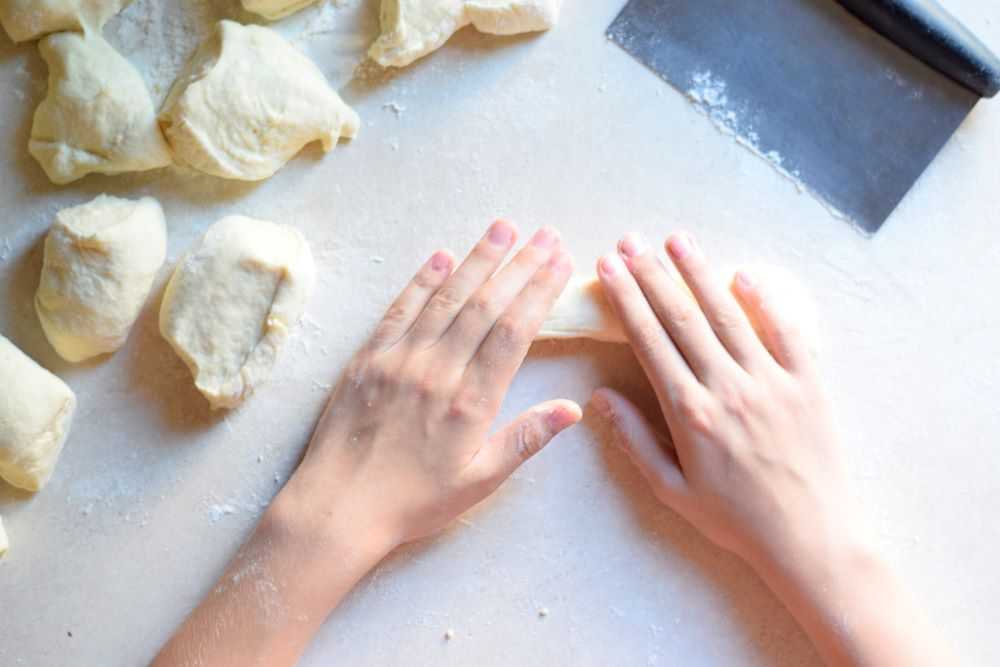
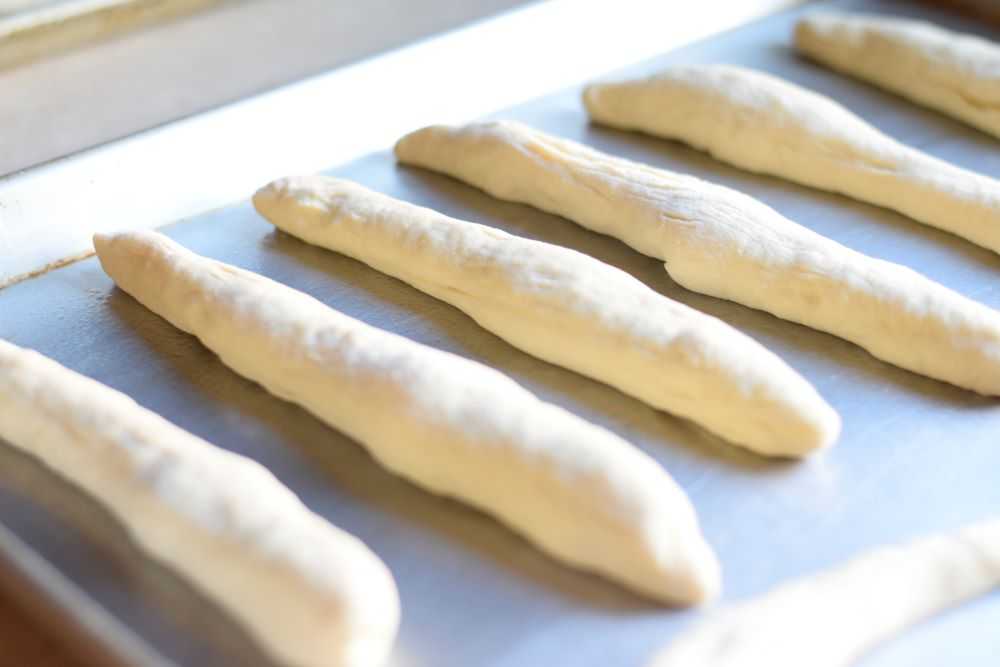
Divide the dough into 16 pieces. I like to use a dough scraperfor this (affiliate link). Using your hands, roll each piece into a 7-inch long breadstick. Place the breadsticks a few inches apart on a greased baking sheet.
Divide the dough into 16 pieces.Roll each piece into a breadstick about 7 inches long.Place the dough on a greased baking sheet.
Step 5: Let the Dough Rise
Cover the breadsticks with your clean kitchen towel and let rise in a warm place for 45 minutes. The dough is ready when it looks puffy and has almost doubled in size.
Step 6: Bake the Breadsticks
Towards the end of the rising time heat the oven to 400 degrees. When the dough has finished rising brush the breadsticks some melted butter. Bake at 400 degrees for 10-15 minutes, or until the bottoms are lightly browned.
The top of the breadsticks will remain light colored even after they are done baking. This is a good thing because it means that they will stay soft and chewy! Checking the bottoms is the best way to tell if they are done.
Brush the breadsticks with melted butter before baking.
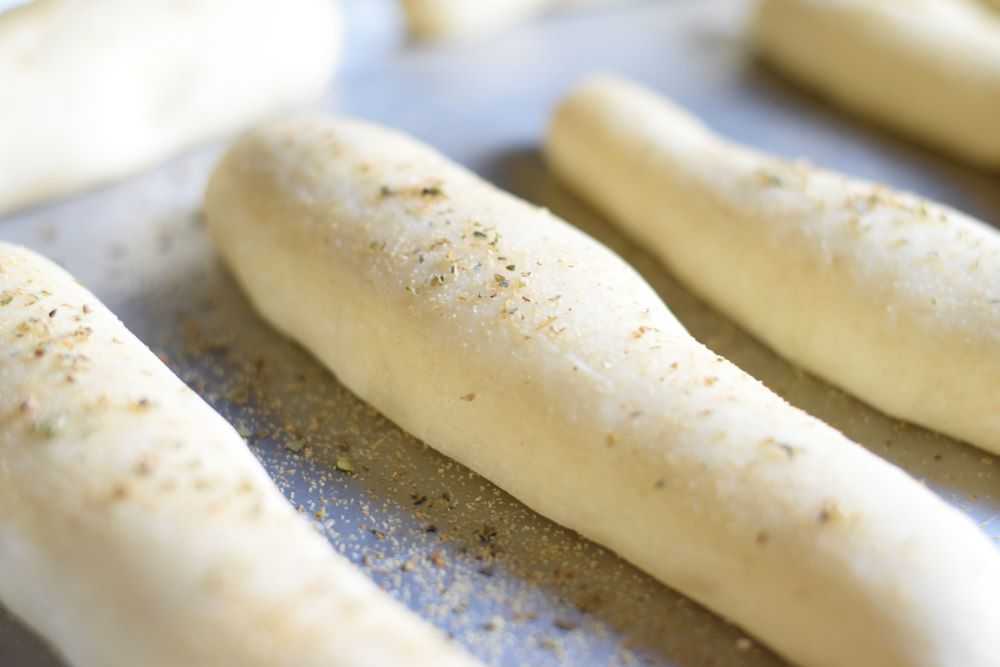
Step 7: Brush the Breadsticks again and Sprinkle with Herbs
Remove the breadsticks from the oven and brush again with melted butter. Immediately sprinkle with garlic powder and oregano to taste. Transfer to a wire rack to cool.
After removing the breadsticks from the oven, brush them again with butter and sprinkle them with herbs.
Serve
Serve these breadsticks warm out of the oven. They are especially delicious with a bowl of homemade soup! Enjoy!
Hope you get to try these soft garlic breadsticks soon. Happy Cooking!
Soft Garlic Breadsticks
Recipe by: Mandy
These will remind you of the breadsticks at Olive Garden. They are especially delicious with a bowl of homemade soup!
Stir the warm water, yeast, softened butter, sugar, and salt together in a large bowl. Add in about 3½ cups of flour and mix well. Stir in enough additional flour to make a soft dough that forms a ball and pulls away from the sides of the bowl.
Turn the dough out onto a lightly floured surface and knead until smooth. Add in more flour, a little at a time, to keep the dough from sticking. The dough is ready when it is smooth and elastic.
Cover the dough with a clean kitchen towel and let it rest on the countertop for 15 minutes. This will help the gluten relax a bit so it will be easier to shape in the next step.
Divide the dough into 16 pieces. Using your hands, roll each piece into a 7-inch long breadstick. Place the breadsticks a few inches apart on a greased baking sheet.
Cover the breadsticks with a clean kitchen towel and let rise in a warm place for 45 minutes. The dough is ready when it looks puffy and has almost doubled in size.
Towards the end of the rising time heat the oven to 400 degrees. Brush the breadsticks with melted butter and then bake for 10-15 minutes, or until the bottoms are lightly browned.
Remove the breadsticks from the oven and brush again with melted butter. Immediately sprinkle with garlic powder and oregano to taste. Transfer to a wire rack to cool.
Serve these breadsticks warm out of the oven. They are especially delicious with homemade soup! Enjoy!
Fall is here and that means that it’s soup season! One of my very favorite soups to make is sausage, potato, and kale soup.
You may recognize this soup as Zuppa Toscana from the Olive Garden. But you are in for a treat because the homemade version is so much better!
This soup is loaded with sausage, potatoes, and fresh kale. One thing that I like about this recipe is that it makes a lot! The soup reheats well and we eat it for lunches during the week. It requires only 10 ingredients and is ready in less than an hour.
This post will take you through how to make this delicious sausage potato and kale soup step-by-step. Let’s get started!
Ingredients for Sausage, Potato, and Kale Soup
Sausage, potato, and kale soup only requires 10 ingredients: Italian sausage, onion, water, potatoes, milk, evaporated milk, oregano, red pepper flakes, kale, and parmesan cheese for the top. We will go through the ingredients now:
Italian Sausage – Italian sausage is made with fennel and herbs that adds a lot of flavor to the soup. I choose the mild Italian sausage (also called sweet Italian sausage) because of my kids but spicy Italian sausage would be delicious as well!
Onion – This adds flavor to the soup. Use a yellow or white onion so it does not change the color of the broth.
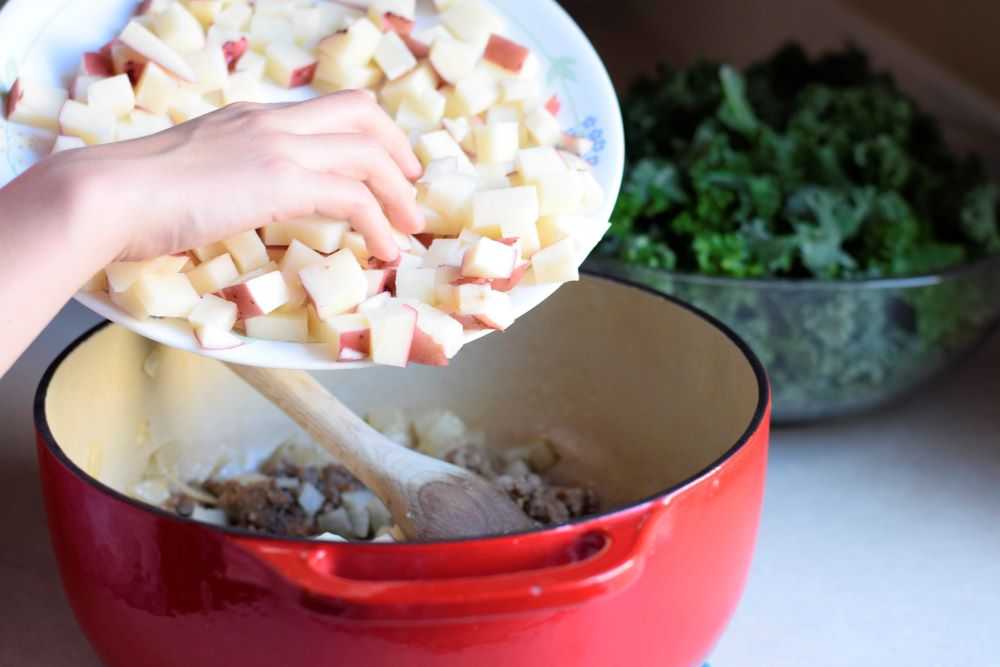
Potatoes – My favorite potatoes to use in this soup are red potatoes or yukon gold potatoes because they have an amazing flavor. Since they have thin skin, I usually do not peel them.
If you don’t have yukon gold or red potatoes, russets work great too! You may want to peel them though because they have a slightly thicker skin.
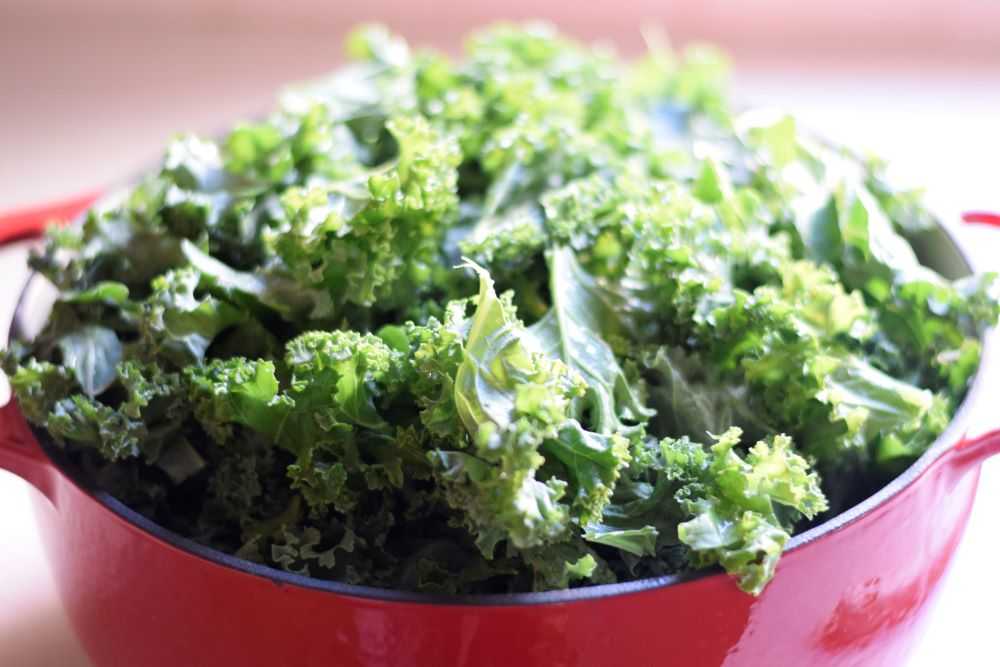
Kale – I LOVE kale in this soup! Unlike spinach or other greens, kale keeps its integrity, even when the soup is reheated for leftovers the next day. This recipe calls for a lot of kale (two bunches!) and it will look like it will be too much. However, you will be surprised by how much it cooks down.
Milk – Adding some milk gives the soup some richness. You can use whatever milkfat you prefer.
Evaporated Milk – Evaporated milk is sold in a can and is quite simply milk that has had some water removed. Do NOT get sweetened condensed milk because it is not the same thing!
Evaporated milk is heated during the canning process which gives it is a slightly darker color than fresh milk. It also has a richer flavor, which I really like in this soup!
You can also use half-and-half or cream instead of the evaporated milk if you prefer, but wait to add it until the end. After the kale is done cooking remove the soup from the heat, stir in the cream, and serve.
Oregano and Red Pepper Flakes – These add flavor to the soup. Adjust the amounts to taste.
Parmesan cheese – I like to sprinkle parmesan cheese on top of the finished soup. This is optional but delicious!
How to Make Sausage, Potato, and Kale Soup
Step 1: Prepare the Ingredients
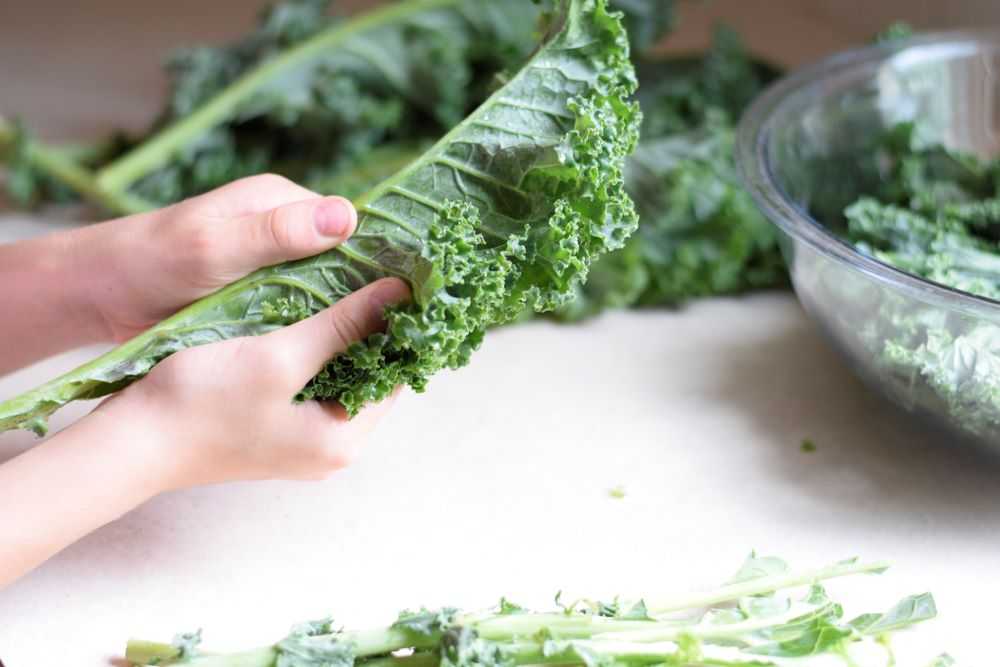
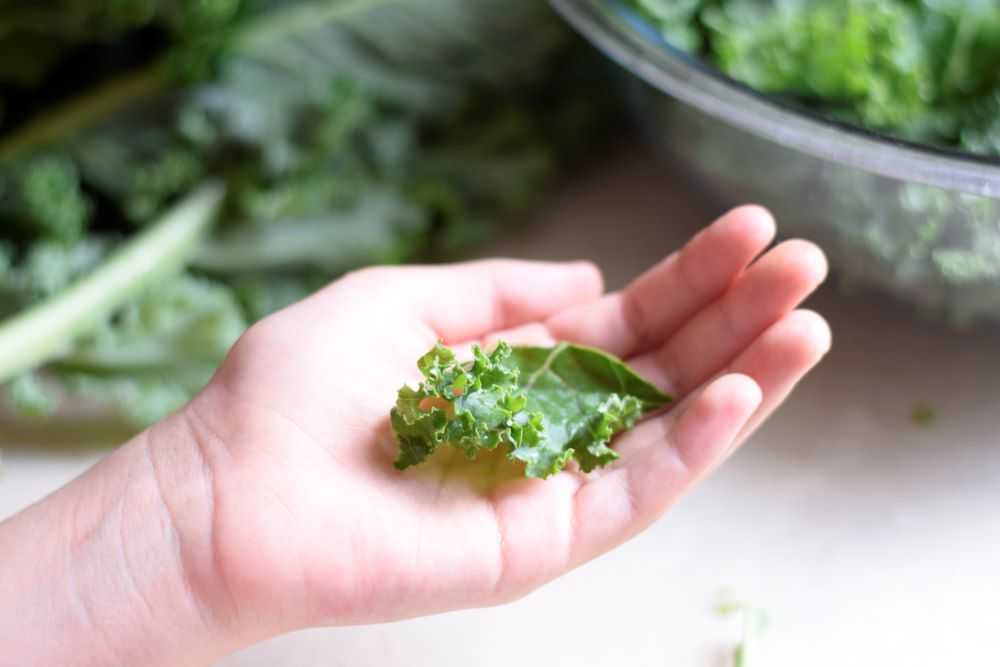
Start by washing the kale thoroughly, making sure to wash any dirt out of the curly leaves. Holding the kale stem in one hand, gently tear the leaves away. Cut or rip the leaves into bite sized pieces and place them in a large bowl. Throw away the stems (they are too tough to eat) and set the leaves aside.
Also wash and chop the onion and potatoes so everything is ready to go.
Tear the kale leaves away from the stem and then tear or chop them into bite-sized pieces.
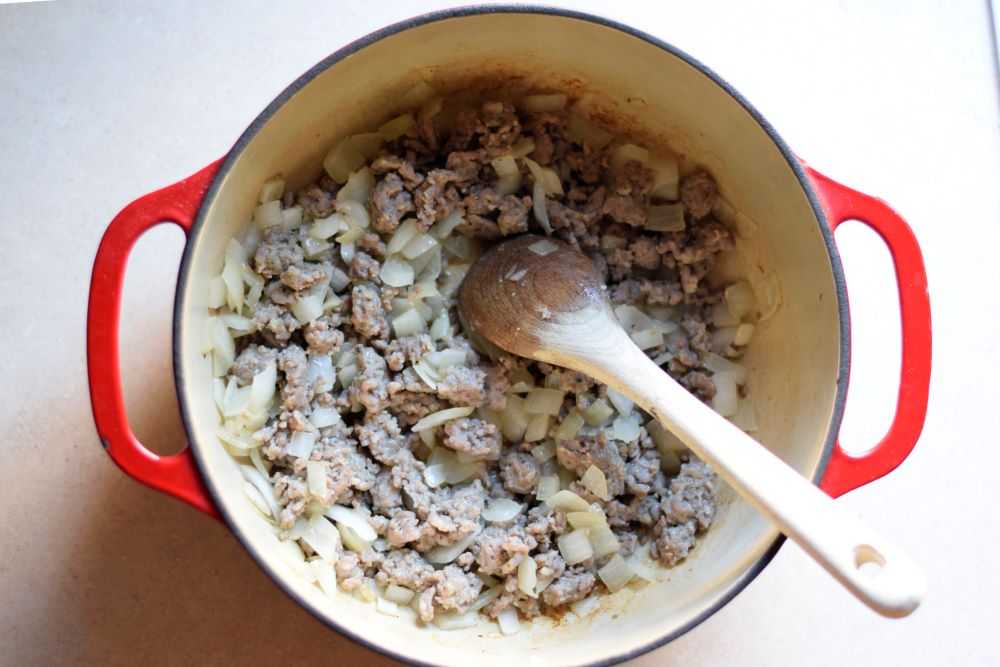
Step 2: Cook the Sausage and Onion
Cook the sausage and onion in a large pot. Break the sausage up into bite sized pieces as it is cooking. Cook the sausage until it is done and the onion is tender.
Step 3: Add the Potatoes
Add in the cubed potatoes and two cups of water. Bring to a boil, cover, and simmer for 20 minutes, or until the potatoes are tender.
Step 4: Add in the Milk and Kale
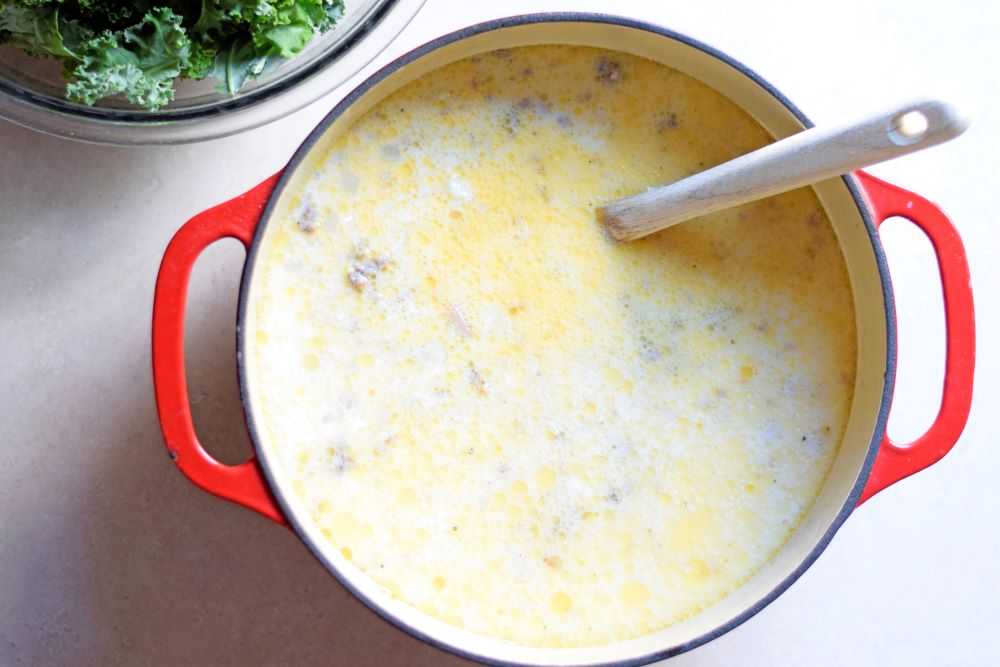
Stir in the milk, evaporated milk, oregano, and red pepper flakes and bring to a gentle boil.
Add in the kale and cook for 10 minutes, or until the kale is tender. At first the kale will be quite fluffy and not all fit! Cover the pot to help trap the steam. Every few minutes uncover the pot and and gently push the kale down into the broth using the back of a spoon. This will help it to soften more quickly.
The kale might look like it will not fit. Don’t worry–it will cook down!
After the kale is tender taste the soup and add salt and pepper to taste. The soup is now done!
Sausage, potato, and kale soup. Yum!!!
Serve
Ladle the hot soup into bowls and sprinkle with shredded parmesan cheese if desired. For the Olive Garden experience, serve with some soft breadsticks. Yum!
Hope you get to try this delicious sausage, potato, and kale soup soon. Happy Cooking!
Sausage, Potato, and Kale Soup
Recipe by: Mandy
This soup will remind you of Zuppa Toscana from the Olive Garden. It is delicious with homemade breadsticks!
2poundspotatoes, cut into ½ inch cubes (about 3-4 medium)
2cupswater
3cupsmilk
1canevaporated milk (12 oz)
½teaspoonoregano
⅛teaspoon red pepper flakes, or to taste
2buncheskale, stems removed and leaves torn or chopped into bite-sized pieces
¾teaspoonsalt, or to taste
Shredded parmesan cheese for serving (optional)
Instructions
Cook the sausage and onion together in a large pot until the sausage is done and the onion is tender.
Add in the cubed potatoes and the water and bring to a boil. Reduce heat, cover, and simmer for 20 minutes or until the potatoes are tender.
Stir in the milk, evaporated milk, oregano, and red pepper flakes. Bring to a gentle boil.
Add in the kale and cook for 10 minutes or until it is tender. At first the kale will be quite fluffy and it might not all fit in the pot. Cover the pot to help trap the steam. Every few minutes gently push the kale down into the broth using the back of a spoon to help it soften more quickly.
After the kale is tender remove from heat. Taste the soup and add salt and pepper to taste.
Serve hot with shredded parmesan cheese sprinkled on top. Enjoy!
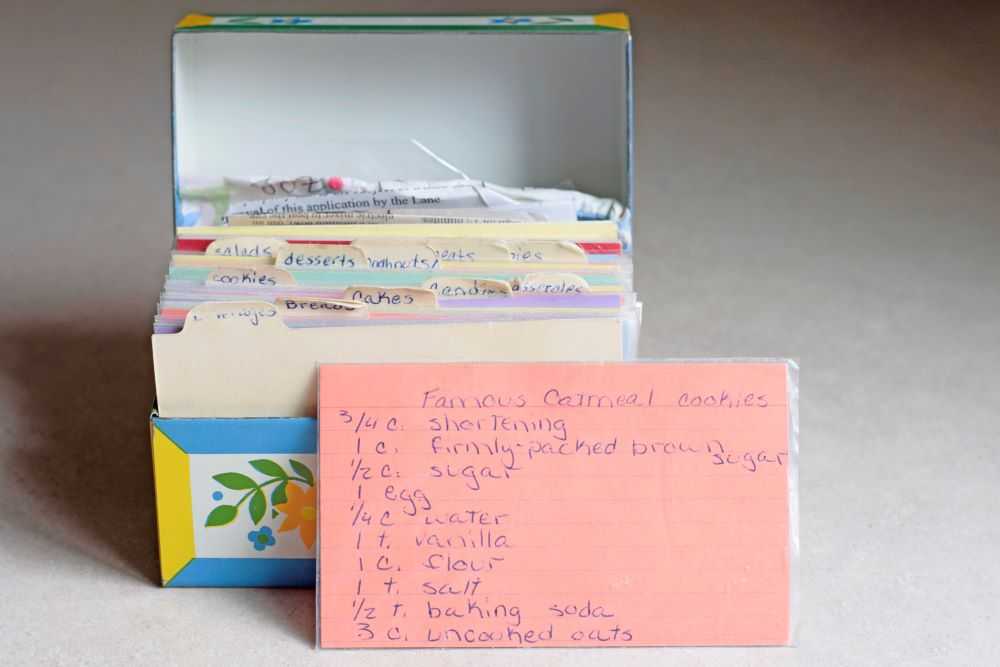
I remember Mom making these cookies for as long as I can remember. She had the recipe neatly written on an index card in her recipe box. And I remember copying the recipe for my own collection in my 10-year-old handwriting.
My recipe box from about 20 years ago, with this same recipe in my own 10-year old handwriting.
The point of this story is: we have been making these cookies practically forever. The recipe is simple and pretty perfect, so no changes have been made in over 20 years. These cookies are soft and chewy with over three whole cups of oats! To this day they are still one of my favorites.
This post will take you through how to make these delicious oatmeal raisin cookies step-by-step. Let’s get started!
Ingredients to Make Oatmeal Raisin Cookies
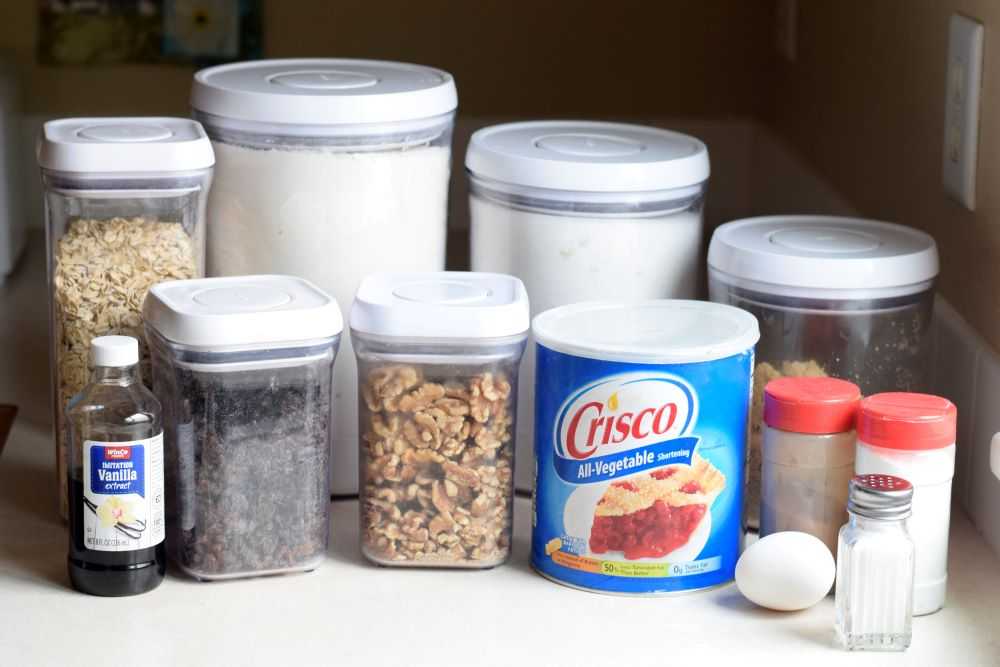
Oatmeal raisin cookies contain 13 ingredients: shortening, sugar, brown sugar, an egg, vanilla, water, flour, baking soda, cinnamon, salt, rolled oats, raisins, and chopped nuts.
Don’t let that long list scare you! It may sound like a lot but you probably have most of the ingredients already in your kitchen!
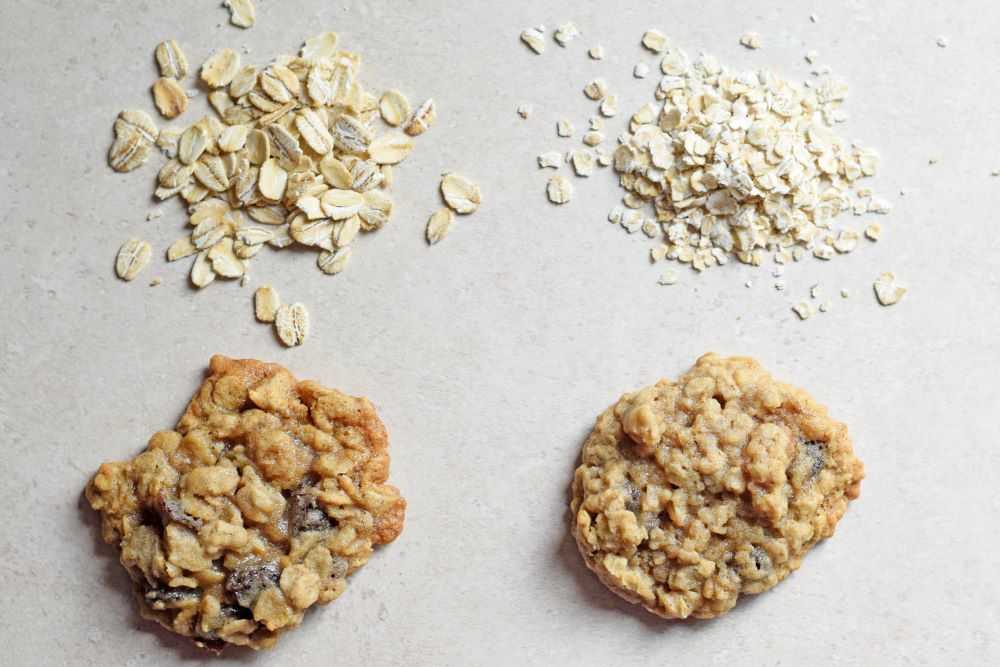
What type of oats should I use?
Old fashioned oats or quick oats, that is the question!
I made this recipe with both types and prefer quick oats in this one. It produced a higher, fluffier, more tender cookie. The cookies made with old fashioned oats were good too, but they were definitely chewier. Try both and see which you prefer!
Oatmeal raisin cookies can be made with old fashioned oats or quick oats. Try both types to see what you prefer!
Why is there both brown sugar and white sugar?
Brown sugar helps cookies to stay soft and chewy, while also giving the cookies a delicious deep flavor. White sugar gives the cookies a little bit of crispness and prevents them from becoming too dark in the oven. By including both white sugar and brown sugar, we get the best of both worlds.
Can I use butter instead of shortening?
Butter has the best flavor and so I usually use it when I bake cookies. But in this recipe I like the slightly crunchy-yet-chewy texture that the shortening provides. If you do try this recipe with butter, reduce the salt (unless you are using unsalted butter) and chill the dough before baking.
How to Make Oatmeal Raisin Cookies
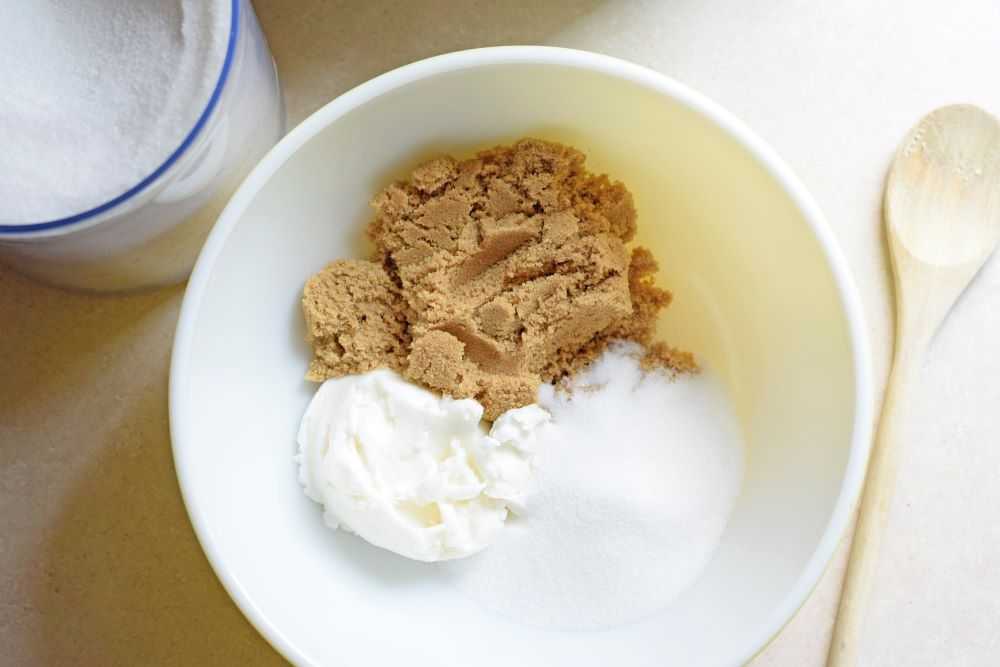
Step 1: Stir the Shortening and Sugars Together
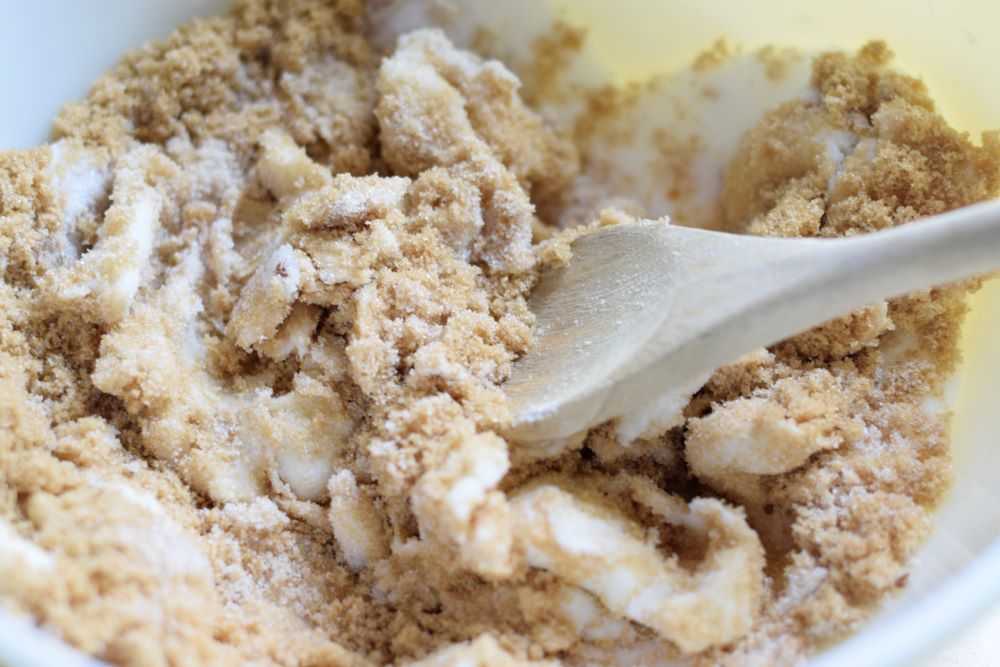
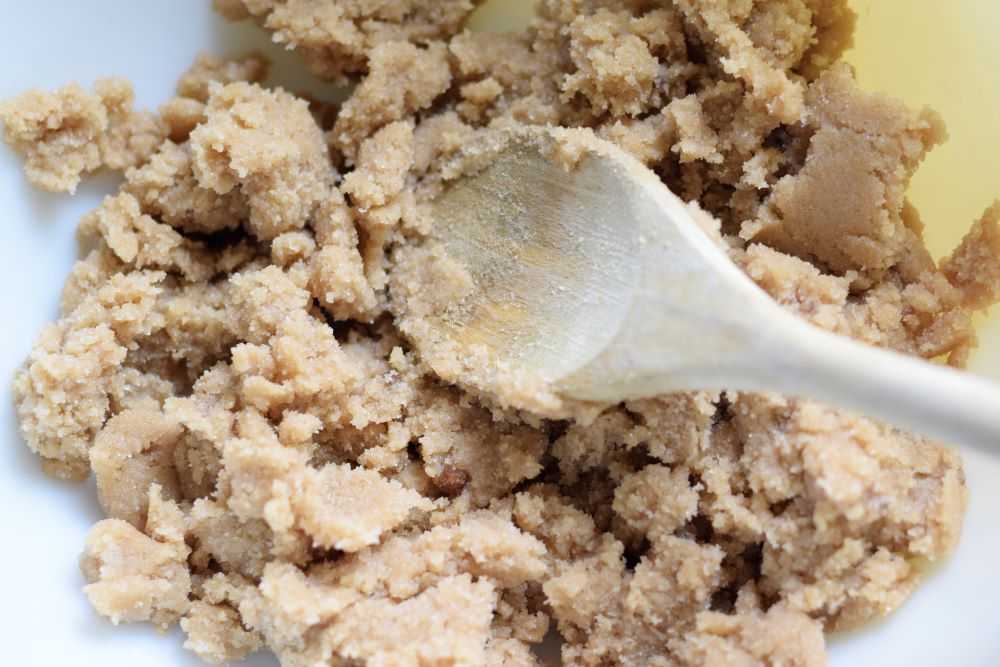
Start by stirring the shortening, white sugar, and brown sugar together in a large bowl. You can certainly use a stand mixer for this but I prefer to use a wooden spoon, as this is how I made it growing up. The shortening is rather soft so you can just smoosh it (I know, a real technical term) with the back of the spoon. When all of the sugar is incorporated you are ready to add the wet ingredients.
Mix the shortening and sugars together in a large bowl. “Smoosh” the shortening with the back of the spoon until the sugars are fully incorporated.
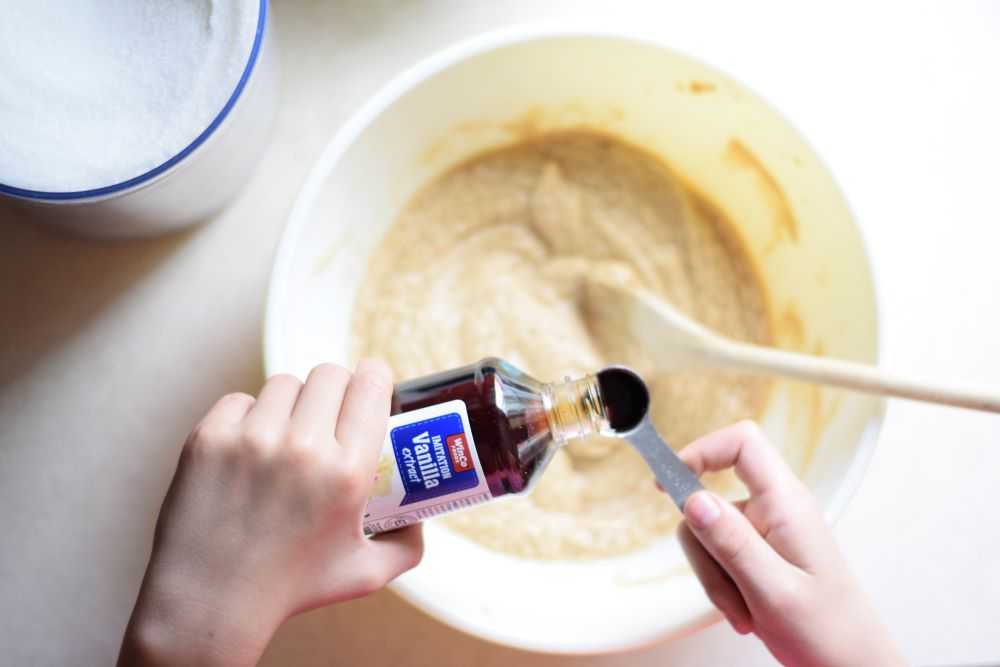
Step 2: Add the Wet Ingredients
When the shortening and sugars are well mixed add in the egg, water, and vanilla. I know, it is a little strange to add water to cookies but just trust me here. Mix these ingredients together until they are smooth.
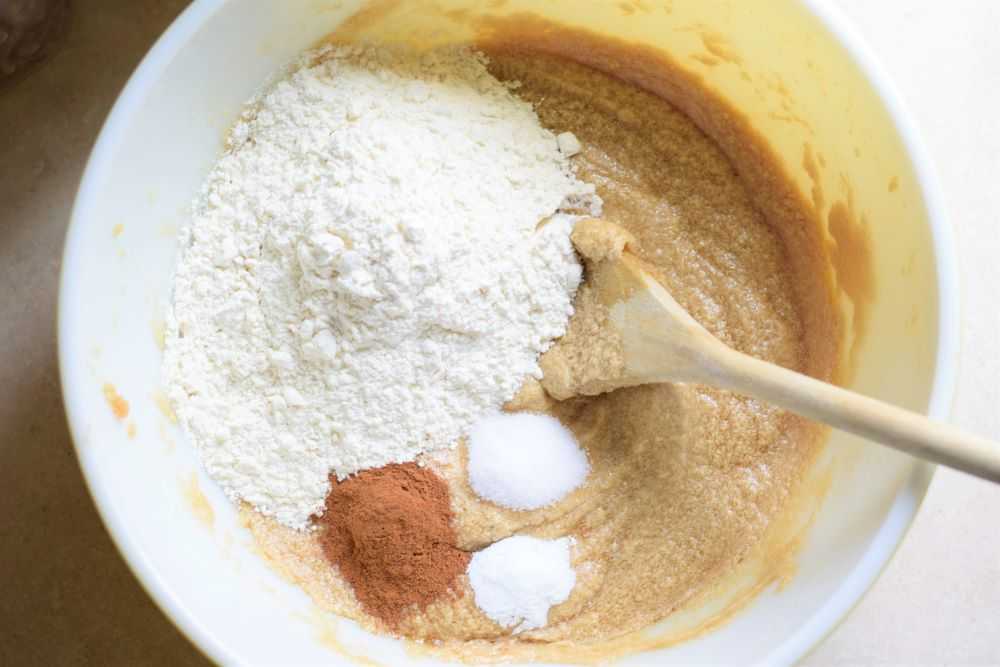
Step 3: Stir in the Dry Ingredients
Next add in the flour, baking soda, cinnamon, and salt. Stir just until combined.
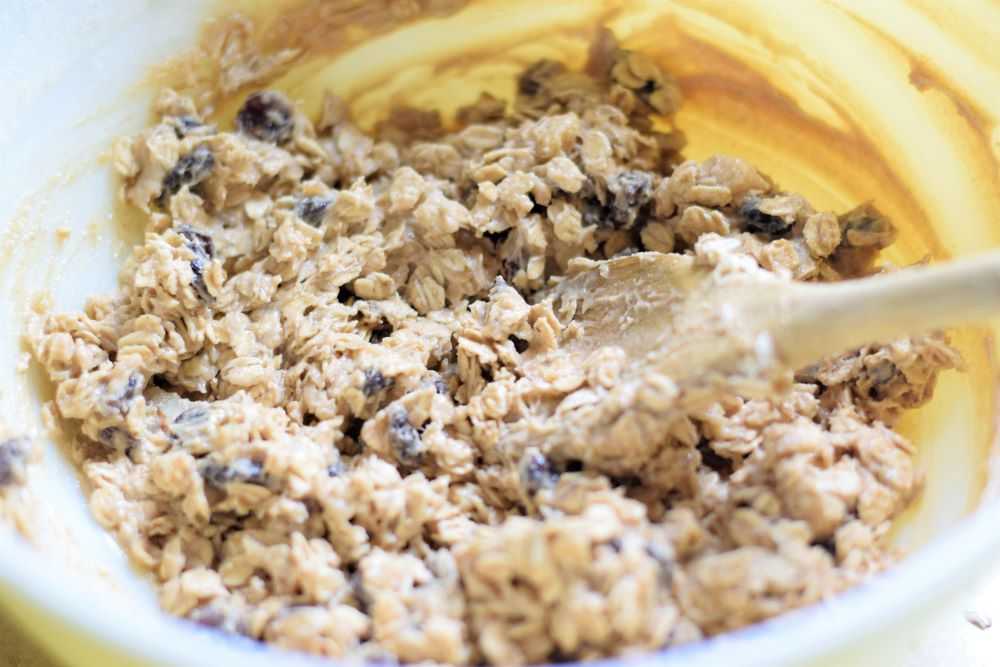
Step 4: Stir in the Raisins, Nuts, and Oats
Lastly add in the raisins, nuts, and oats. If you are using a mixer put it on the lowest setting here so it does not break up the raisins or nuts. The dough is now done and you are ready to bake your cookies!
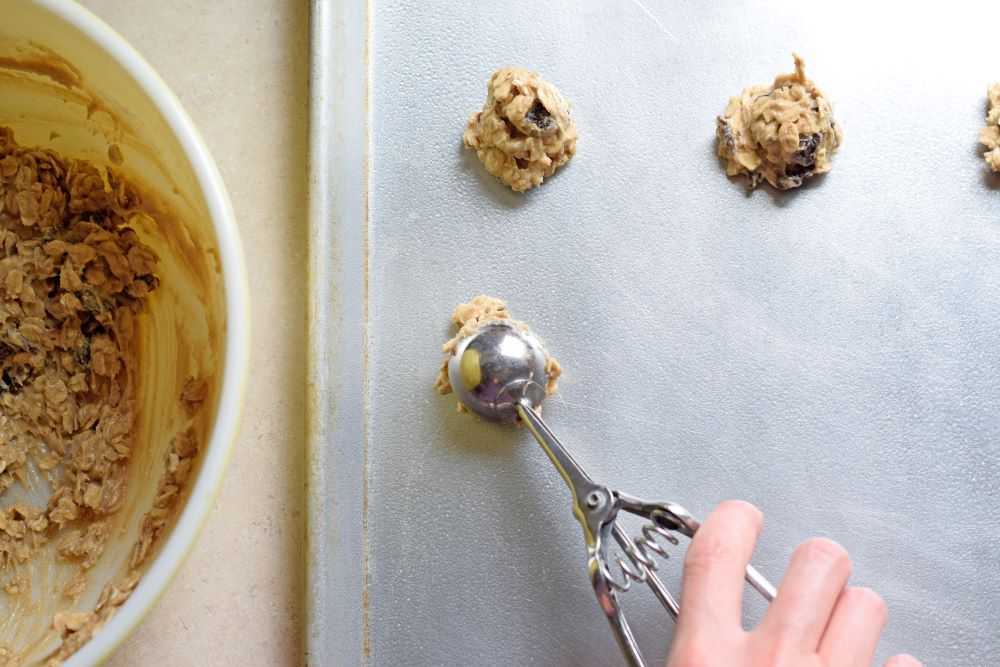
Step 5: Drop the Cookies onto the Baking Sheet
Since the dough contains shortening which is solid at room temperature it does not need to chill before baking. Drop the dough by rounded tablespoons onto a greased baking sheet. Make sure they are about two inches apart because they will spread slightly as they bake. I like to use my handy dandy cookie scoop for this job but you can also use two spoons if that is easier. The cookies are now ready for the oven!
Step 5: Bake the Cookies
Bake the cookies at 350 degrees for 8-10 minutes. They are done when the edges just start to turn brown. At this point they will not look done but they will firm up as they cool. Let them sit on the baking sheet for 1-2 minutes before transferring them to a wire rack to cool.
Serve
Enjoy these oatmeal raisin cookies warm out of the oven with a glass of cold milk. Yum!
Hope you get to try these oatmeal raisin cookies soon. Happy Cooking!
Oatmeal Raisin Cookies
Recipe by: Mandy
These cookies are soft and chewy and loaded with oats. They will quickly become a family favorite!
3cupsrolled oats (old fashioned or quick – your choice!)
1cupraisins
½cupchopped nuts (optional)
Instructions
Preheat the oven to 350°.
Stir the shortening, sugar, and brown sugar together in a large bowl.
Add in the egg, vanilla, and water and mix until smooth.
Next add in the flour, baking soda, cinnamon, and salt and mix well. Add in the raisins, nuts, and oats and stir just until combined.
Drop the cookies by rounded teaspoons onto a greased baking sheet. Make sure they are about two inches apart because they will spread slightly as they bake.
Bake at 350° for 8-10 minutes. They are ready when the edges just start to turn brown. At this point they may not look done but they will firm up as they cool. Let them sit on the baking sheet for 1-2 minutes before transferring to a wire rack to cool completely.
Serve these cookies warm right out of the oven. Enjoy!
I discovered leeks later in life. I had never purchased them at the grocery store because I did not know what to do with them. Are they an onion? How do you cook them? Why are they so big? So. Many. Questions. And then one day I tried them in this leek and potato soup and the rest is history! I have been cooking them regularly ever since.
If you have never tried leeks before you are in for a treat! Leeks have a mild onion taste and they give this soup a subtle sweetness. Bacon is sprinkled on top to give a satisfying salty crunch. Yum!
This soup is now a favorite around our house. With only five ingredients, it is incredibly easy to make and is ready in less than an hour. Continue reading to learn how to make this delicious leek and potato soup at home!
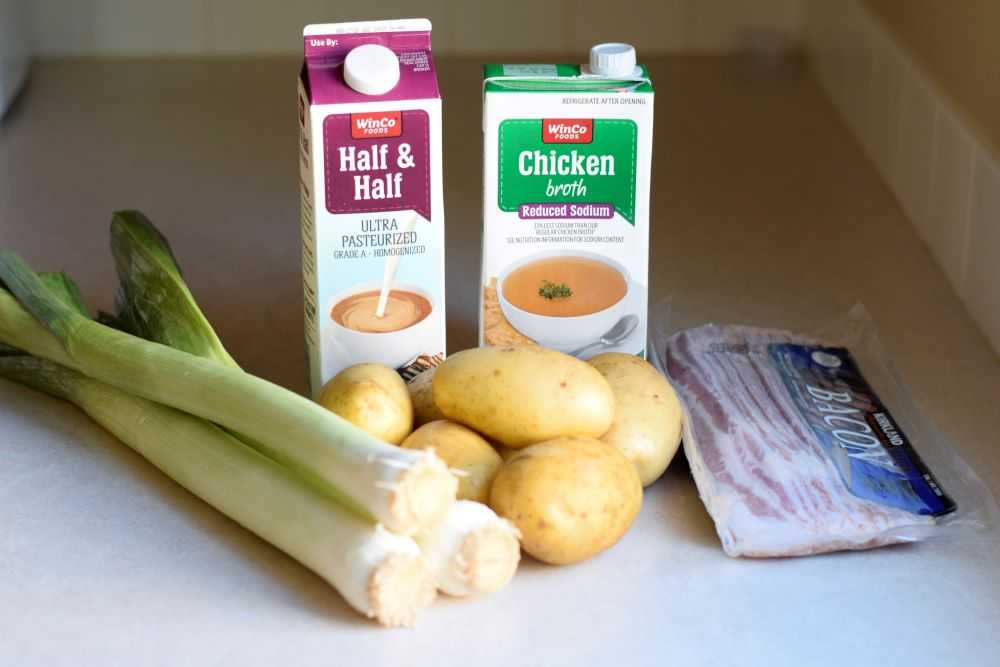
Ingredients to Make Leek and Potato Soup with Bacon
Leek and potato soup only requires 5 ingredients: leeks, potatoes, chicken broth, half and half, and bacon.
Leek and potato soup only requires five ingredients.
What are Leeks?
Leeks are a member of the onion family, and they look like a giant green onion. Leeks have a mild onion flavor and when cooked they become slightly sweet. They give a great taste to this soup!
What type of Potatoes Should I Use?
My favorite potatoes to use in this soup are yukon gold potatoes because they have an amazing flavor. Since they have thin skin, I do not peel them for this soup.
If you don’t have yukon gold potatoes, russets work great too! You may want to peel them though because they have a slightly thicker skin.
How to Make Leek and Potato Soup with Bacon
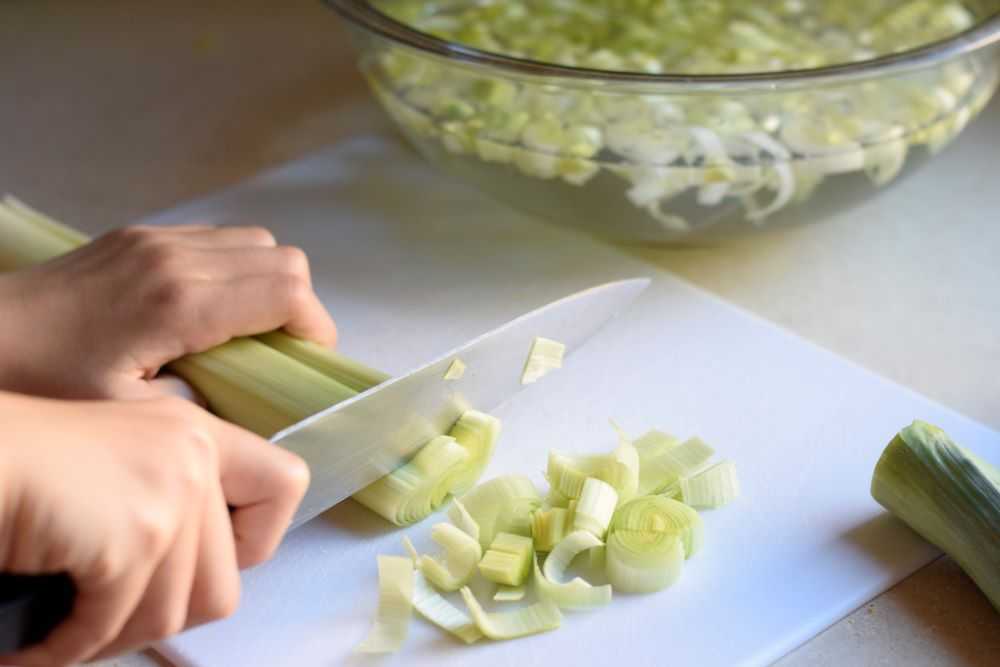
Step 1: Prepare the Leeks
Start by cutting the root off of the leeks. Also cut off the dark green leaves at the top because they can be quite tough. Slice the leeks in half lengthwise, and then cut them crosswise in quarter inch slices.
Start by cutting the root off of the leek. Also remove the dark green leaves because they can be quite tough.Slice the leek in half lengthwise and then cut into quarter inch slices. Wash the leeks in a big bowl of water to help remove any dirt trapped between the layers.
Place the leeks in a big bowl of water and use you fingers to move them around a bit. Leeks can be very dirty so this is the best way to remove dirt and sand that gets trapped between the layers. Once the leeks are ready, set them aside.
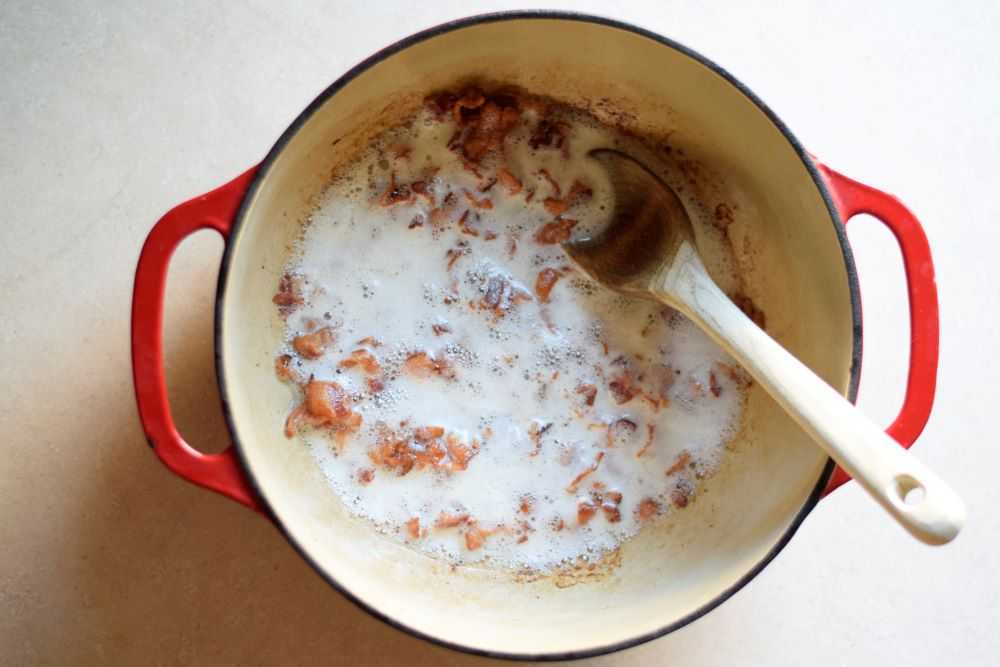
Step 2: Cook the Bacon
Cut the bacon into quarter inch thick slices. I like to use kitchen shears and cut the bacon directly into the pan. Cook the bacon until it is crispy and then transfer it to a bowl lined with paper towels to drain. Set aside.
Cut the bacon into quarter inch thick slices and cook until crispy.
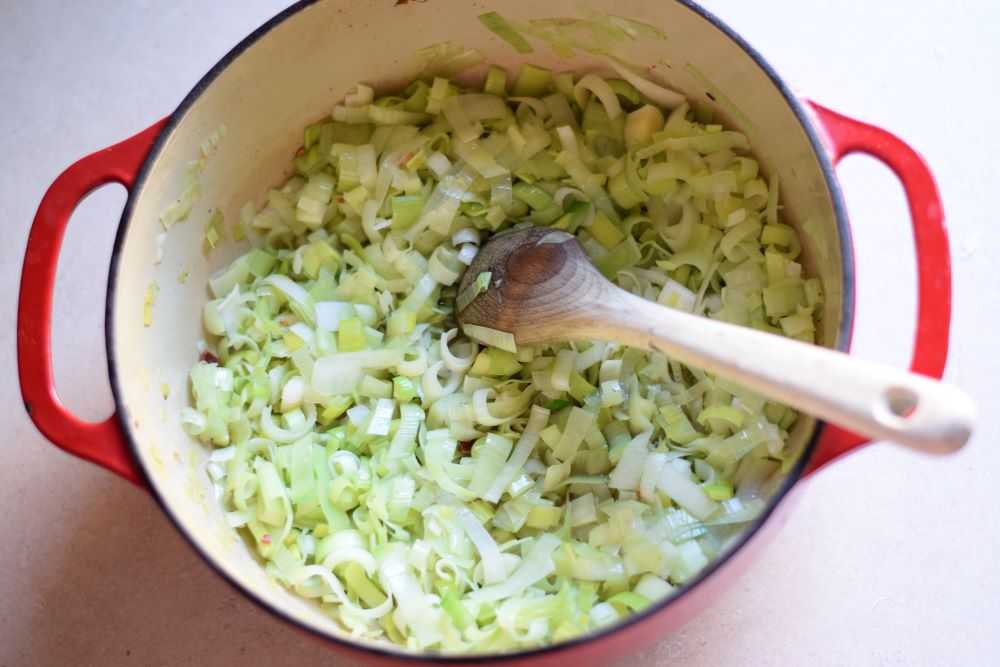
Step 3: Add the Leeks
Drain away most of the bacon grease, reserving 1-2 tablespoons in the bottom of the pan. Add in the sliced and washed leeks. Cook them for 5 minutes or until they soften up a bit, stirring occasionally.
Cook the leeks for five minutes or until they soften up a bit, stirring occasionally.
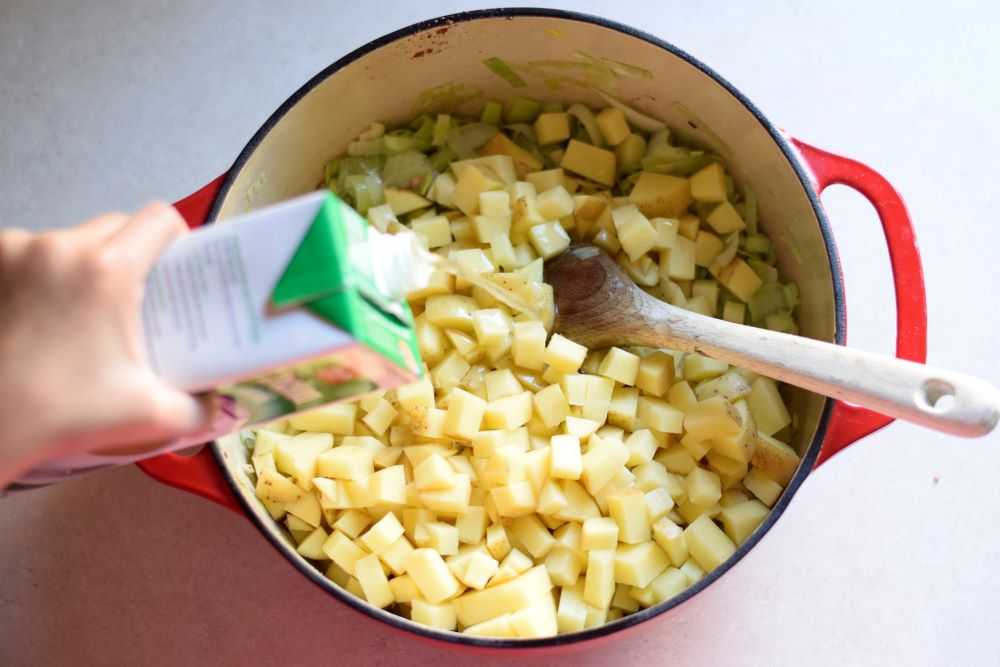
Step 4: Add the Potatoes and Broth
Add in the cubed potatoes and chicken broth. Bring to a boil, cover, and simmer for 20 minutes, or until the potatoes are tender.
Add the chopped potatoes and chicken broth. Simmer until the potatoes are tender.
Step 5: Stir in the Half-and-Half
Stir in the half-and-half and remove from heat. Taste the soup and then add salt and pepper to taste.
Add the half and half and then season with salt and pepper to taste.
If a slightly thicker soup is desired, use a potato masher to lightly mash some of the potatoes. Your soup is now ready to serve!
Serve
Ladle the hot soup into bowls and sprinkle the reserved bacon on the top. Serve with crusty bread if desired. Yum!
Serve the soup hot topped with the reserved bacon. Yum!
Hope you get to try this delicious leek and potato soup soon. Happy Cooking!
Recipe Tips
This soup is also delicious with ham instead of bacon! Use about a pound of ham, cut into bite-sized pieces. You may not need to add additional salt because the ham is so salty already.
This soup may be fully pureed for a smoother consistency. An immersion blender works great for this because the soup can be blended directly in the pan.
You can use full whipping cream instead of the half-and-half to make this soup even creamier. Yum!
Leek and Potato Soup with Bacon
Recipe by: Mandy
This creamy leek and potato soup is topped with bacon for a satisfying salty crunch. With only 5 ingredients, it can be ready in less than an hour!
Prepare the leeks by cutting off the root and dark green leaves. Slice them in half lengthwise and then crosswise into ¼ inch slices. Place the leeks in a big bowl of water and move them around a little with your fingers to remove any dirt trapped between the layers. Set aside.
In a large pot, cook the bacon until crispy. After it is done transfer the bacon to a bowl lined with paper towels to drain. Set aside.
Drain away most of the bacon grease, leaving about 1-2 tablespoons in the bottom of the pan. Add in the sliced and washed leeks. Cook for about 5 minutes or until they soften up a bit, stirring occasionally.
Add in the cubed potatoes and chicken broth. Bring to a boil and simmer for 20 minutes, or until the potatoes are tender.
Stir in the half-and-half and remove from heat. Taste the soup and then add salt and pepper to taste. If a slightly thicker soup is desired, use a potato masher to lightly mash some of the potatoes.
Serve hot with the reserved bacon sprinkled on the top. Enjoy!
Notes
This soup is also delicious with ham instead of bacon! Use about a pound of ham, cut into bite-sized pieces. Leftover ham is great for this soup, too. You may not need to add additional salt because the ham is so salty already.
This soup may be fully pureed for a smoother consistency. An immersion blender works great for this because it can be blended directly in the pan.
You can use full whipping cream instead of the half-and-half to make this soup creamier.
Fall is in the air. The mornings are crisp and cool and the apples are ripening on our apple tree. It is time to make apple crisp!
I look forward to apple crisp all year long. I love it because it is easy to make and the flavors of fall really shine through. This apple crisp has a crunchy brown sugar and oat topping and gooey apple filling. I have been using this same apple crisp recipe for over 10 years now. Why mess with perfection?
This article will take you through how to make apple crisp step-by-step. Let’s get started!
Note: This article may contain affiliate links, where I earn a small commission from qualifying purchases with no additional cost to you. I only provide links to products that I love and use personally.
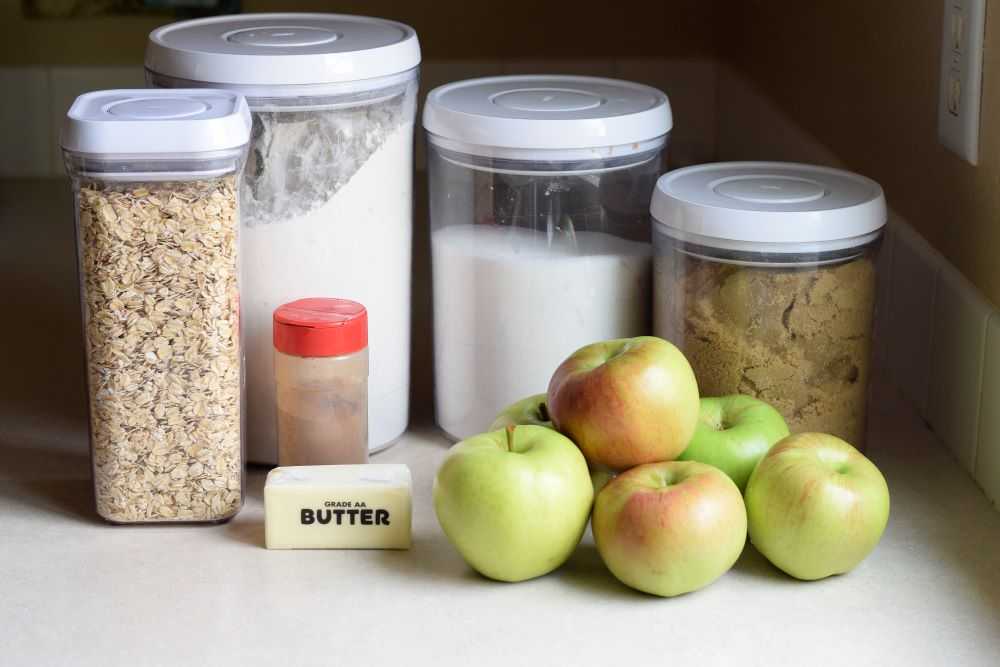
Ingredients for Apple Crisp
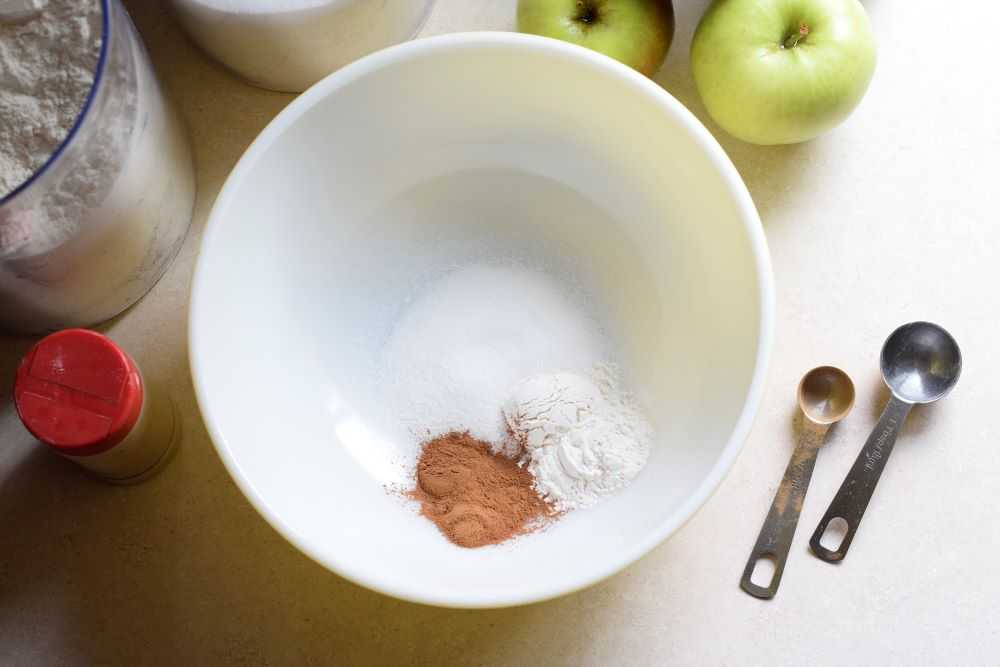
Apple crisp uses only seven simple ingredients. Let’s go through them now:
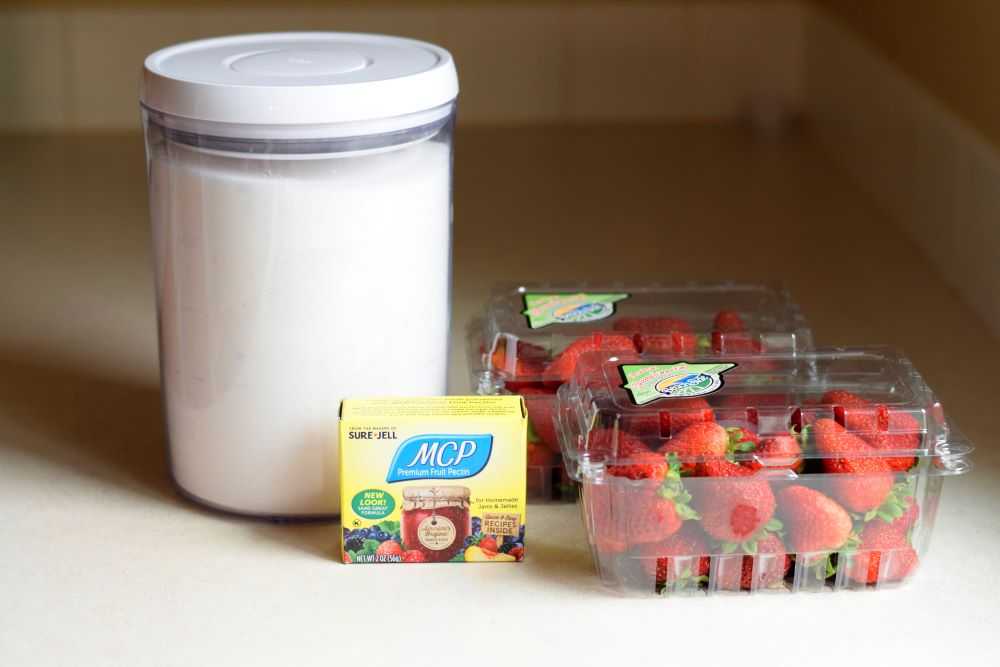
Apple crisp requires only a few simple ingredients.
Apples – What type of apples to use for apple crisp? The short answer is, use whatever you like. Apple preference is very personal and depends on what region of the country you live in. In general though, I recommend using a tart apple to give the apple layer more flavor and prevent the topping from being overly sweet.
My absolute favorite baking apple of all time are Gravenstein apples. They have amazing flavor and soften nicely when cooked without becoming overly mushy. Gravensteins are very hard if not impossible to find in the store because of their short shelf life, which is why I planted one in my backyard 🙂 Other popular apple choices are Granny Smith (although these never really soften, but some people prefer that), Pink Lady, Jonagold, or Golden Delicious. You can also do a blend of different apple varieties. Again, use whatever you like!
Gravensteins are my favorite baking apple. While tart apples generally work best for apple crisp, you can use whatever variety you prefer!
Brown sugar – I prefer brown sugar in the topping because it gives it a nice caramel-like flavor. White sugar is mixed into the apples but you can use brown sugar here too if you like.
Why is there sugar in the apple mixture and also in the topping? Besides sweetening the apples a little the sugar has a second purpose here and that is to draw some moisture out of the apples. The flour will then help the juice to thicken to the perfect consistency.
Oats – Oats give the topping a nice texture. I usually use regular oats but quick oats can be used too!
Nuts – Nuts are great in apple crisp! They toast in the oven while the apple crisp is baking and give it a great crunch. Walnuts, pecans, or almonds are great choices here.
Flour – Flour helps to thicken the apple filling so it is gooey and delicious instead of thin and watery. Regular all-purpose flour is what you want here.
Spices – I keep it simple here and just use cinnamon. You can certainly add some nutmeg, cloves, or allspice if you want!
Butter – Real butter gives this the best texture and flavor! I use salted butter because I like how the salt in the butter helps to balance the sweetness of the sugar.
Now that we know what goes in our apple crisp, let’s find out how to make it!
How to Make Apple Crisp
Step 1: Prepare the Apple Filling
Start by stirring the flour, sugar, and cinnamon together in a large bowl. Set this aside while you prepare the apples.
Mix the sugar, flour, and cinnamon together first before adding the apples. This will help to prevent clumps.
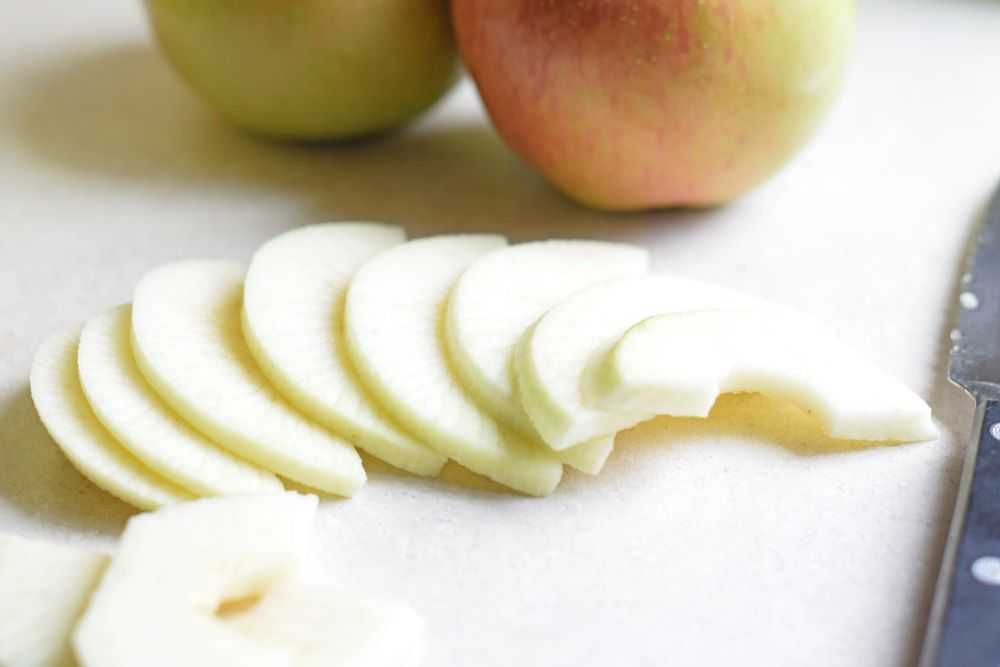
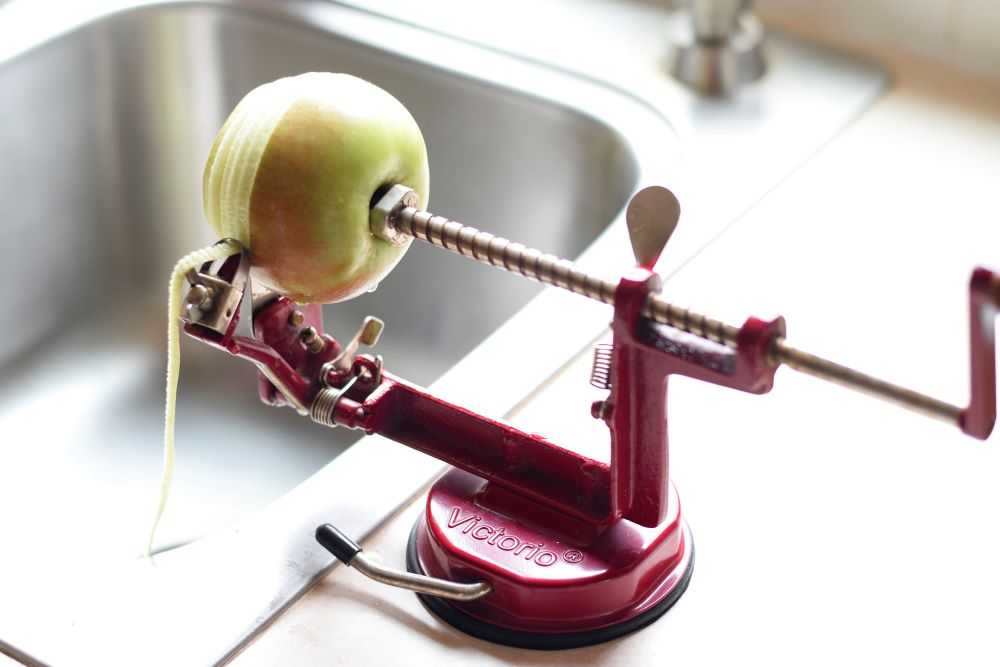
Peel, core, and slice the apples into 1/4 inch pieces. Try to make the slices about the same thickness so they cook evenly.
When I am in a hurry I love to use my apple corer/peeler/slicer (affiliate link). I purchased this off of Amazon six years ago now and it is still going strong! It takes just a few seconds per apple and is easy to use. If you go through a lot of apples this will save you so much time!
Cut the apples into 1/4 inch thick slices. An apple corer/peeler/slicer can make this job super fast!
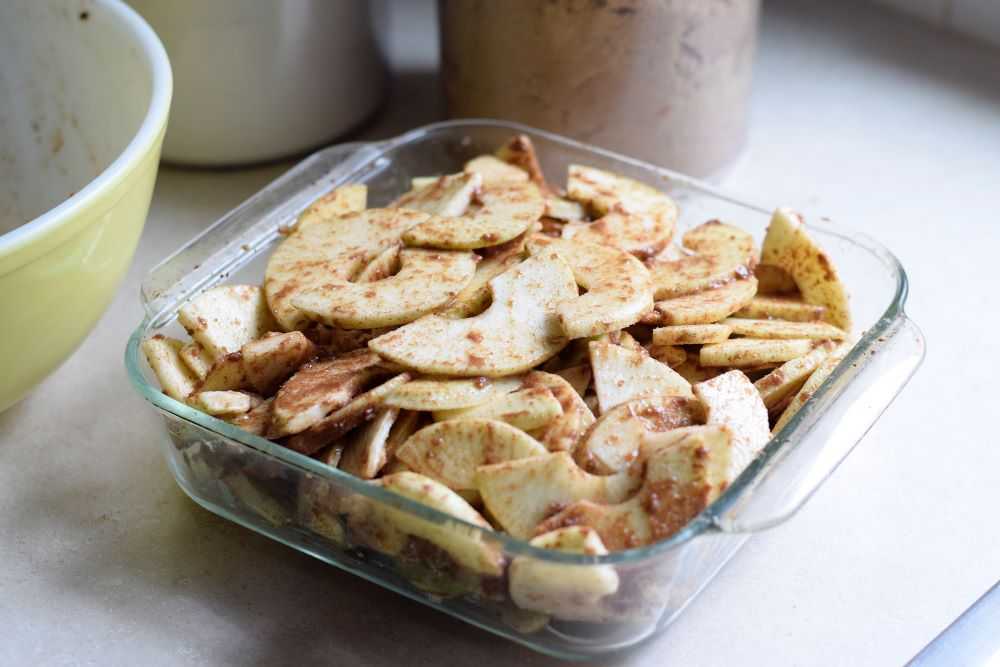
After the apples are sliced add them to the flour and sugar mixture in your bowl. Stir the apples well (I like to use my hands for this part) until the apples are evenly coated. Then transfer the apples to an ungreased 8-inch square pan.
At first it may look like the apples won’t all fit in the pan. You may need to use your hands to move them around and squish them down a bit. They will cook down a lot in the oven so not to worry! After your apples are ready start working on the topping.
Transfer the apples to an 8-inch square pan. Use your hands to squish them down a bit so they all fit.
Step 2: Make the Topping for the Apple Crisp
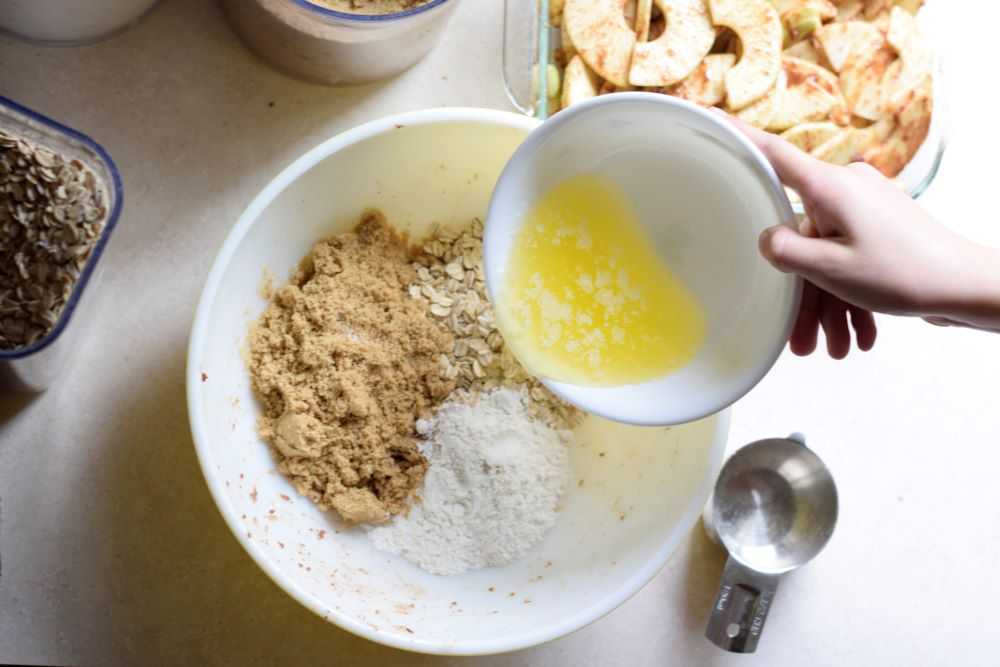
Measure the brown sugar, flour, oats, and nuts into a large bowl (you can reuse the bowl the apples were in). Pour in the melted butter and mix with your hands until everything is thoroughly combined.
Add the melted butter to the dry ingredients. Mix well until thoroughly combined.
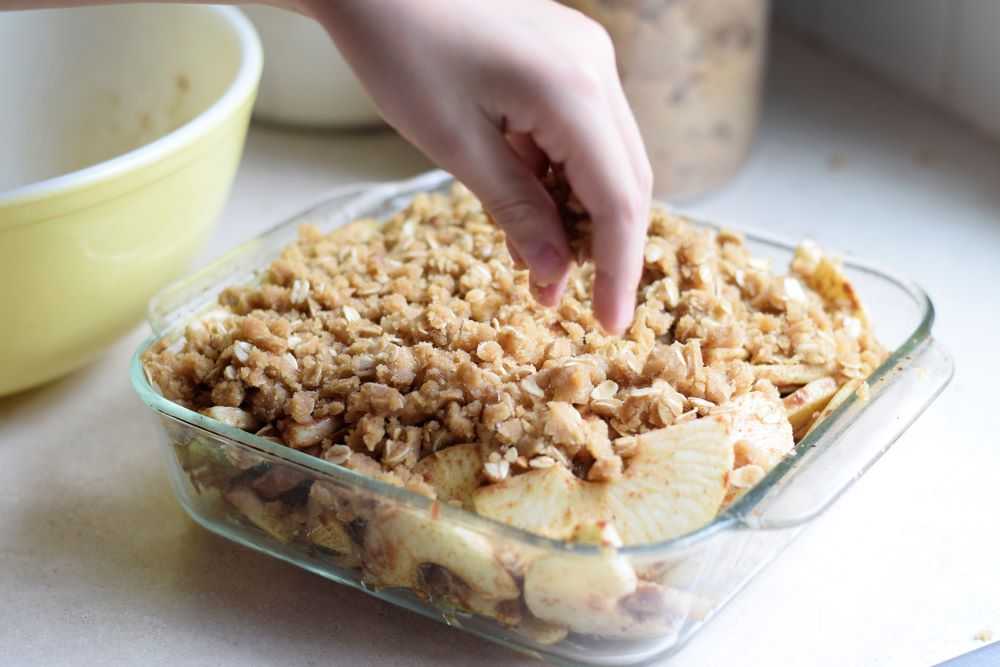
Once the topping is mixed together sprinkle it on top of the apples. To get some larger chunks I squeeze some of the topping together in my hand and then gently break it into bigger pieces. Make sure to get all the way to the edges and cover the apples evenly. The apple crisp is now ready to go into the oven!
Sprinkle the topping over the apples. Make sure to get all the way to the edges!
Step 3: Bake the Apple Crisp
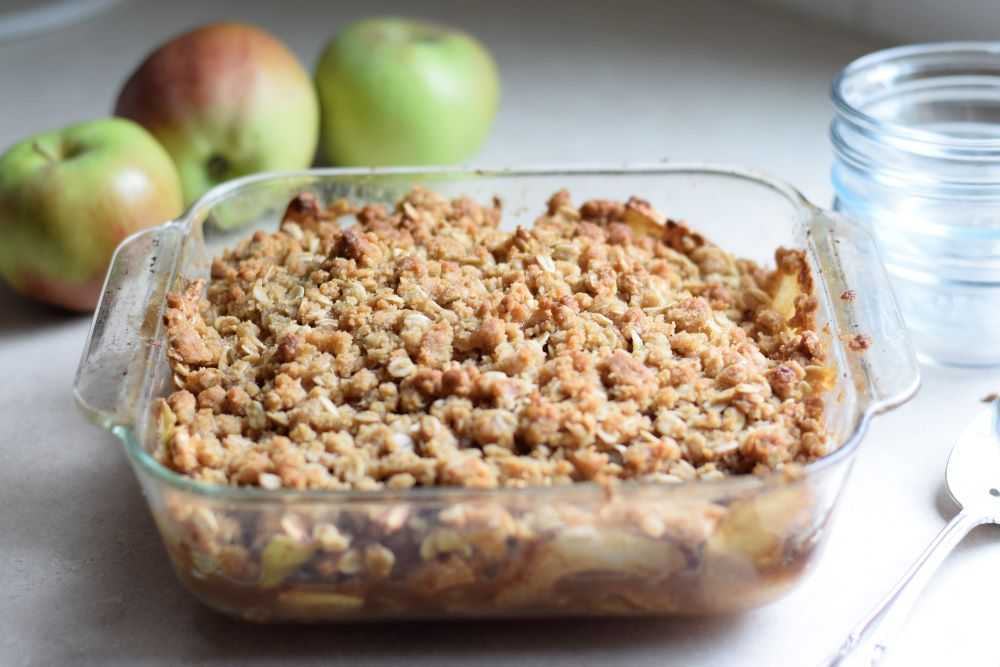
Bake the apple crisp at 375 degrees for 30-40 minutes. It is done when the edges are bubbly and a fork slides easily into the apples. The topping should be a beautiful golden brown color.
Apple crisp warm from the oven. Yum!!!
Serve
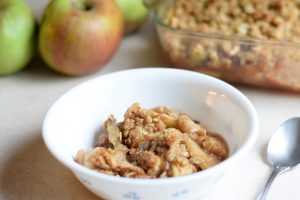
Let the apple crisp cool for a few minutes before serving. This will help to thicken the delicious goo around the apples. Add a big scoop of vanilla bean ice cream and you have the perfect fall dessert! Yum!
Hope you get to make this apple crisp soon! Happy Cooking!
Perfect Apple Crisp
Recipe by: Mandy
Are you looking for the perfect apple crisp recipe? Look no further! This apple crisp has a crunchy brown sugar and oat topping and over a sweet apple filling. Enjoy it with a scoop of vanilla ice cream!
To make the apple filling stir the sugar, cinnamon, and flour together in a large bowl. Set this aside while you prepare the apples.
Peel, core, and slice the apples into ¼ inch slices. Add them to the sugar mixture in your bowl. Stir well (it is easiest if you use your hands) and then transfer them to an ungreased 8-inch square pan. Set this aside while you make the topping.
Measure the brown sugar, flour, oats, and nuts into a large bowl (you can reuse the bowl the apples were in). Pour in the melted butter and mix with your hands until everything is thoroughly combined.
Sprinkle the topping over the apples in the pan. Make sure to get all the way to the edges and cover the apples evenly.
Bake the apple crisp at 375° for 30-40 minutes. It is done when the edges are bubbly and a fork slides easily into the apples. The topping should be a beautiful brown color. Set aside to cool a little before serving.
Serve the apple crisp warm with a big scoop of vanilla bean ice cream. Enjoy!
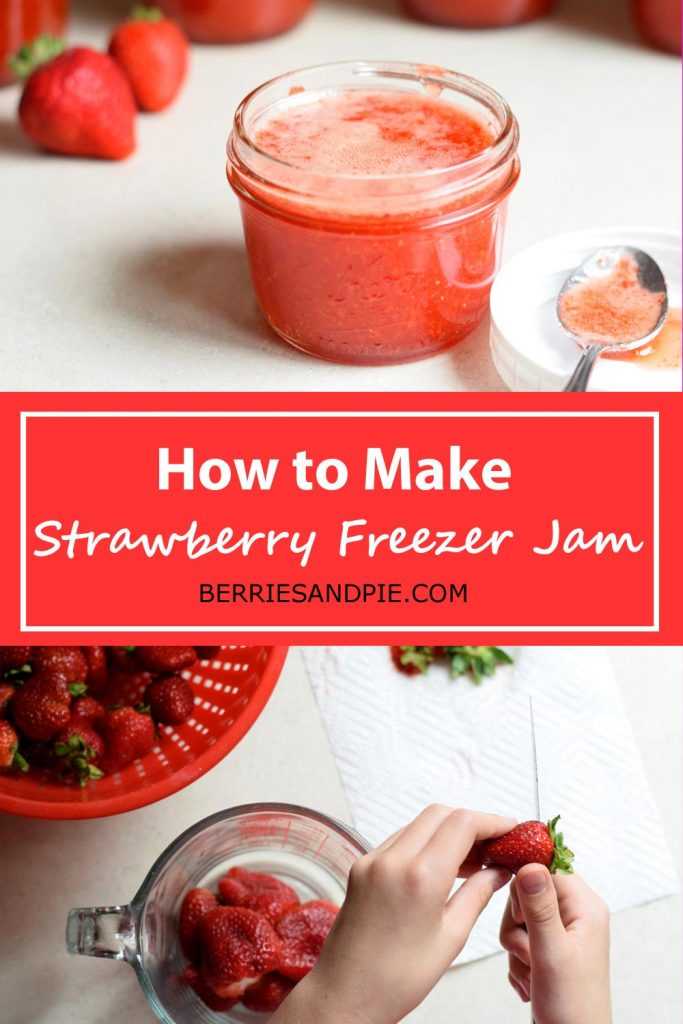
I have not bought jam at the grocery store in many years. Years. Why? Because the store does not sell freezer jam, which is my absolute favorite type of jam in the whole wide world. For those of you who have not tried freezer jam you are in for a treat! Since the fruit in freezer jam is never cooked it keeps its fresh fruit taste. It’s like summer in a jar. Yum!!!
Strawberry freezer jam is one of my favorite types of freezer jam. It is easy to make at home, requires only four ingredients, and can be made in under an hour. This article will take you through how to make strawberry freezer jam, step-by-step. Let’s get started!
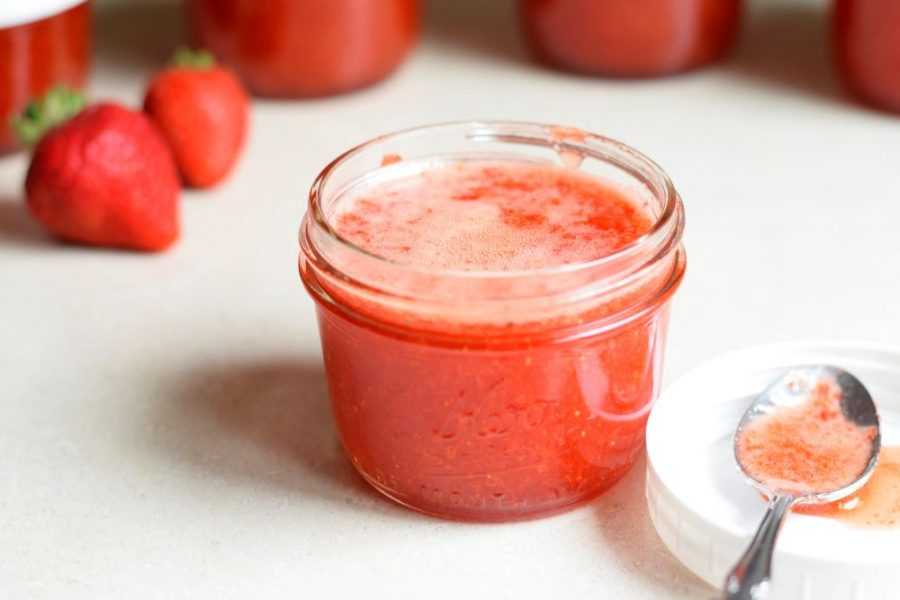
Strawberry freezer jam – YUM!
Note: This article may contain affiliate links, where I earn a small commission from qualifying purchases with no additional cost to you. I only provide links to products that are similar to what I use personally.
Equipment for Strawberry Freezer Jam
You need some basic equipment to make strawberry freezer jam. We will go through the list now:
Jars
You need containers to hold about 6 cups of finished jam. Some people prefer plastic containers for freezer jam but I usually use half pint mason jars (one cup capacity). I prefer wide mouth jars so the jars are easier to fill. Jars similar to what I use can be found here (affiliate link). I use these plastic jar lids (affiliate link) so the containers are easier to open and close.
Make sure that your jars or containers are cleaned in hot soapy water before use and allowed to air dry. I run the jars and lids through the dishwasher and they are ready to go!
Jar Funnel
This makes it SO MUCH EASIER to fill your jars. If you do not have a jar funnel you can purchase one similar to the one I use here (affiliate link).
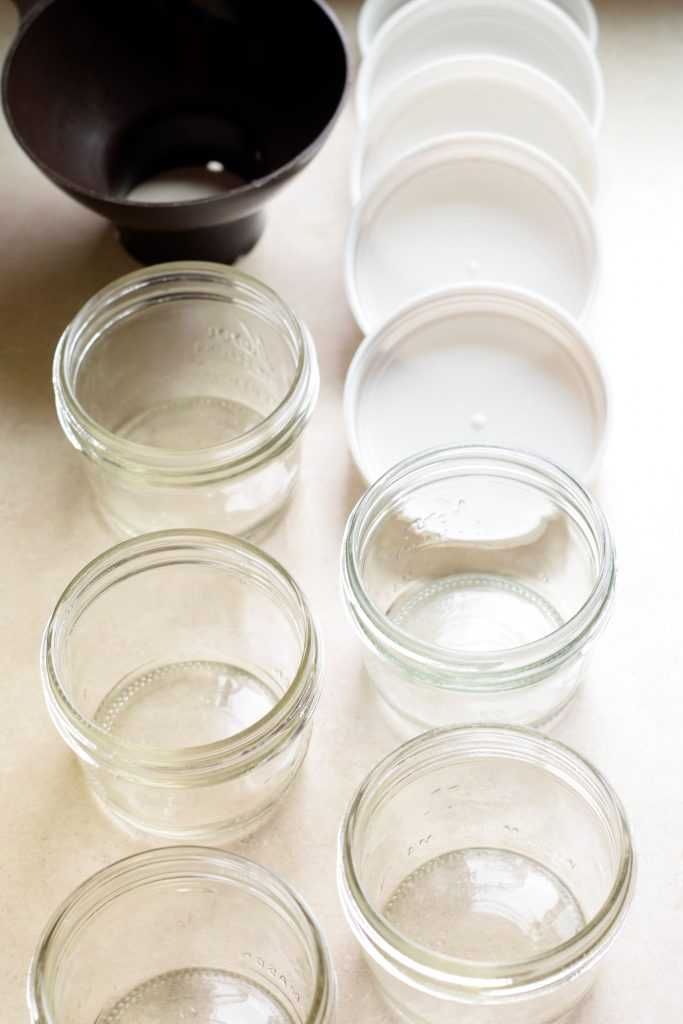
Clean your jars and lids so they will be ready when you need them. A jar funnel makes filling the jars much easier.
Immersion Blender or Potato Masher
You need some way to crush the fruit for the jam. I prefer to use an immersion blender (or regular blender) to puree the fruit most of the way. If you don’t have a blender you can also use a potato masher or even a fork to crush the berries, especially if you like your jam a little on the chunky side.
Measuring Cups
I use a standard measuring cup for the sugar but I like a glass measuring cup for the strawberry puree because it is easier to measure and pour.
Other items needed: A large bowl, a small saucepan, a whisk, and a ladle.
Ingredients for Strawberry Freezer Jam
Fresh Strawberries
For fresh strawberry taste you need to start with fresh strawberries! You can use strawberries out of your garden or strawberries from the store. Both taste great in this jam!
You need less fruit than you may think for jam, only about 2 cups of crushed or pureed fruit. One pound of fresh strawberries is probably enough but I always purchase an extra carton to make sure that I have what I need.
Sugar
Jam takes a LOT of sugar. About 4 cups of it to be exact! Plain old granulated sugar is what you want here. Do not try to reduce the amount of sugar or use a sugar substitute because the jam will not thicken properly.
Pectin
Pectin is very important for making jam. It is what makes the jam gel and become thick. Many people have never bought or used pectin before, so we will now learn more about it.
Pectin is a type of fiber most commonly made from green apples or citrus fruits. It comes in a powdered form and is what makes jam thicken.
What is pectin? Pectin is a type of fiber that is usually made from green apples citrus fruits. Some dextrose and citric acid is also added to the powdered pectin so it tastes sour if you try it. This sour taste is good though because it helps to counter all the sweetness from the sugar and bring out the taste of the fruit. When heated along with with sugar and acid the pectin will gel and give the jam the correct texture.
What types of pectin should I buy? This recipe calls for powdered pectin that comes in a small box, usually 1.75 to 2 ounces depending on the brand. Make sure that you purchase regular pectin and not the type formulated for low sugar recipes.
Where can I find pectin? Pectin usually comes in a single-use box but you can also buy it in bulk on Amazon. Pectin is sold in many grocery stores in the summer months, when many people are making jam. If you can’t find it at your grocery store try looking at Bi-Mart or a farm store.
Pectin differs a little between brands and you may have more success with some brands than others. Today I am using MCP pectin (fun fact: MCP stands for Modified Citrus Pectin) but I have also used Mrs. Wages pectin in the past with great results. I do not have a favorite brand and usually buy what is on sale 🙂
Now that that you have everything you need, let’s go through the process of making homemade strawberry freezer jam!
How to Make Strawberry Freezer Jam
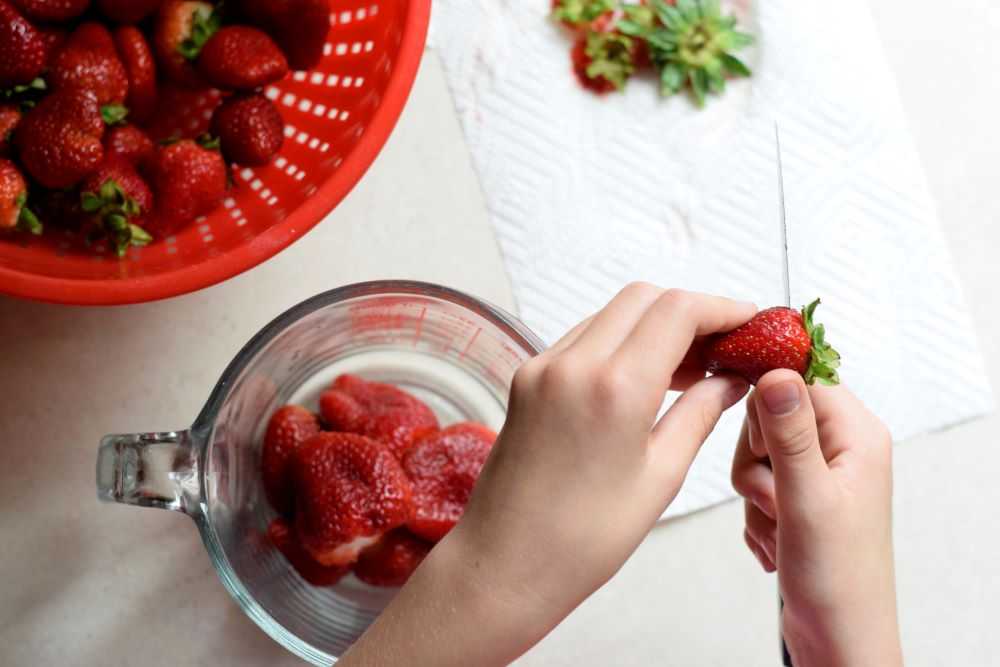
Step 1: Prepare the Fruit
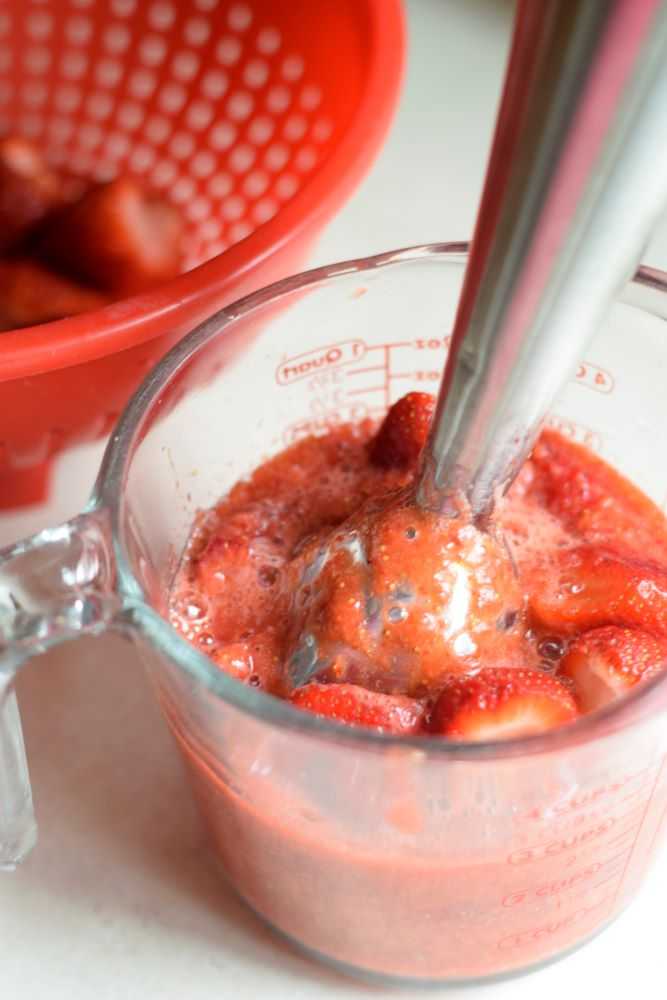
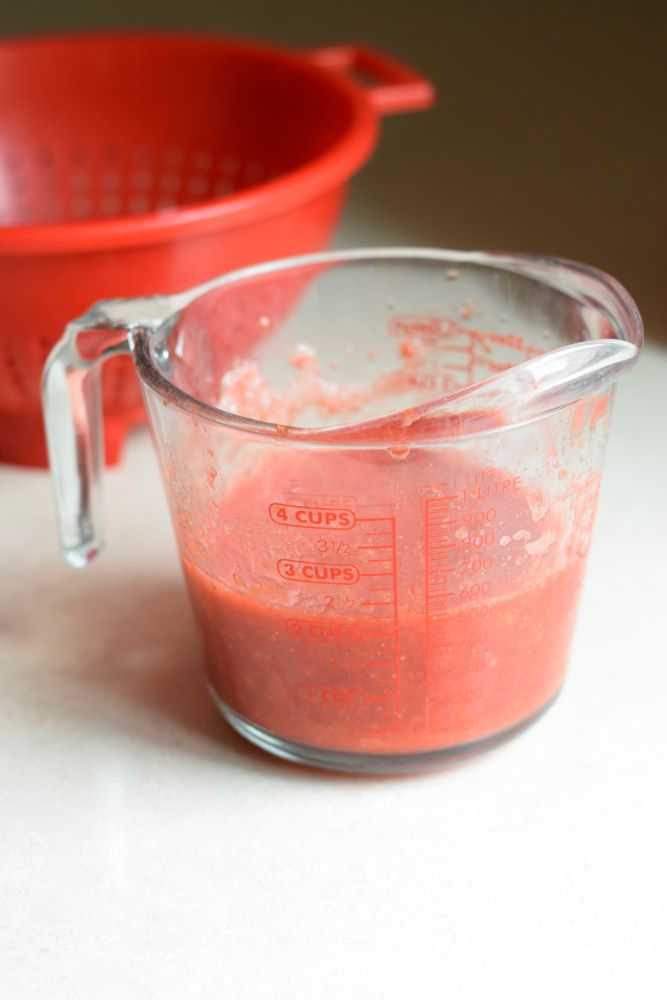
Start by washing the strawberries and removing the stems. Then puree or mash the fruit until the desired consistency is reached.
There are several ways to crush the berries. Some people spread the fruit into a 9×13 inch pan and mash them with a potato masher. I prefer to put the strawberries in a four cup glass measuring cup and use my immersion blender to puree them most of the way, leaving a few small pieces here and there. You can leave your fruit a little chunky or puree it until it is perfectly smooth. The choice is up to you!
After the berries are mashed measure out exactly two cups of fruit. You are now ready to add the sugar!
Puree or mash the strawberries until the desired consistency is reached. Measure out two cups of berries and proceed to the next step.
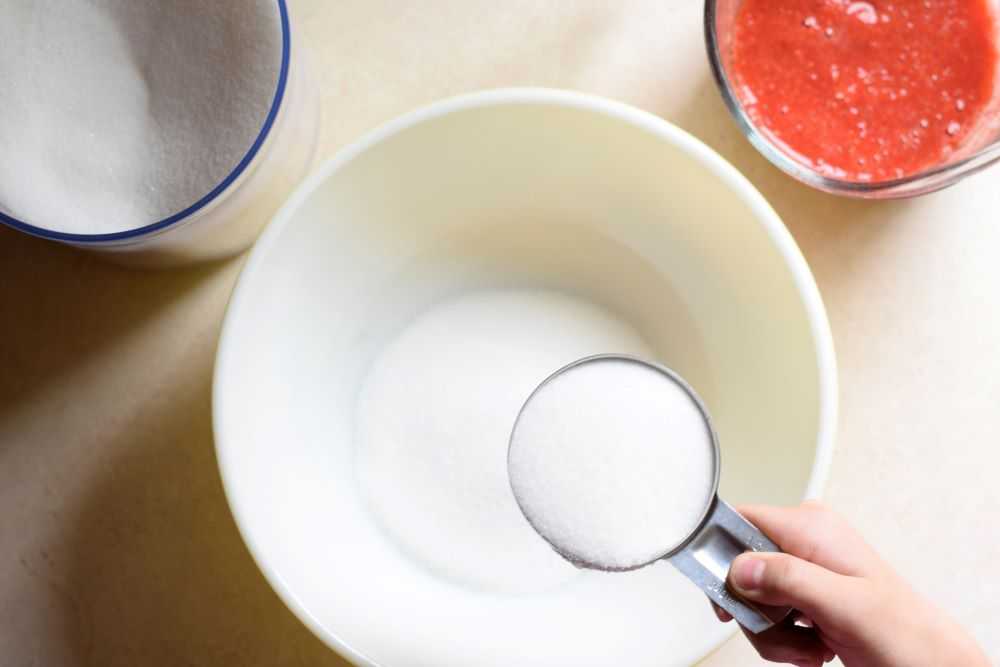
Step 2: Stir the Fruit and Sugar Together
Measure out 4 cups of sugar into a large bowl. Add in the pureed strawberries and stir well. Let the strawberries and sugar sit in the bowl for 20 minutes, stirring occasionally. This will allow the sugar to dissolve most of the way.
Measure the sugar into a large bowl, then stir in the strawberry puree.
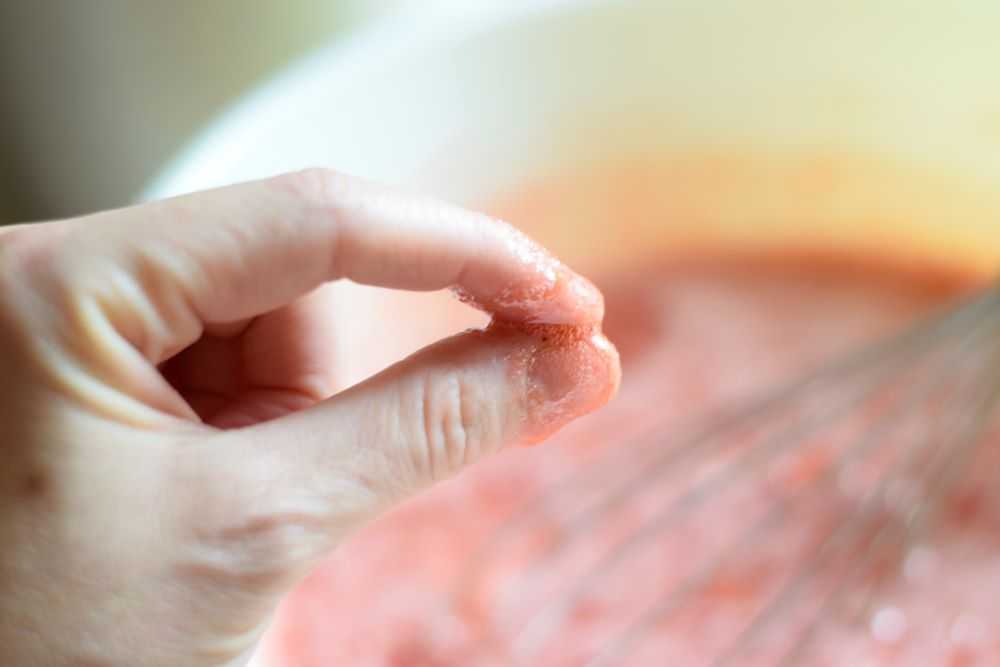
To test whether the sugar has dissolved enough you can take out a little jam and rub it between your fingers. By the end of the 20 minutes it should be much less gritty that it was initially (but it is okay if it is not perfectly smooth at this point). Towards the end of the 20 minutes you can start to cook the pectin.
Rub a little of the sugar and berries between your fingers to see if the sugar has dissolved.
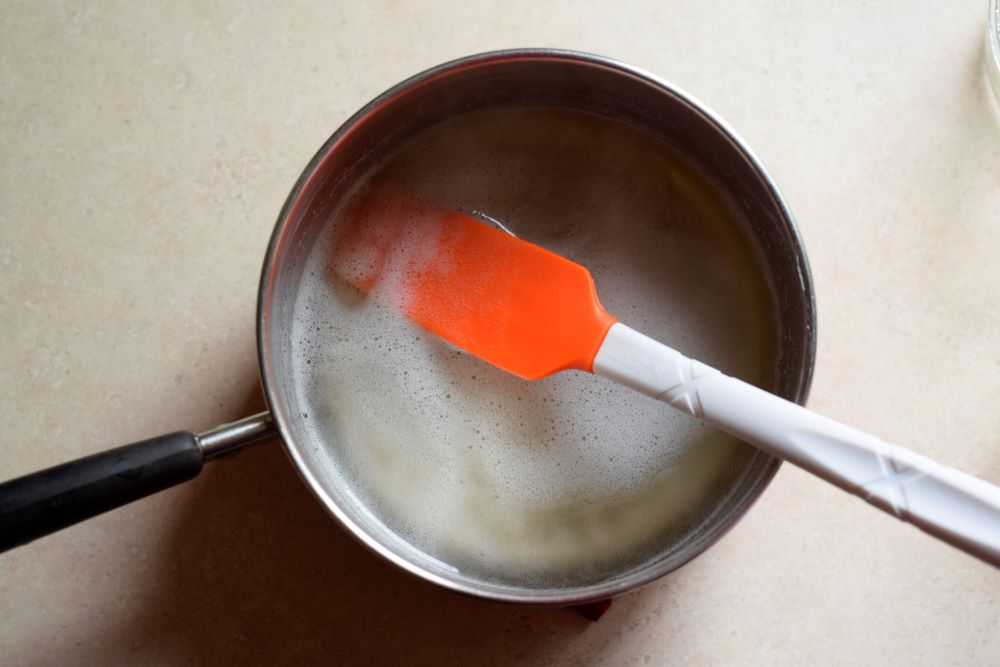
Step 3: Cook the Pectin
Empty the box of pectin into a small saucepan. Add 1 cup of cool water and stir well with a whisk to break up any clumps. Heat the pectin over medium high heat, stirring constantly, until it comes to a full boil. Boil for one minute and then remove from heat.
Cook the pectin and water together in a saucepan. Boil for one minute and then remove from heat.
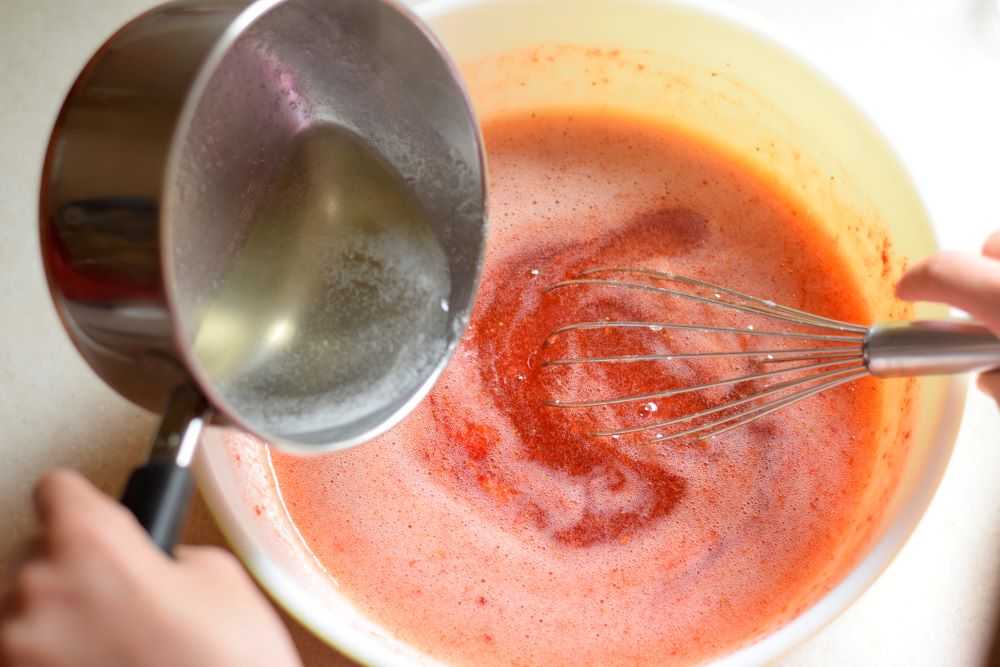
Step 4: Add the Pectin to the Fruit
Add the hot pectin to the fruit and sugar. Whisk briskly for 1-2 minutes or until thoroughly incorporated. Instead of being watery the fruit should now have a thicker, more syrupy consistency. Your jam is now done and you are ready to fill the jars!
Add the pectin into the fruit. Stir briskly for 1-2 minutes or until thoroughly incorporated.
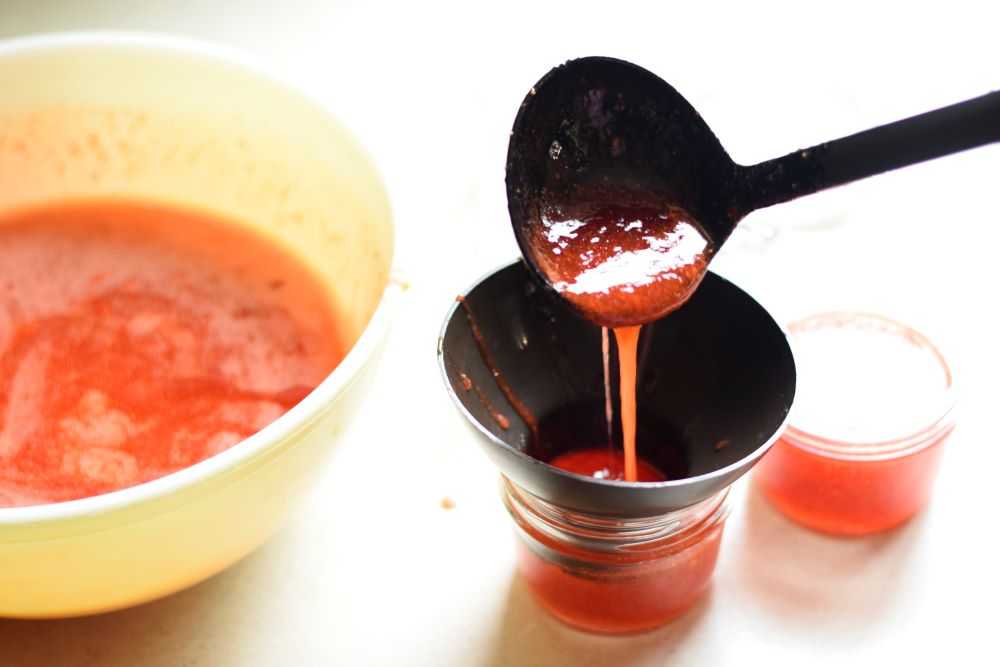
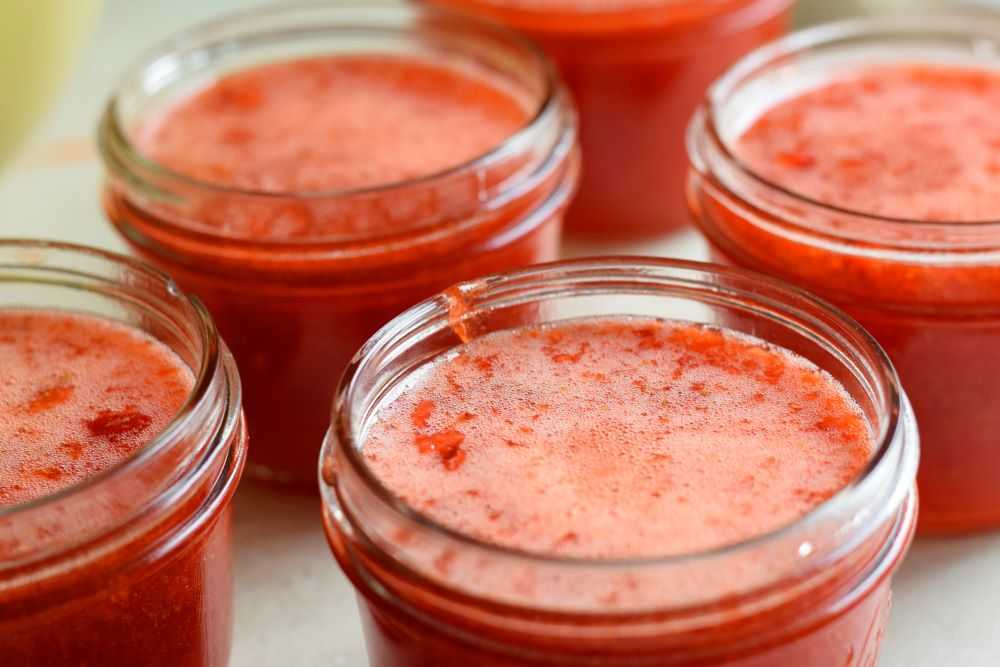
Step 5: Fill the Jars
Use a ladle to fill the jars with the jam. A jar funnel is very handy for this so you do not drip sticky jam on the edges of the jars.
Fill the jars with jam. A jar funnel makes this an easier task.
Leave about half an inch of head space between the top of the jam and the top of the jar. I use these plastic jar lids so the lids are easier to open and close. Once all of the jars are filled, transfer them to the refrigerator to cool and fully set.
After the jars are filled put on the lids and transfer them to the refrigerator for one day to fully set.
Freezer Jam Storage
After 24 hours the jam can be transferred to the freezer for long term storage. Thaw it in the refrigerator for a day before use. Once opened, use within 3 weeks or so. Jam keeps for up to 1 year in the freezer.
Serve
This strawberry freezer jam is good on so many different things! Try it on pancakes or waffles, toast or biscuits. It also tastes amazing on homemade yogurt!
Hope you get to try this freezer jam soon! Let me know how it went in the comments below. Happy Cooking!
Strawberry Freezer Jam
Recipe by: Mandy
This jam is easy to make, requires only four ingredients, and can be made in under an hour. Since the fruit is never cooked it is bursting with fresh strawberry taste. Yum!
2cupscrushed or pureed strawberries (from 1-2 pounds of fruit)
4 cupssugar
1boxregular fruit pectin (1.75 or 2 oz box, depending on the brand)
1cupcool water
Instructions
Stir the crushed strawberries and sugar together in a large bowl. Let sit for 20 minutes for the sugar to dissolve most of the way.
Empty the box of pectin into a small saucepan. Add in the water and stir well with a whisk to break up any clumps. Heat over medium high heat, stirring constantly, until it comes to a full boil. Boil for one minute then remove from heat.
Stir the hot pectin mixture into the strawberries. Whisk briskly for 1-2 minutes or until thoroughly incorporated.
Ladle the jam into small, clean jars or containers. Leave about half an inch of headspace between the top of the jam and the top rim of the jar. Once all the jars are filled, put the lids on the jars and transfer them to the refrigerator to cool and fully set.
After 24 hours the jam can be transferred to the freezer for long term storage. Thaw in the refrigerator for a day before use. Once opened use jam within three weeks or so. Jam keeps for up to 1 year in the freezer.
I used to love helping Mom make granola when I was a kid. She always got out the BIG bowl because she made such a big batch. I remember helping her mix it using my hands, and then getting to lick the sticky sugar off of my fingers afterwards.
As an adult I still love granola, but for a different reason. I love that it is a quick and easy breakfast on the mornings that I work. I add some homemade yogurt and fruit and I have a delicious breakfast to power me through the morning. Yum!
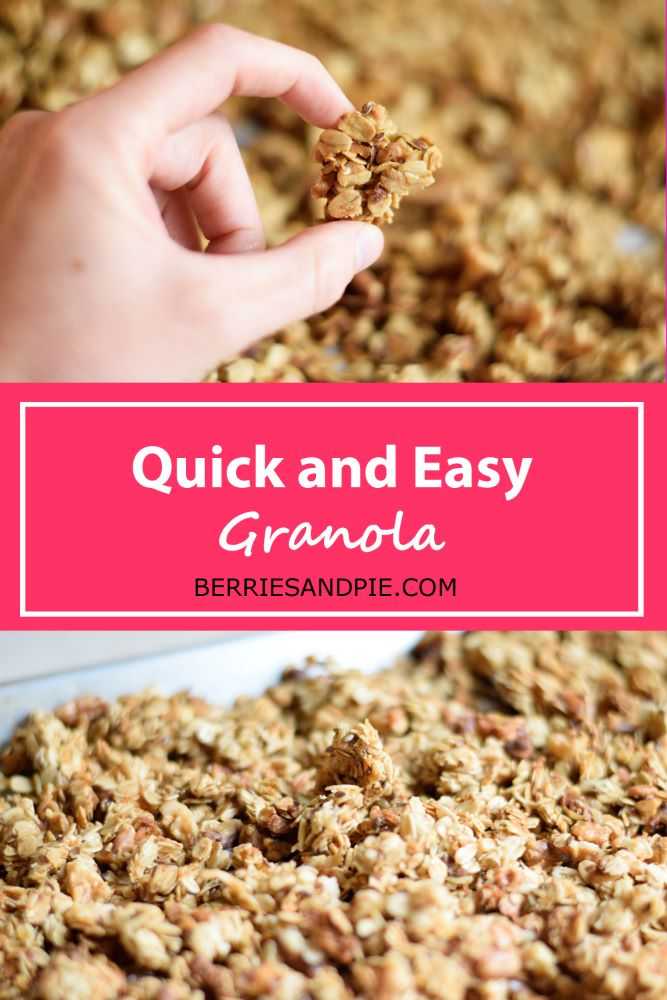
This homemade granola is made from real ingredients and tastes so much better than the granola you can buy at the store. It is easy to customize and you can add whatever mix-ins you want to this recipe. We will now go through how easy it is to make at home!
Note: This article may contain affiliate links, where I earn a small commission from qualifying purchases with no additional cost to you. I only provide links to products that I use personally and recommend highly.
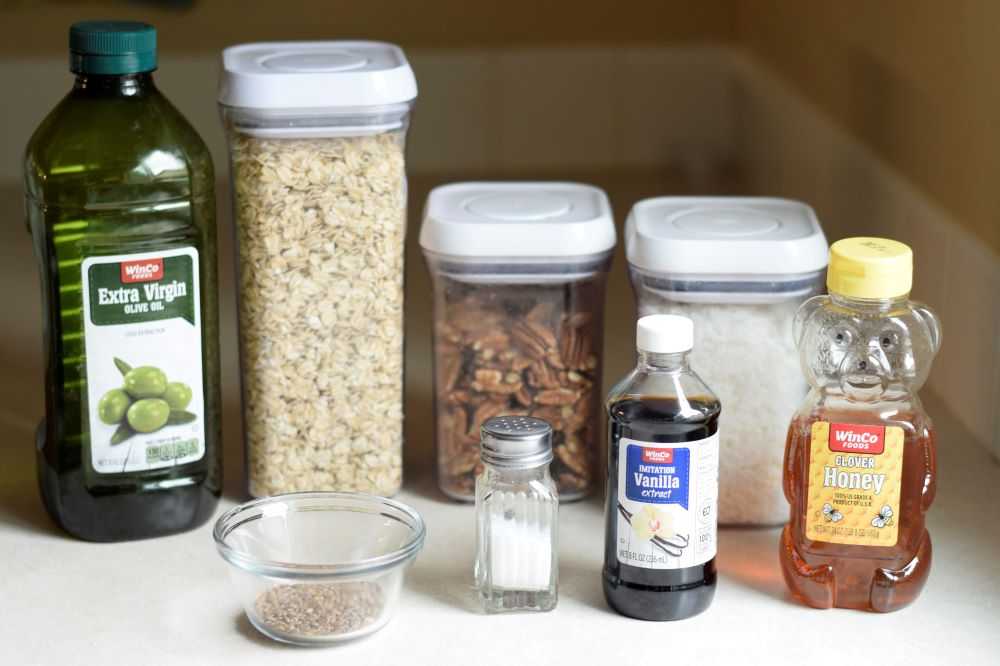
Ingredients
The best thing about this granola is that you can customize it however you want! Let’s go through the ingredients now:
It only takes only a few ingredients to make your own granola!
Oats – I use regular rolled oats. These have more fiber than quick oats and they hold up better in the granola.
Sweetener – Some type of sweetener is needed to give the granola a sweet taste. The sweetener has another important job though and that is to help bind the ingredients together.
I use both honey and brown sugar regularly when I make this granola. Honey coats the ingredients better and helps the granola to form large clusters. Brown sugar is easy and inexpensive but you will have smaller clumps and the texture will not be as smooth. You can also try real maple syrup or a different sweetener if you prefer.
Oil – Oil is needed to help make the granola crunchy. I usually use olive oil but you can also use coconut oil, canola oil, or whatever you like.
Flavorings – I usually use vanilla but you can also try adding different spices such as cinnamon or nutmeg.
Salt – A little salt is needed to balance the sweetness and bring out the flavor of the granola. I use table salt but use whatever you like.
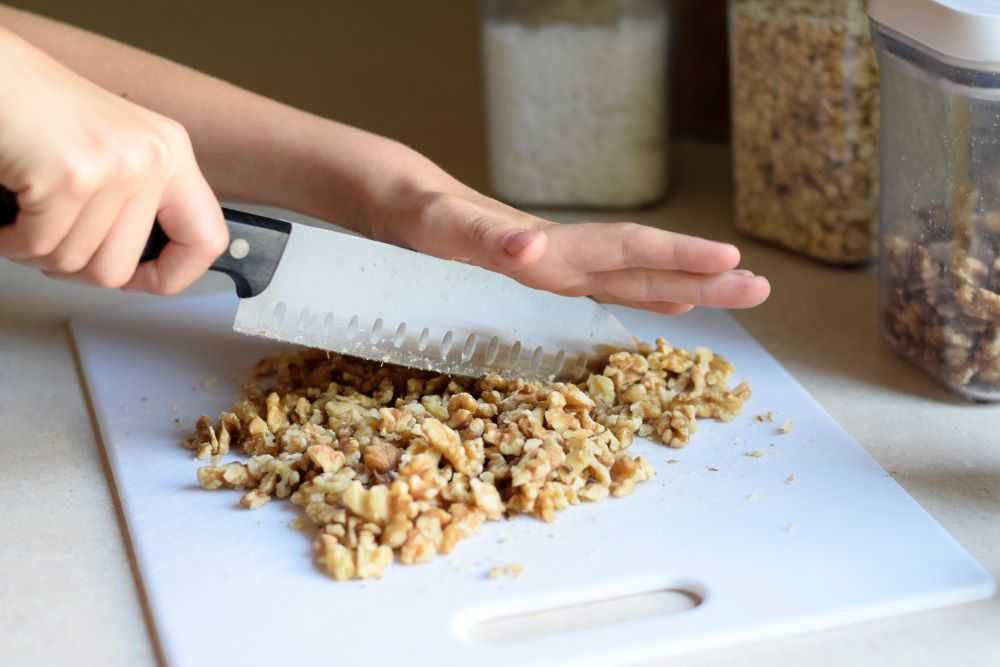
Nuts – Nuts give the granola a good crunch. They also contain protein and healthy fats which can help you feel full. I use walnuts but pecans or almonds would also be good choices.
Nuts give a good crunch to the granola. Be sure to roughly chop them before adding them in.
Mix-ins – You can add up to a cup of mix-ins to this granola. My favorite mix-ins are flax seeds and shredded coconut. I love the way the coconut browns in the oven. Yum! Here are some other ideas:
Raisins
Sunflower seeds
Dried fruit such as apricots, cranberries, or cherries
Orange zest
Pumpkin seeds
Sesame seeds
Wheat germ
Chocolate chips
Wheat bran or oat bran
If you are adding in dried fruit or chocolate add it after the granola is done cooking and has cooled completely. This is so the fruit does not burn and the chocolate does not melt.
Now that we know what goes in our granola, let’s find out how to make it!
Process
Step 1: Mix the Ingredients Together
Measure all of the ingredients into a large bowl. If you are using dried fruit or chocolate for any of your mix-ins, set them aside for when the granola is done cooking.
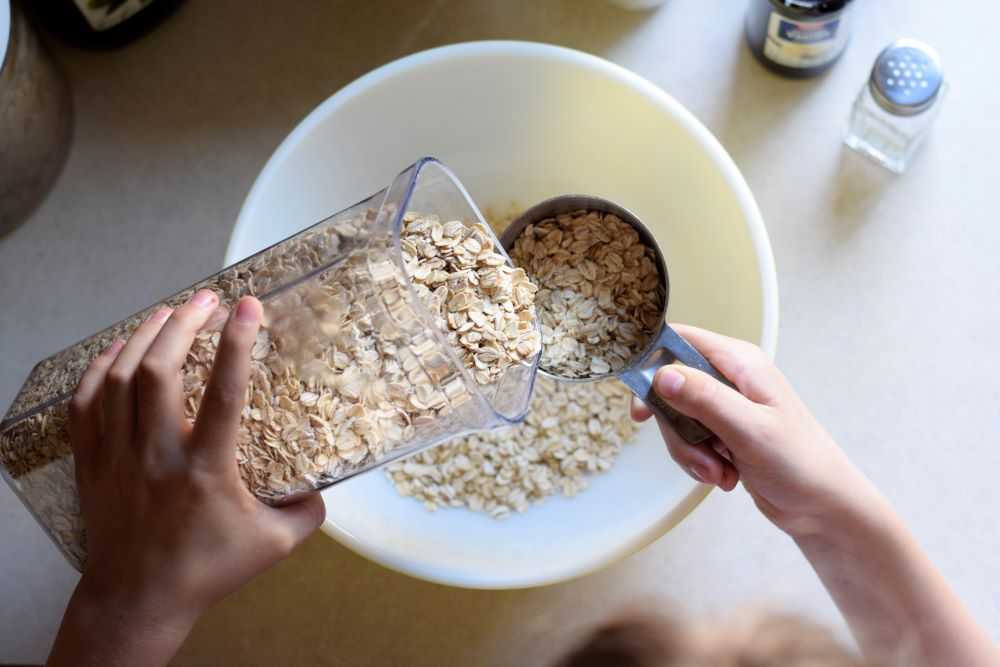
Measure all of the ingredients into a large bowl.
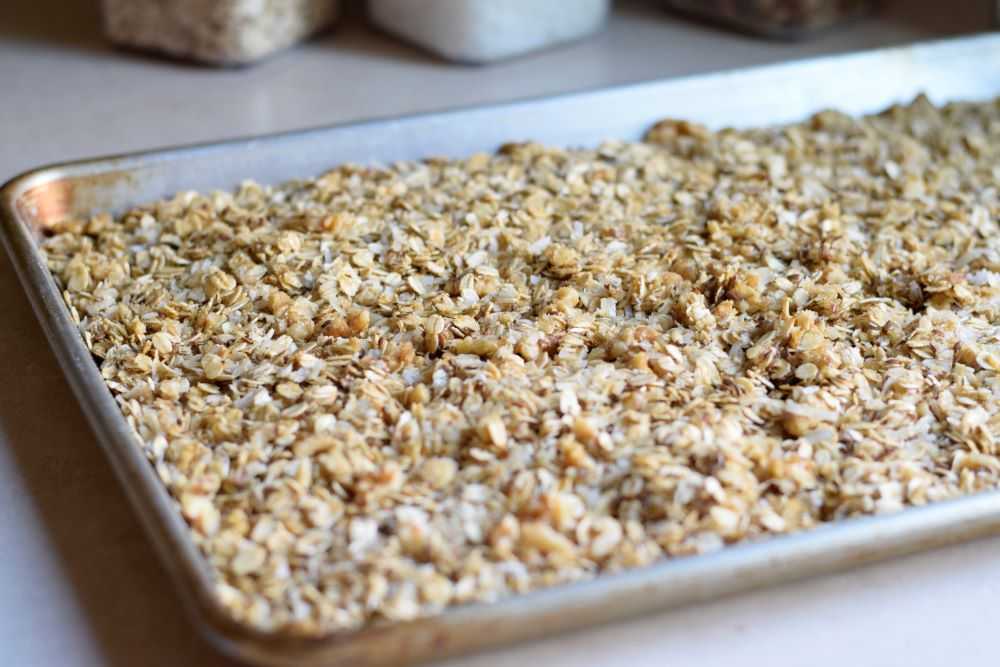
Stir all the ingredients together until thoroughly combined. It may be easier to mix if you use your hands. Then pour the granola out onto a greased baking sheet. Jiggle the pan a little to help it spread into a nice even layer. Pat the granola down firmly with your hands. It is now ready to go in the oven!
Spread the granola onto a greased baking sheet and pat it down firmly. This will help it form crunchy clusters.
Step 2: Bake the Granola
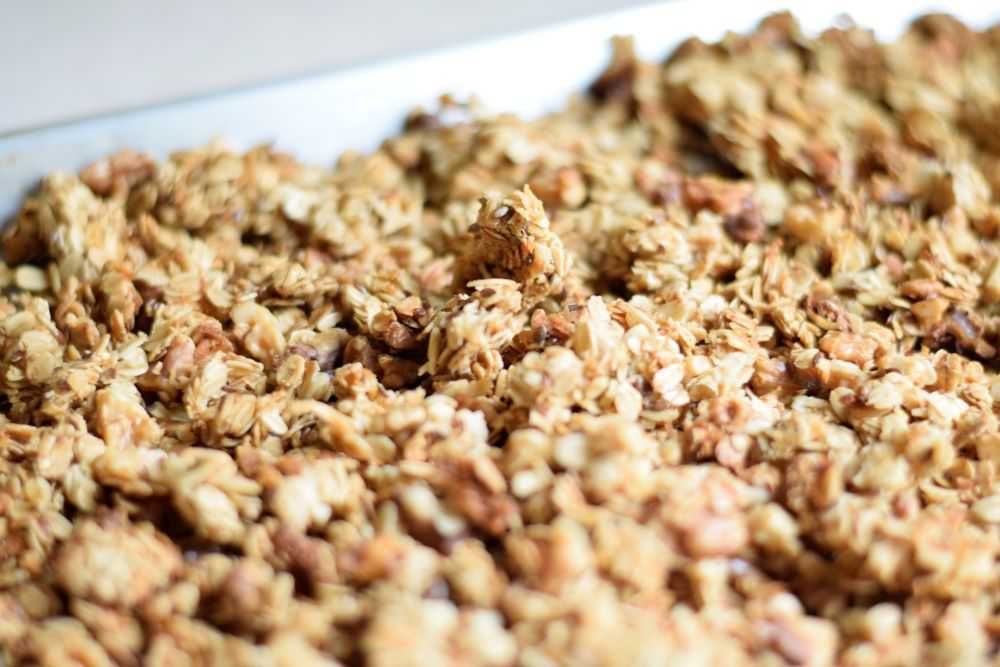
Bake the granola at 350 degrees for 25-30 minutes or until golden brown. You can stir the granola halfway through if you like. I do not stir mine and it turns out okay. Just make sure you watch it carefully so it does not get too dark around the edges.
It’s done! Let the granola cool completely on the pan without stirring.
When the granola is done baking set it aside to cool completely without stirring. This will help to form larger chunks.
Step 3: Stir and add in Mix-Ins
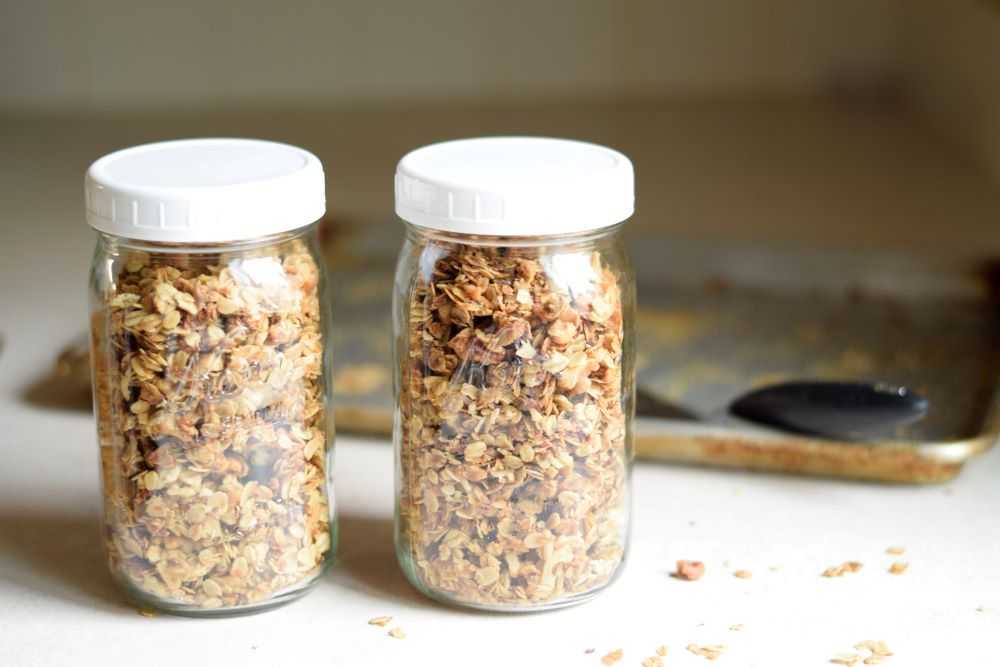
When the granola has cooled completely, gently stir it and break it into large pieces. Also add in any chocolate or dried fruit. Then transfer the granola to an airtight container for storage.
After the granola has cooled completely, gently stir it and break it into large pieces. Also add in any chocolate or dried fruit.
This recipe makes about 8 cups of granola, which fits perfectly in two mason jars. I use these lids (affiliate link) and they work great!
Granola is easily to store in mason jars with tight fitting lids.
Serve
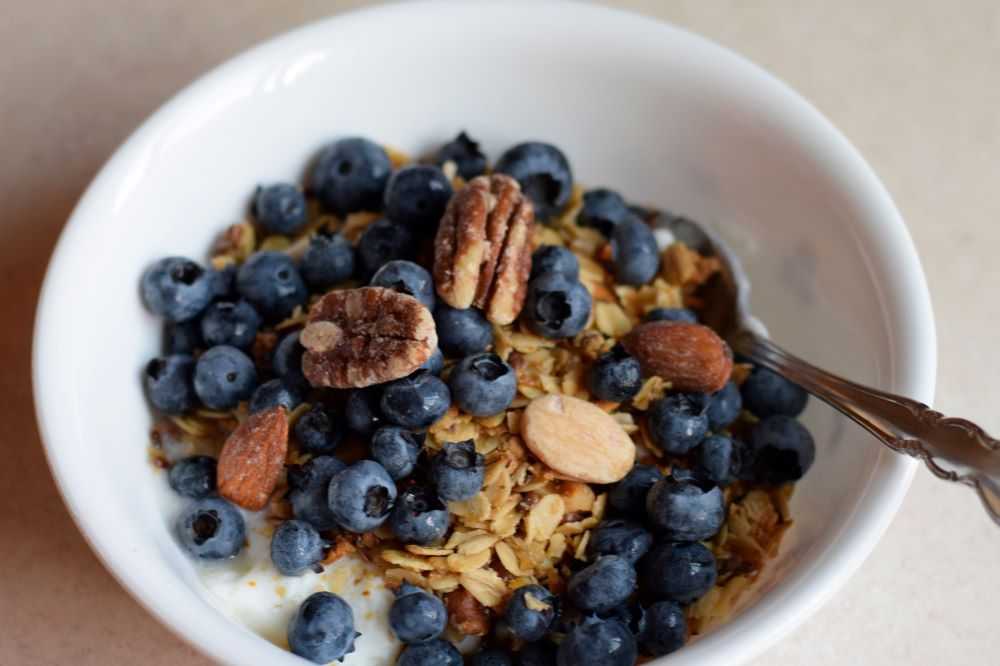
Serve your granola with milk or on top of homemade yogurt for a quick breakfast. It is also good sprinkled on fruit or ice cream. Yum!
Granola with yogurt and fruit makes a quick and easy breakfast!
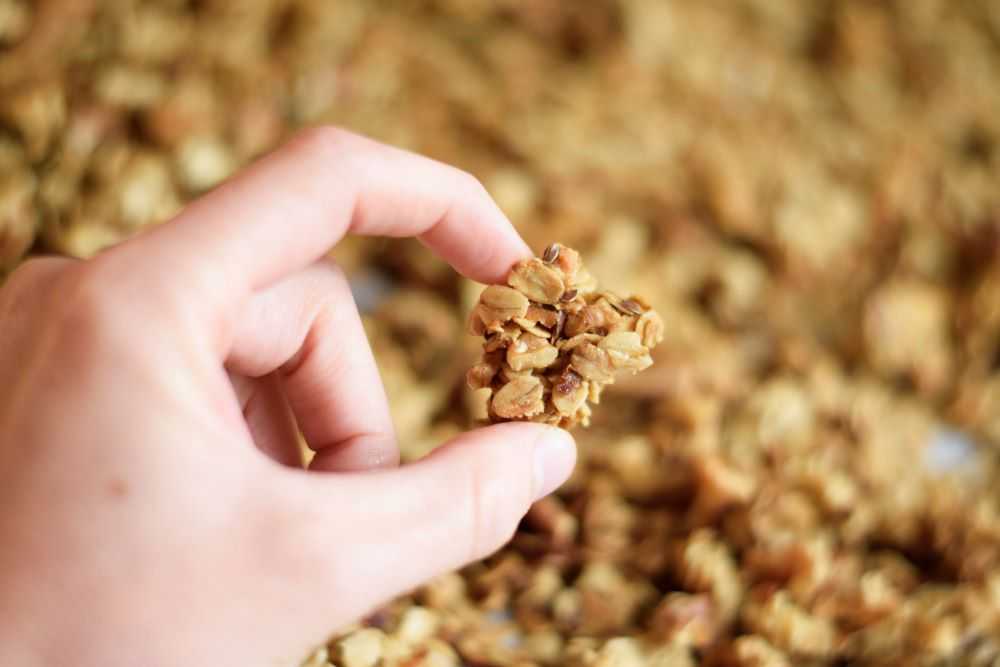
Tips for Chunky Granola
Do you love granola that forms crunchy clusters? Me too! Here are some tips to help you get maximum chunkage:
Big crunchy clusters. Yum!
Use honey instead of brown sugar as a sweetener. This will help the oats stick together better.
Do not add too many mix-ins. If you add more than a cup of mix-ins before baking the sugar and oil will not be able to bind everything together properly.
Pat the granola firmly into the pan before baking and do not stir as it cooks.This will help it form one large sheetof granola. Watch it carefully so it does not get too brown while it is baking.
Do not stir the granola until it has cooled completely.The sugar needs to harden before you stir it to form clusters.
There you have it! You are on your way to beautiful large chunks of crunchy granola. Add new mix-ins and make it different each time. Hope you get to try this granola recipe soon! Happy Cooking!
Easy Homemade Granola
Recipe by: Mandy
Granola is so simple to make! It is made from real ingredients and is so easy to customize. It makes a great breakfast for busy mornings!
½cupshredded coconut, or mix-ins of your choice (see recipe notes)
2tablespoonsflax seeds, or mix-ins of your choice (see recipe notes)
Instructions
Preheat the oven to 350°.
Stir the oats, oil, honey, nuts, vanilla, and salt together in a large bowl. Add in the coconut and flax seeds or up to 1 cup of optional mix-ins (see recipe notes). Mix everything together thoroughly.
Pour the granola out onto a large greased baking sheet. Jiggle the pan a little to help it spread into a nice even layer and then pat the granola down firmly with your hands.
Bake at 350° for 25-30 minutes. Watch the granola carefully so it does not get too dark around the edges.
Allow the granola to cool completely without stirring. This will help to create larger chunks.
After granola has finished cooling, add any dried fruit or chocolate mix-ins if desired. Transfer to an airtight container for storage.
Notes
You can add up to 1 cup of mix-ins of your choice to this recipe. Here are some ideas:
Raisins
Sunflower seeds
Dried fruit such as apricots, cranberries, or cherries
Orange zest
Pumpkin seeds
Sesame seeds
Wheat germ
Chocolate chips
Wheat bran or oat bran
If you are adding in dried fruit or chocolate add it after the granola is done cooking and has cooled completely. Enjoy!
I was a little late to jump on the homemade yogurt bandwagon. It looked amazing but sounded too hard, or like too much work. Then I made my first batch and realized two things: homemade yogurt is really easy to make and it tastes SO much better than store bought yogurt! I was hooked and have been making homemade yogurt ever since.
Our family goes through a one gallon batch of yogurt each week and we always have yogurt in the fridge now. We eat it with fruit for breakfast, or use it as a substitute for sour cream or buttermilk. The more yogurt we have, the more we use it. Funny how that works?
This article will walk you through the yogurt making process step by step. It is not hard but does take some time. Let’s get started!
Note: This article may contain affiliate links, where I earn a small commission from qualifying purchases with no additional cost to you. I only provide links to products similar to what I use personally and highly recommend.
Advantages to Homemade Yogurt
There are many advantages to making your own yogurt. Here are some of them:
It saves you money. Homemade yogurt is about half the cost of store bought yogurt. The savings can really add up!
You can make it exactly how you like it. Do you prefer thick or thin yogurt? Do you prefer a tangy flavor or a more mild one? Making your own yogurt puts you in control!
There are no additives or extra ingredients. Many commercial yogurts contain added sugars, preservatives, or other additives to thicken the yogurt. Not this one!
It’s fun! I get so excited every time I make yogurt because I can transform a simple gallon of milk into something amazing! How cool is that?
Yogurt Making Overview
Before we get into the specifics, let’s look at the yogurt making process in a little more detail so you can understand what is going on and why we do the things we do.
The first step in making yogurt is to heat the milk to around 180 degrees. While this does kill any harmful bacteria that are present in the milk (pasturized milk should already be free of harmful bacteria), the main reason for doing this is to denature or change the milk proteins so they will be able to form a gel and thicken into yogurt.
After the milk is heated it needs to cool to around 110-115 degrees. This is the optimal temperature for the good bacteria that we are going to introduce to the milk. Then yogurt starter cultures are added and those little bacteria go to work! They digest the lactose in the milk and produce lactic acid. This is why yogurt tastes tangy (and why people with lactose intolerance can sometimes eat yogurt). In response to the acid the milk proteins rearrange and over the course of several hours, milk is completely transformed into yogurt. Neat!
Now that we know a little about what we’re doing, let’s get started!
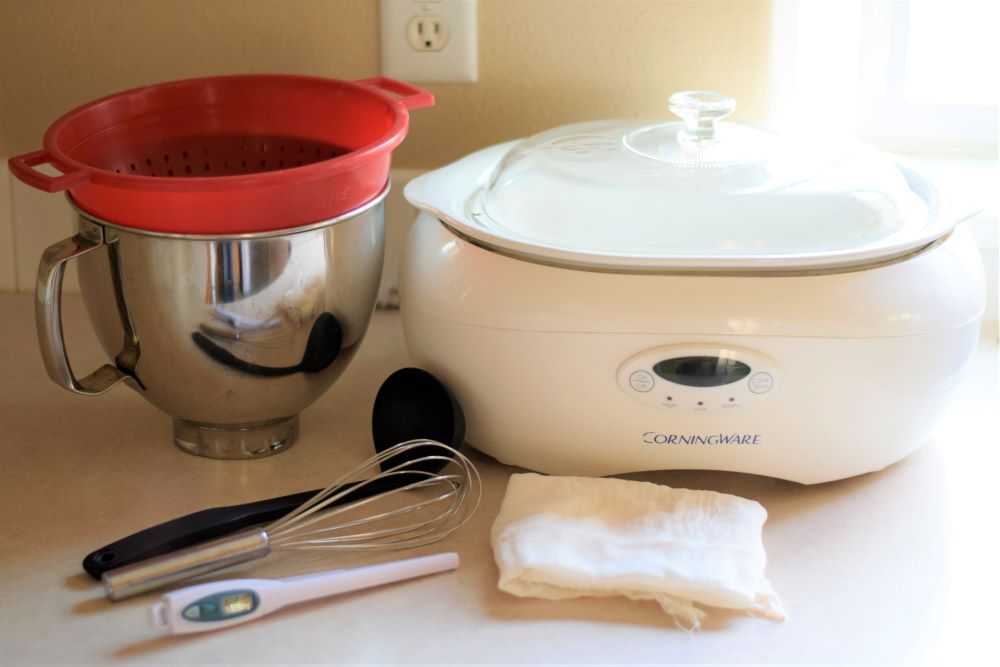
Equipment
There are a few pieces of equipment needed to make homemade yogurt. We will go through them now:
Equipment needed to make yogurt – you may already have everything you need!
Slow Cooker – This is used to heat the milk up to the correct temperature. Also, the heavy crock will help keep the milk warm as the yogurt incubates.
If you do not have a slow cooker you may also heat the milk using a heavy pot on the stove. However, this method is much more labor intensive because you have to watch the milk more carefully and stir it often so it will not burn. The slow cooker is the way to go here!
Whisk – This is used to mix the starter cultures into the warm milk.
Quick-Read Thermometer – This is helpful for checking the temperature of the milk at different stages in the yogurt making process. The yogurt needs to be at the correct temperature for the cultures to grow.
Colander – Your colander should have a one gallon capacity.
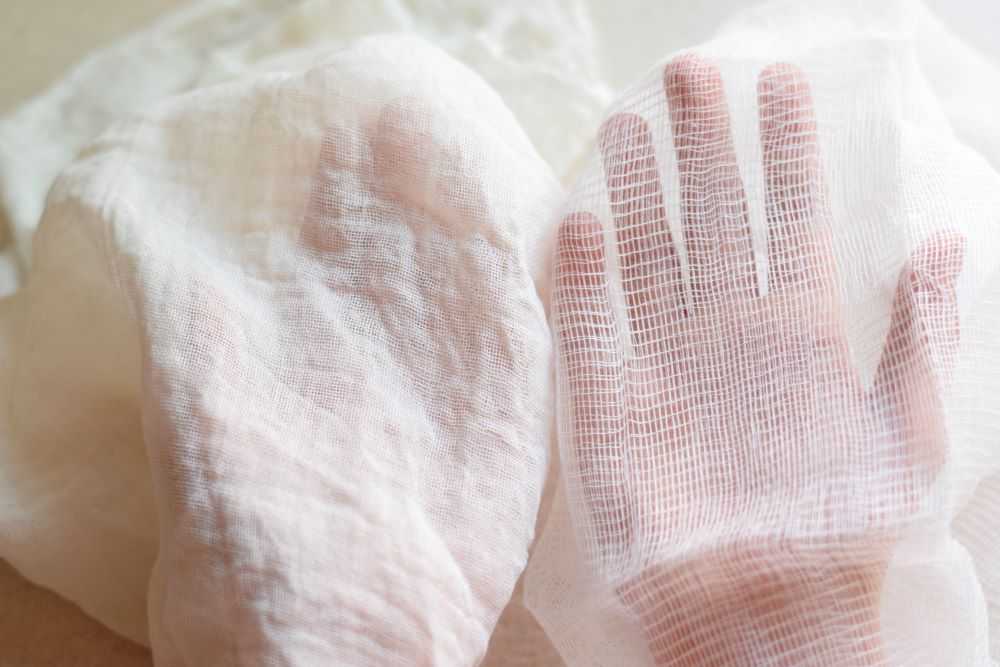
Cheesecloth – Cheesecloth helps to strain the whey from the yogurt to make it thicker. In the past year I have used many different types of cheesecloth and learned that not all cheesecloth is created equal!
Standard cheesecloth that you buy at the grocery store is quite thin with big holes. It takes several layers to drain your yogurt and is more difficult to work with. The cheesecloth I use is no longer available but a very similar one can be purchased on Amazon here (affiliate link). It is more tightly woven and holds up well to repeated use. You can wash it out when you are finished and use it again and again. Can you see the difference between the pictures below? I highly recommend investing in some good cheesecloth!
Both of these contain two layers of cheesecloth. On the the left is cheesecloth purchased from Amazon, on the right is cheesecloth from the grocery store.
A Large Bowl – This is used while draining your yogurt. It should be narrower than your colander so the whey will drip and collect in the bottom. Ideally the bowl will be able to hold 6-8 cups of whey without touching the bottom of the colander.
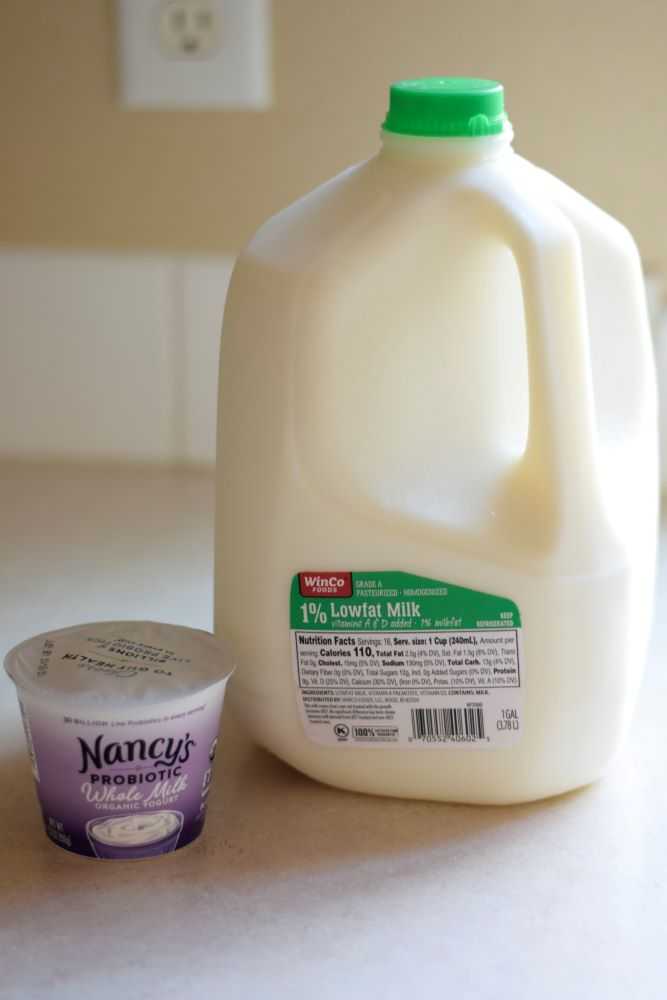
Ingredients
Only two ingredients are needed to make homemade yogurt:
Only two ingredients are needed to make homemade yogurt.
Milk – This will be transformed into yogurt. I usually use 1% milk but you can choose any fat content you want.
Yogurt Starter Cultures – This contains helpful bacteria that will grow in your warm milk and transform it into yogurt. You only need to buy this the first time you make yogurt. After that you can save some of your own yogurt to seed subsequent batches.
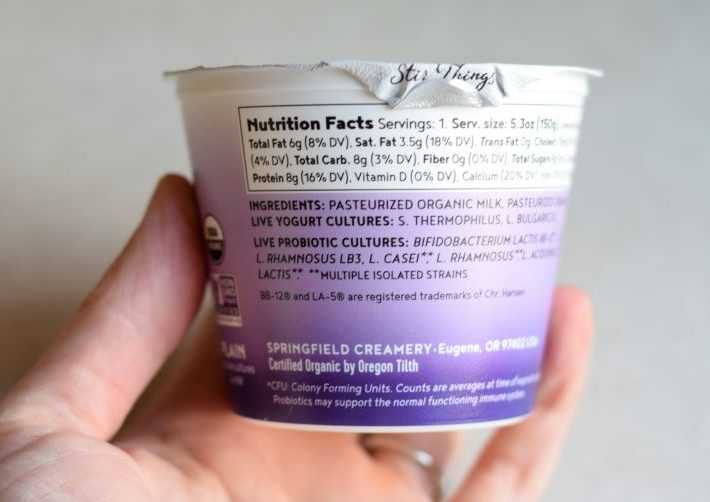
Choose a plain yogurt that contains only milk and a variety of live and active cultures.
When you are looking for the perfect yogurt starter culture find a small container of plain commercial yogurt. Do not choose fruit yogurt or yogurt flavored in any way. It pays to be a little picky here because the success of your homemade yogurt depends on the quality of your starter culture.
The yogurt I use is Nancy’s brand plain yogurt. I like this because it has two ingredients: milk and live cultures. It also contains more types of active cultures than other brands. All yogurt usually contains S. Thermophilus and L. Bulgaricus because they are needed in the yogurt making process. Some commercial yogurt such as Nancy’s yogurt has other probiotic cultures added after processing which are beneficial for our digestive tracts. Make sure that your yogurt starter is fresh because culture activity decreases with age.
Now that you have everything you need, let’s make some yogurt!
Process
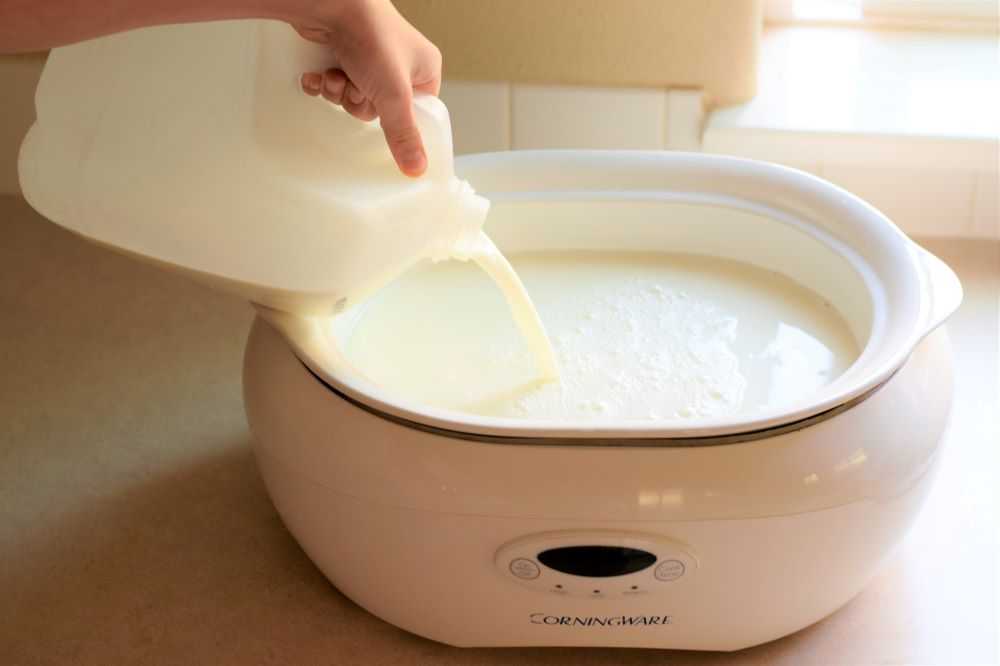
Step 1: Heat the Milk
Pour your milk of choice into the slow cooker. Cover it with the lid and cook on high until the milk registers 180 degrees with your thermometer. The first time you do this it can be a rather tedious process so make sure you time how long it takes to get up to temperature. Next time you make a batch of yogurt, you can just set a timer for however long and double check the final temperature with your thermometer. For my slow cooker this takes 2 hours and 45 minutes.
Step 2: Let the Milk Cool
After your milk reaches 180 degrees, turn off the slow cooker and remove the lid. Let the milk cool until it reaches 110-115 degrees. Again, time how long this takes so you can just set a timer next time and double check the final temperature with your thermometer. For me this step takes about one hour.
If a skin forms on top of the milk, just peel it off with your fingers or a clean spoon before proceeding to the next step.
Let the milk cool to 115 degrees before adding the yogurt starter cultures.
Step 3: Add in the Yogurt Starter Cultures
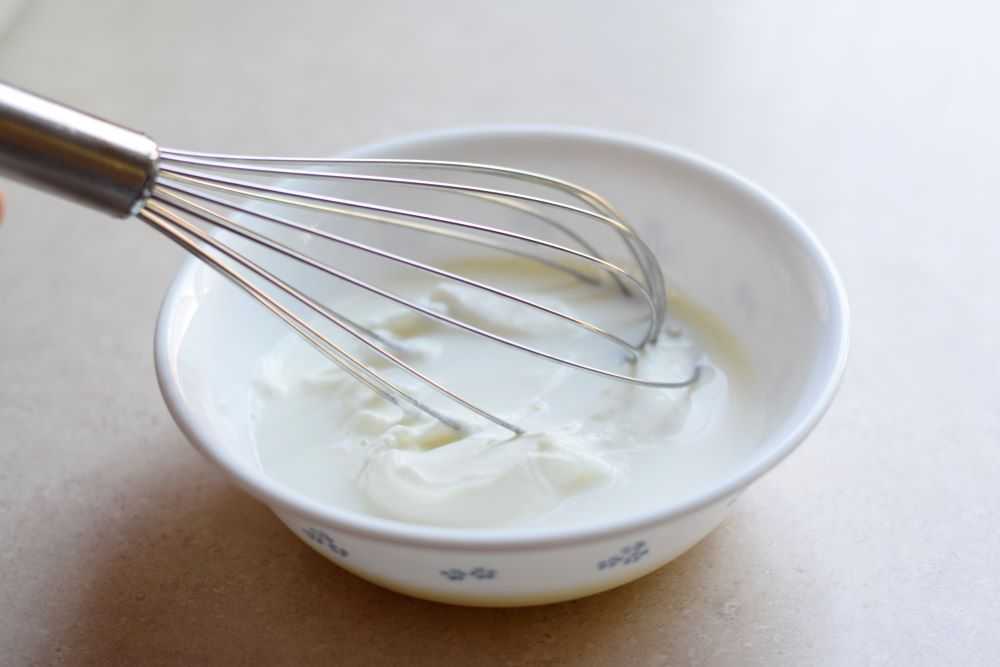
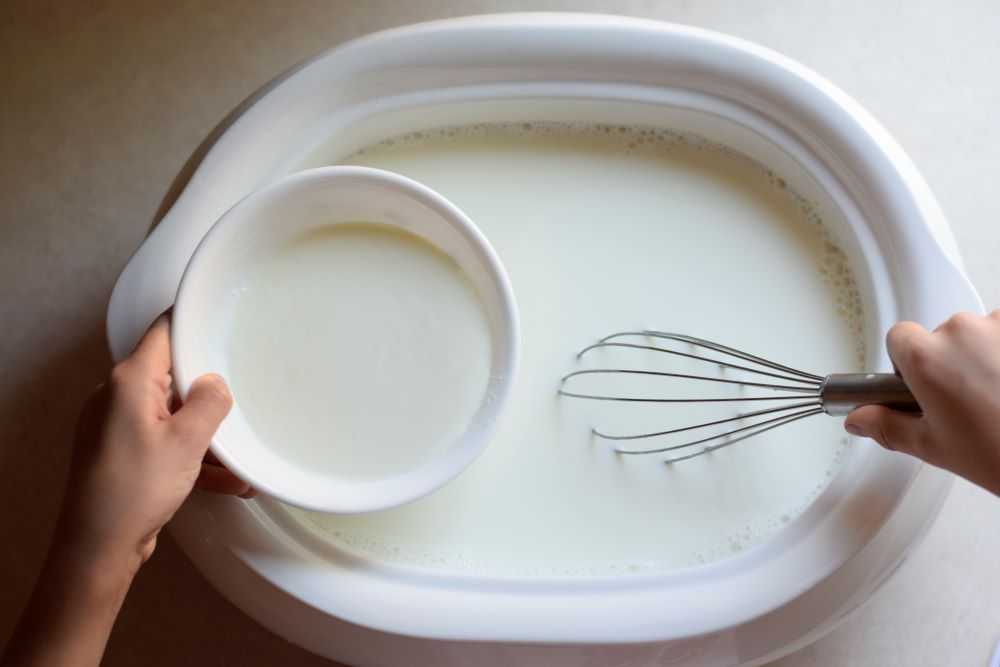
After your milk is around 110-115 degrees it is time to add in the yogurt starter cultures. In a small bowl place about half a cup of the plain yogurt with active cultures you purchased from the store. You do not need to be really exact with the measurements here–just eyeball it. Then use a ladle to take about half a cup of your warm milk and add it to the yogurt in the bowl. Using your whisk stir these together until they are smooth.
Whisk the yogurt culture and milk together in a small bowl before adding it to the rest of the milk. This will thin it so it will be able to be evenly distributed.
This step is important because it thins out the yogurt a bit so it will be easier to mix into the milk. Once I tried mixing the yogurt in without thinning it first, and the yogurt stayed in large clumps, sank to the bottom, and my yogurt did not thicken. So, after your yogurt is thinned out a bit whisk it back into the milk in the slow cooker. Take a few minutes and mix everything together thoroughly.
Whisk the thinned yogurt into the warm milk.
Step 4: Let the Yogurt Incubate
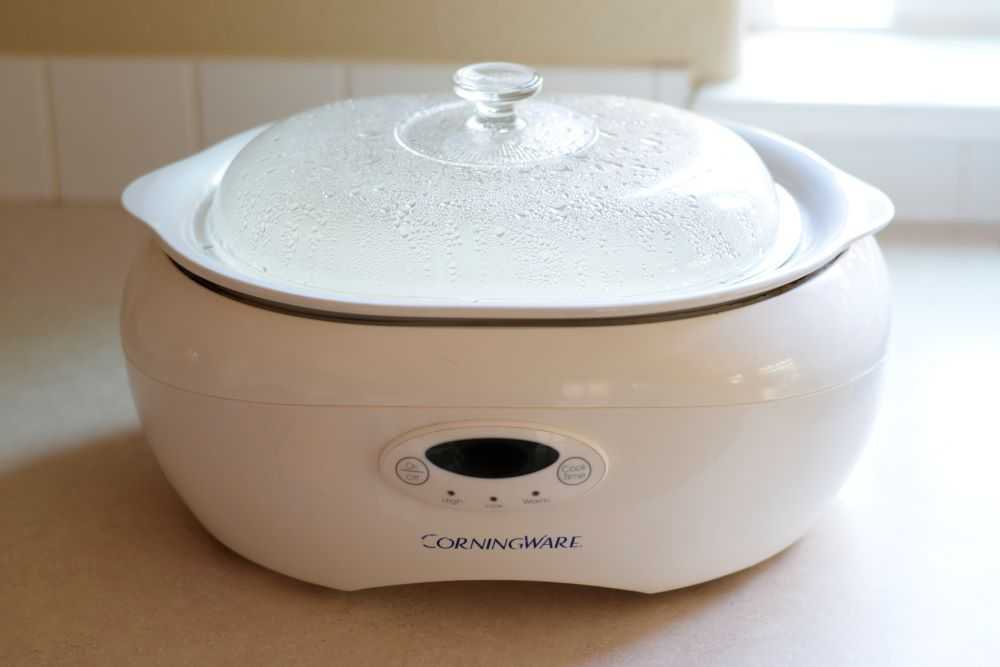
After the yogurt cultures are mixed in, put the lid on the slow cooker. Let it sit undisturbed for at least 6 hours, and overnight is fine. The slow cooker retains heat well, so I do not use any additional heat while my yogurt is incubating.
Let the yogurt sit for at least 6 hours. The slow cooker retains heat well and it can sit at room temperature.
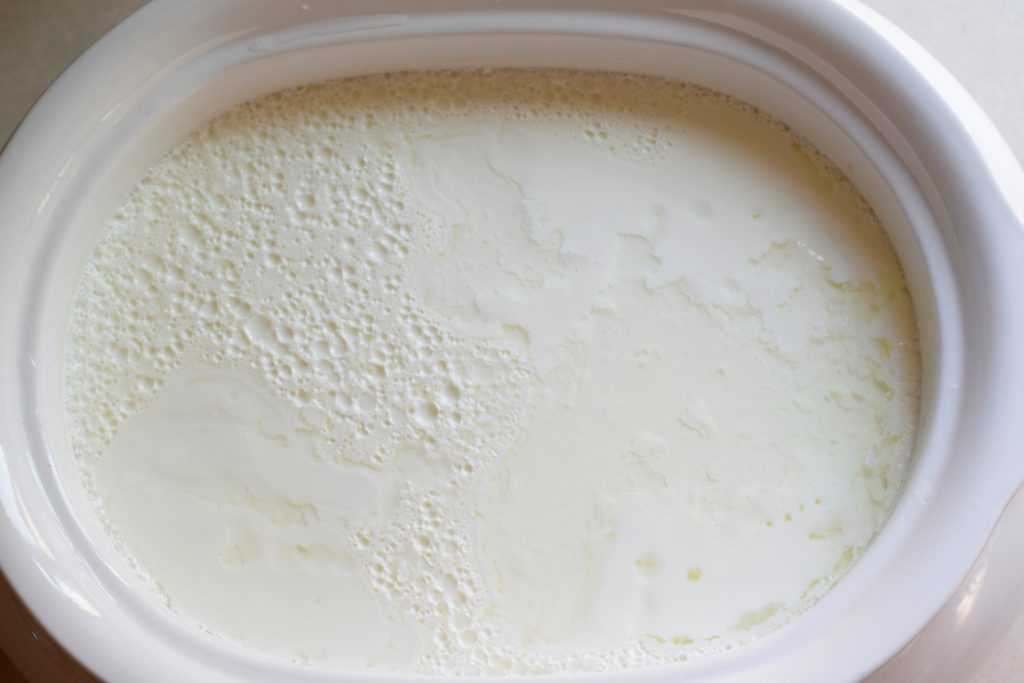
You can let your yogurt sit for up to 12 hours or so if you like. The longer it sits it will become slightly thicker but also more sour. You know the yogurt is ready when it has thickened considerably and you can see some clear whey starting to form around the edges.
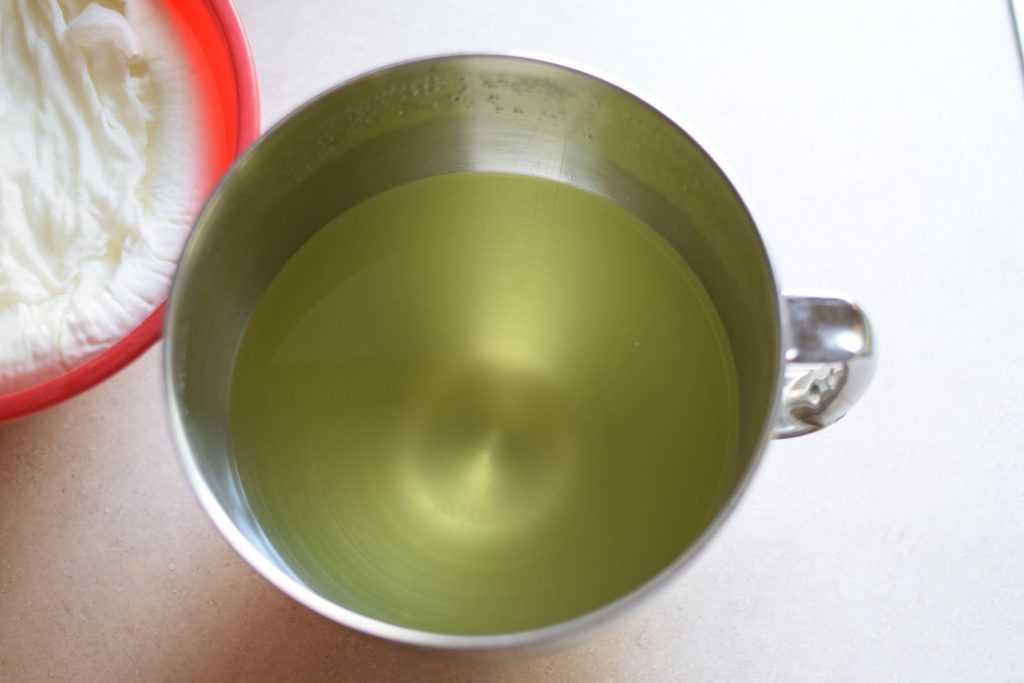
The yogurt is done! It has thickened considerably and you can see some clear whey on top and around the edges.
Step 5: Strain the Yogurt
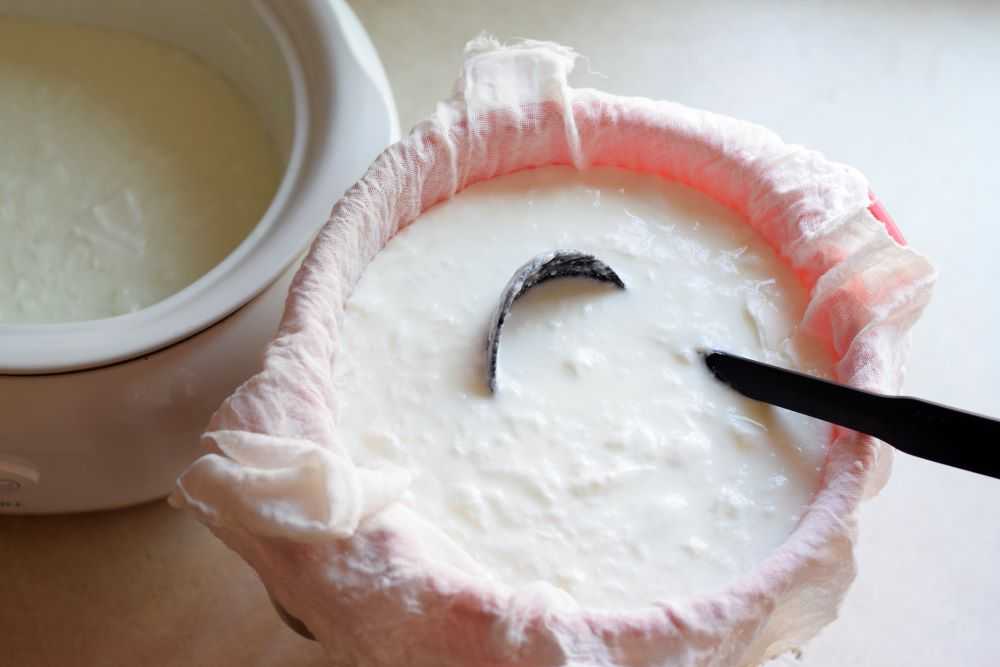
If you enjoy yogurt on the thinner side you can skip this step and enjoy your yogurt now. But if you prefer a thicker, creamier Greek-style yogurt, you need to strain it. There are several ways to do this but I prefer using a colander lined with cheesecloth (affiliate link). It is simple and inexpensive with easy clean up.
Scoop the yogurt into a cheesecloth lined colander. Make sure a bowl is placed under the colander to catch the whey.
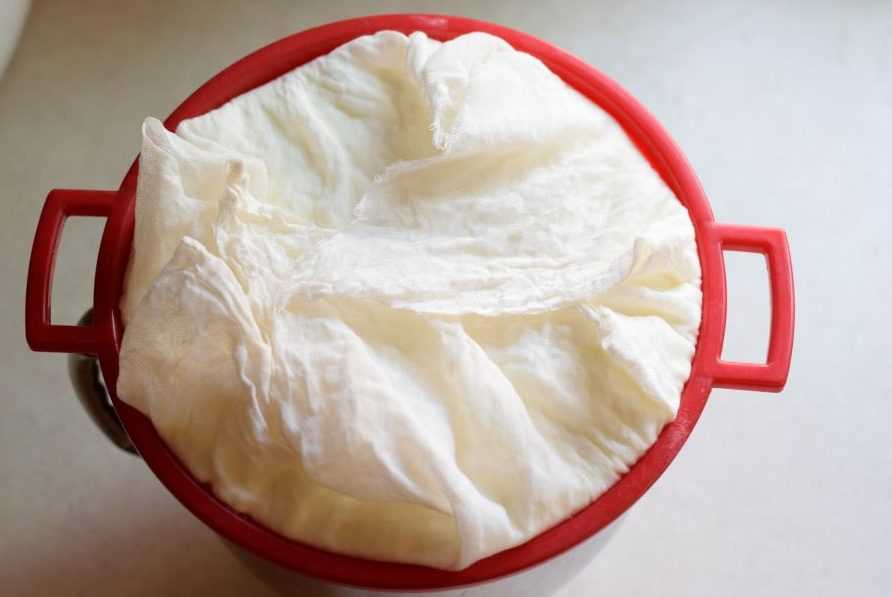
Take your colander and place it over a large bowl to collect the whey as it drains. Line the colander with two layers of cheesecloth and then pour or scoop the yogurt into the colander. Fold any extra cheesecloth over the top of the yogurt so the whey does not start dripping on your counter. Place the bowl-colander-yogurt stack into the refrigerator to drain for 6-24 hours, or until the yogurt is as thick as you would like. If the bowl gets full of whey, just dump it out.
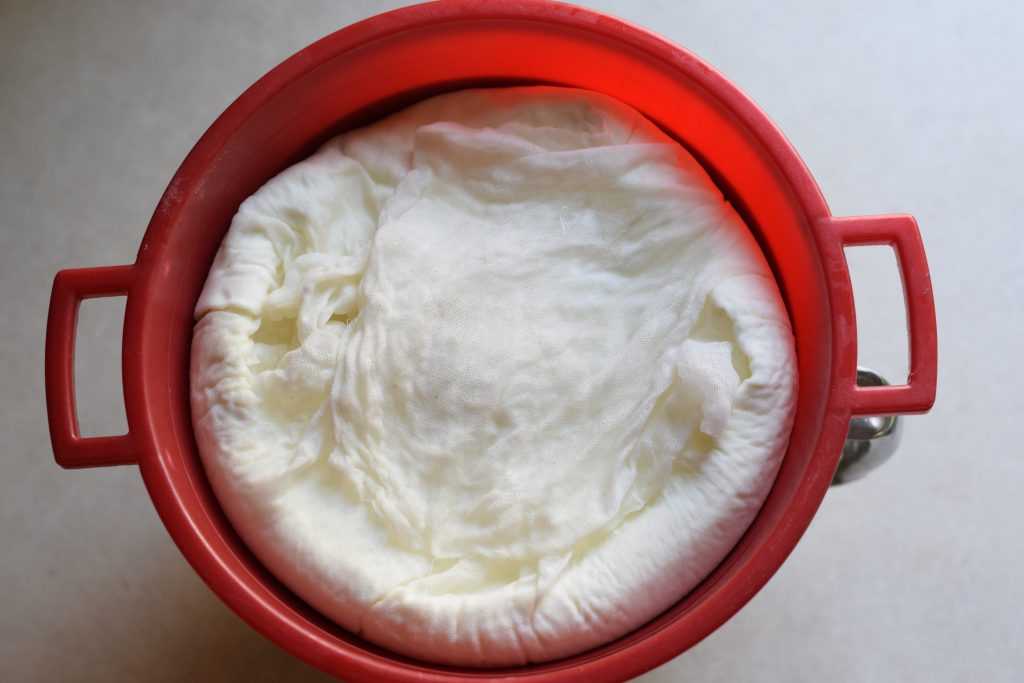
After straining for six hours, the yogurt has sank down considerably and several cups of whey have drained out.
Step 6: Transfer the Finished Yogurt to a Clean Bowl
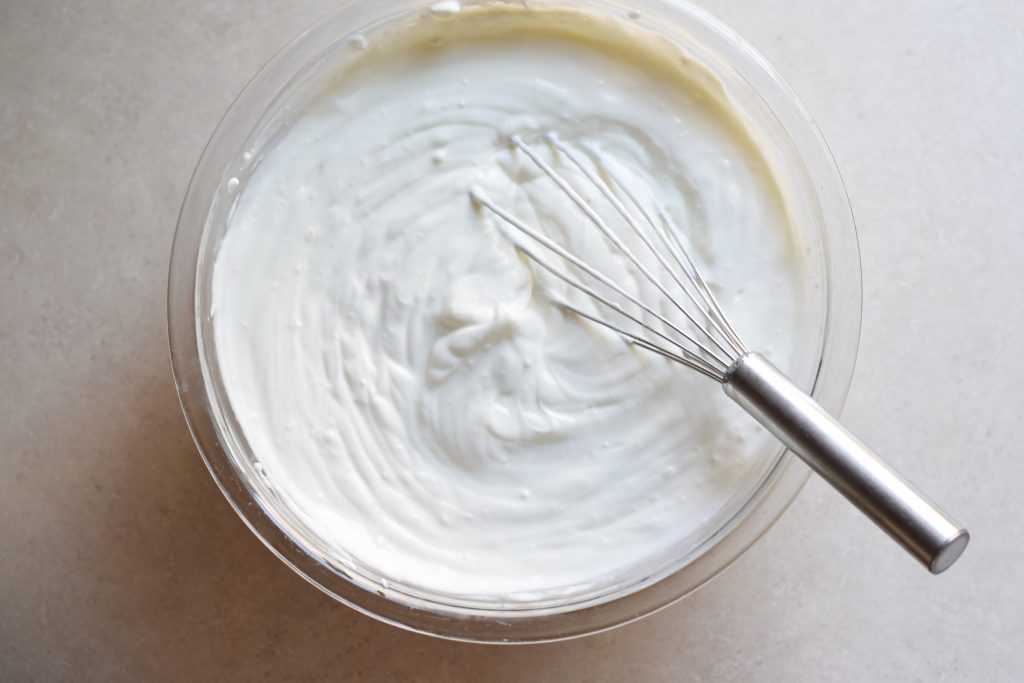
After the yogurt is as thick as you would like, invert the colander over a clean bowl and peel off the cheesecloth. Whisk it vigorously to get out any lumps and make the yogurt creamy and smooth. If your yogurt is too thick, just stir some of the extra whey back in.
Transfer the finished yogurt to a bowl and whisk it to make it smooth and creamy. It is now ready to eat!
Transfer about half a cup of yogurt to a small clean bowl to start your next batch. I like to take it out now so it won’t get contaminated later on. Store it in the refrigerator until needed.
Rinse out your cheesecloth in the sink and let it dry completely. You can use this same cheesecloth next time. I store my dried cheesecloth in a zip-top bag to keep it clean.
Serve
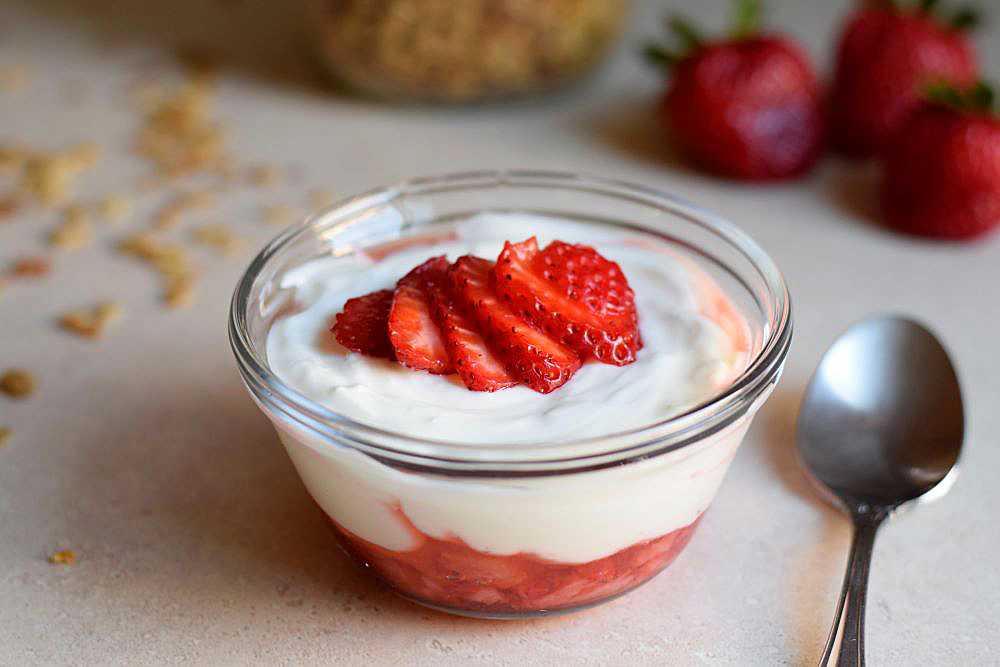
You did it! You made your own yogurt! Enjoy this creamy deliciousness with homemade granola or homemade strawberry freezer jam and fruit for breakfast. Or add it into a smoothie or protein shake. You can also use it as a substitute for sour cream or buttermilk. The possibilities are endless!
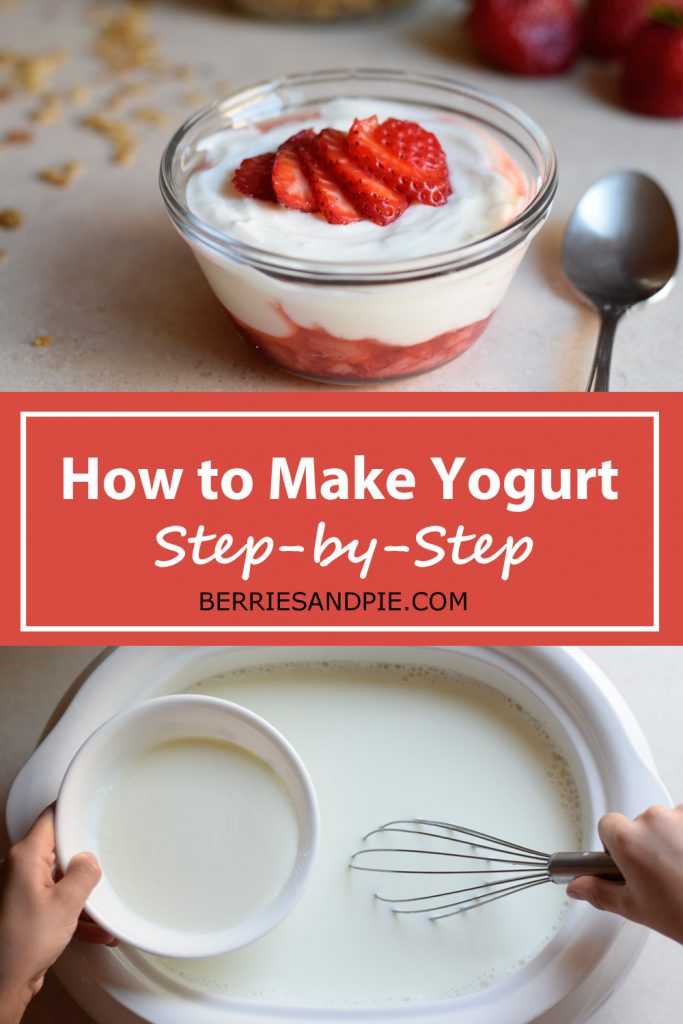
Yogurt with fresh berries and homemade granola. Yum!
Hope you enter into the exciting world of yogurt making soon. Happy Cooking!
Homemade Yogurt
Recipe by: Mandy
Making yogurt is easier than you may think! With two simple ingredients and some time you can transform a gallon of milk into fresh and delicious homemade yogurt!
Pour the milk into a slow cooker. Heat on high for 2-3 hours or until the milk reaches 180°.
Turn off the slow cooker and remove the lid. Let the milk cool for one hour or until it reaches 110-115°. If a skin forms on top of the milk, peel it off before proceeding to the next step.
Place the plain yogurt in a small bowl. Add about half a cup of the warm milk and whisk until smooth. Add the thinned yogurt back into the slow cooker and whisk it thoroughly until it is evenly distributed.
Place the lid back on the slow cooker. Let it sit undisturbed at room temperature for at least 6 hours, and overnight is fine. You know the yogurt is ready when it has thickened considerably and clear whey starts to form around the edges.
Line a large colander with two layers of cheesecloth. Place the colander over a large bowl to catch the whey as it drains. Pour or scoop the yogurt into the colander and fold any extra cheesecloth over the top.
Place the yogurt, colander, and bowl in the refrigerator for 6-24 hours or until the yogurt is as thick as you would like. If the bowl gets full of whey, just dump it out.
After the yogurt is as thick as you would like, invert the colander over a clean bowl and peel off the cheesecloth. Whisk the yogurt vigorously until smooth. If your yogurt is too thick, stir some of the extra whey back in.
Your yogurt is now ready to eat! Store it covered in the refrigerator for up to two weeks.
Notes
Make sure you save some yogurt to start your next batch. After your yogurt is done draining transfer about half a cup to a small clean bowl. Cover and refrigerate until needed.
Common Questions
Is it okay for milk to sit at room temperature for long periods of time?
Usually we think that milk at room temperature will go bad. This can be true. But when we are making yogurt, we are introducing good bacteria that quickly overwhelm any harmful bacteria that may be present in the milk. Lactic acid produced in the yogurt making process lowers the pH and also helps to prevent the growth of harmful bacteria.
Why is my yogurt not getting thick?
There are a few reasons why your yogurt may not thicken properly:
Your yogurt starter was too old.Make sure your yogurt cultures are fresh.
The milk was too warm when the yogurt starter was added. Make sure your milk is 110-115 degrees for optimal growth.
Your yogurt has not had enough time to thicken. Yogurt takes at least 6 hours to thicken properly. It may take slightly longer in cooler temperatures.
Can I heat the milk on the stove instead of in a slow cooker?
Yes, you can! This speeds the process up considerably because it takes a shorter amount of time to get the milk up to temperature. However, you need to watch the milk carefully so it does not burn and stick to the bottom of your pot.
If you heat the milk on the stove I recommend using a heavy pot or dutch oven because this will help retain the heat better as yogurt is incubating.
How much yogurt will I get from a gallon of milk?
This depends on the thickness. If you like thin yogurt, you get around a whole gallon. If you choose to thicken your yogurt, you will get around half a gallon of finished yogurt (8 cups) and half a gallon of clear whey.
What can I use the whey for?
The type of whey left over from making yogurt is called acidic whey. It tastes more sour than the whey left over from making cheese, which is called sweet whey. Although it is full of nutrients and probiotics, acidic whey has limited uses at home.
You can try using leftover acidic whey in baked goods instead of milk or water. You can also try thinning it with water and using it as a fertilizer in your garden.
How long will my yogurt cultures last before I need to make yogurt again?
Fresh yogurt cultures are important for making yogurt. I recommend making a new batch within 7-10 days.
How long will my finished yogurt last in the refrigerator?
Homemade yogurt typically lasts up to two weeks when stored properly.