The new year is here! It has been a challenge to get outside this month in between rain storms but luckily we have had some nice days too. Most of my time has been spent on planning, pruning, and other maintenance tasks. Here is what is going on in the garden this month:
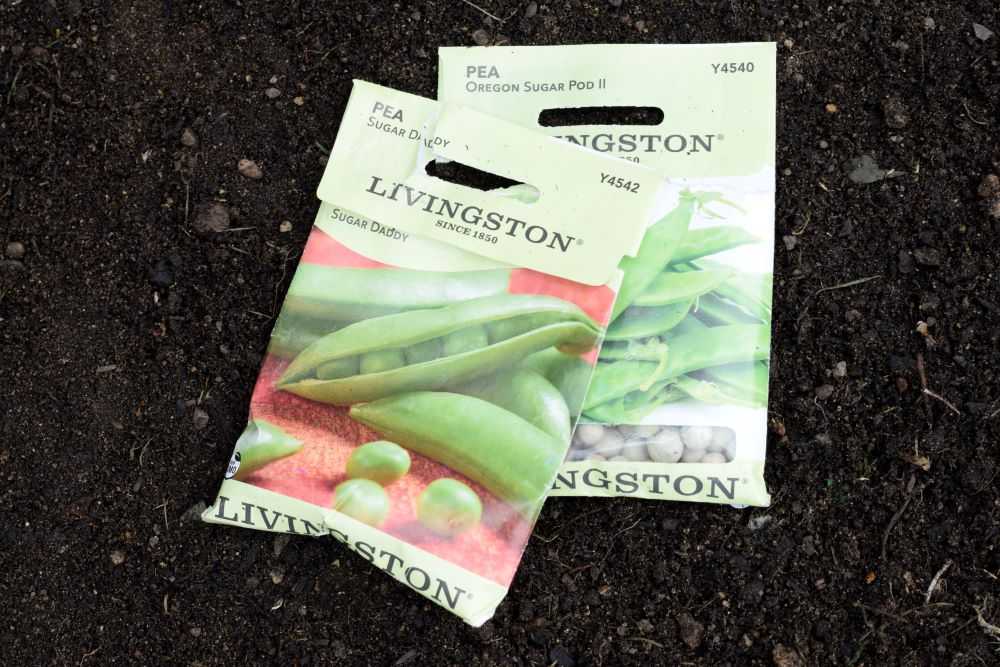
Peas
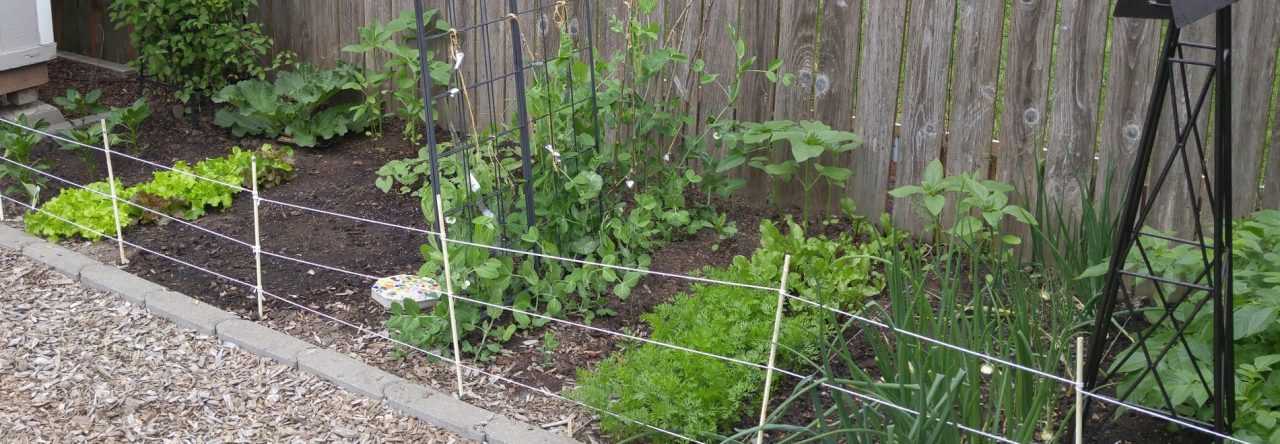
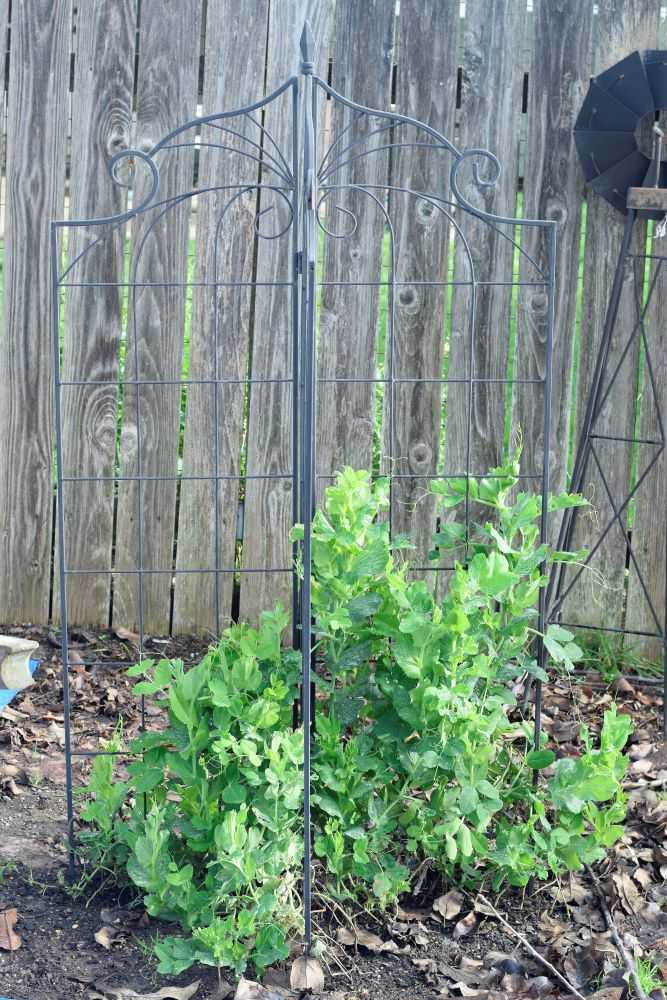
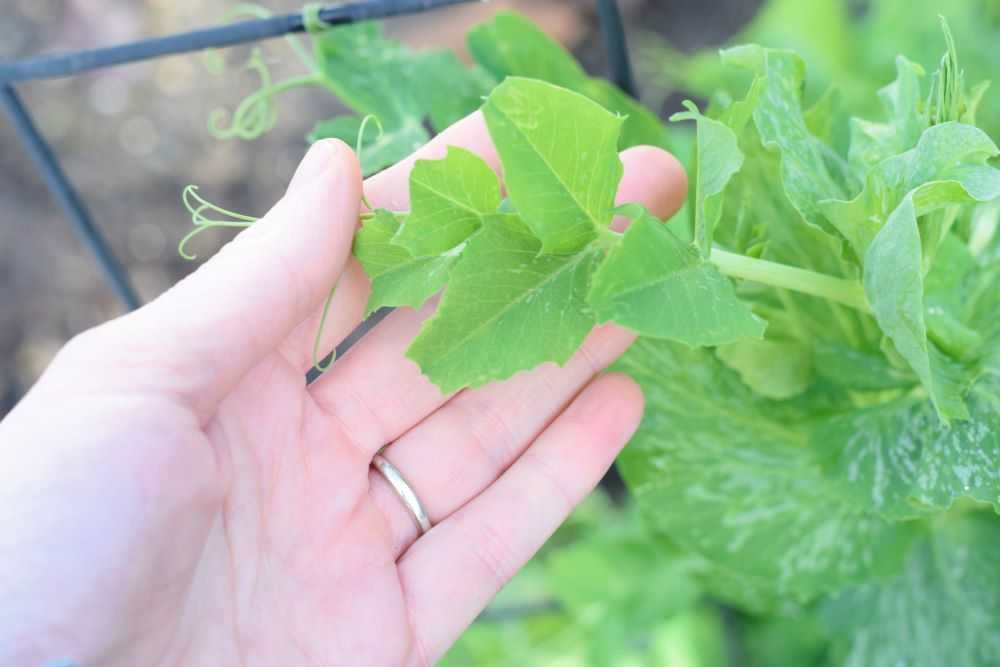
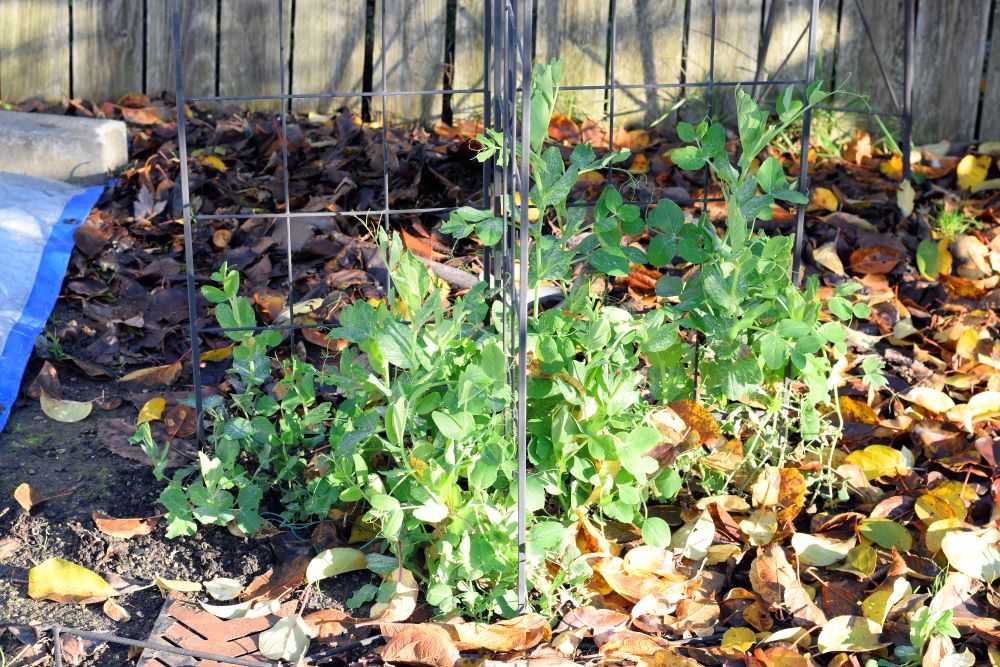
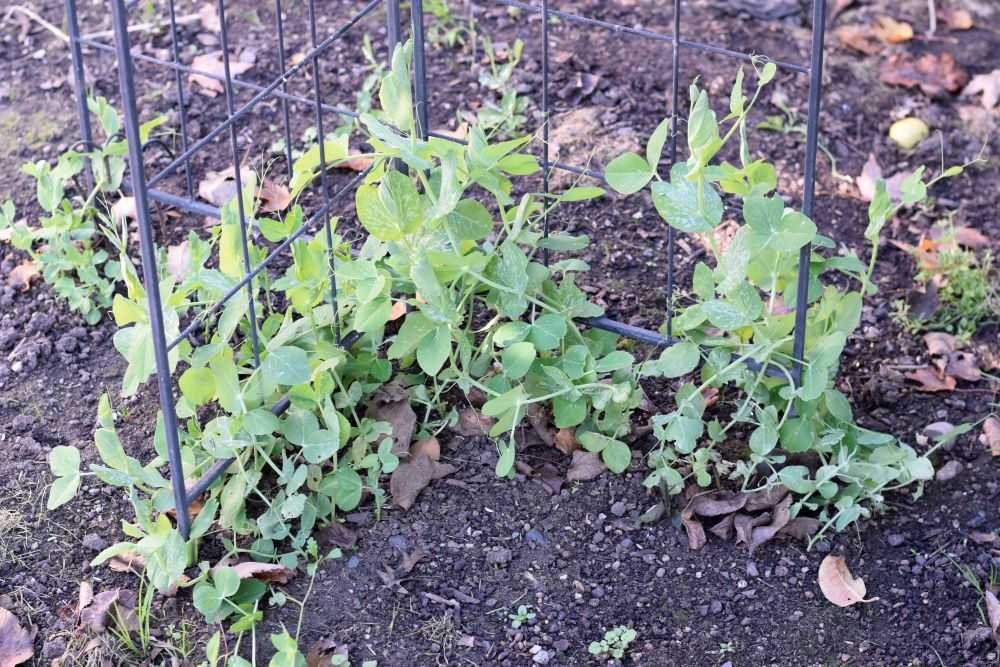
My peas are still doing well! I planted them last fall and they continue to grow and look very healthy. The birds have been pecking at them but luckily the damage is minor since the plants are well established. If the peas were still small seedlings the damage would be much more severe. I am looking forward to fresh peas in the next few months!
My peas are healthy and continue to grow!The birds have been pecking the edges of some of the leaves. Luckily the plants are large enough to withstand this damage.
Garlic
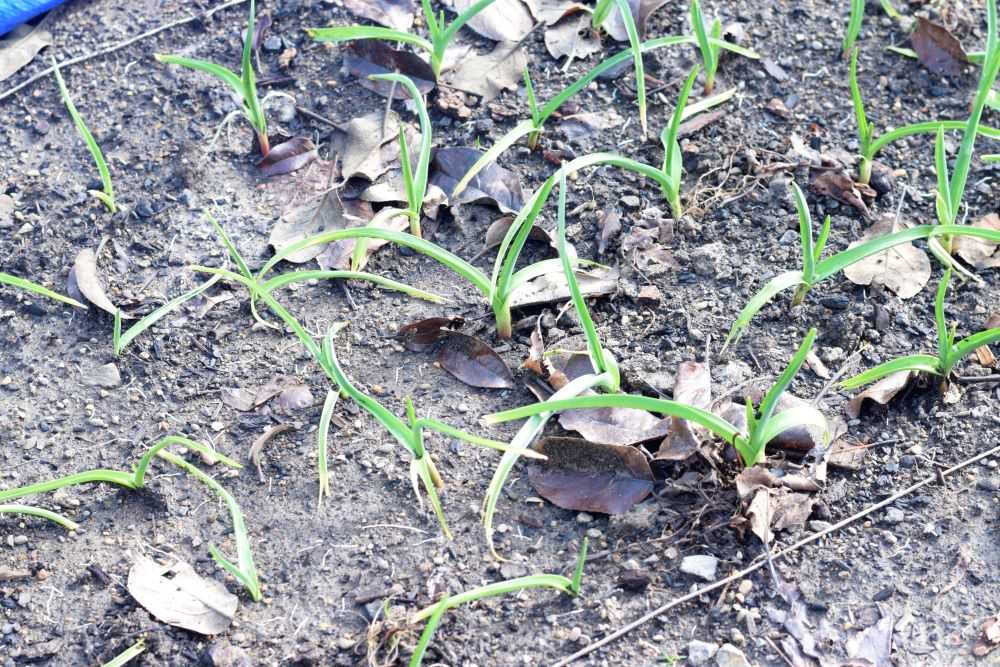
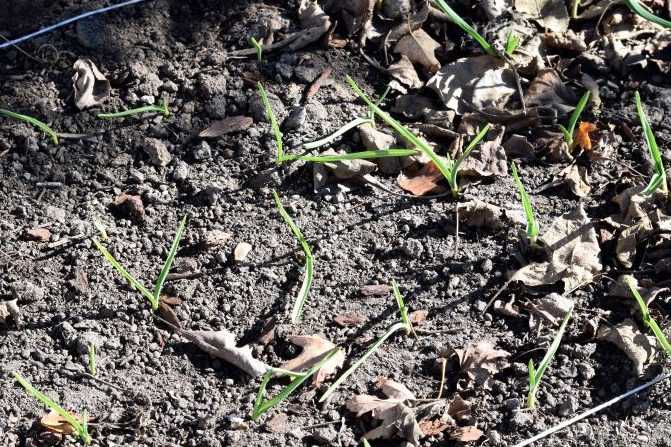
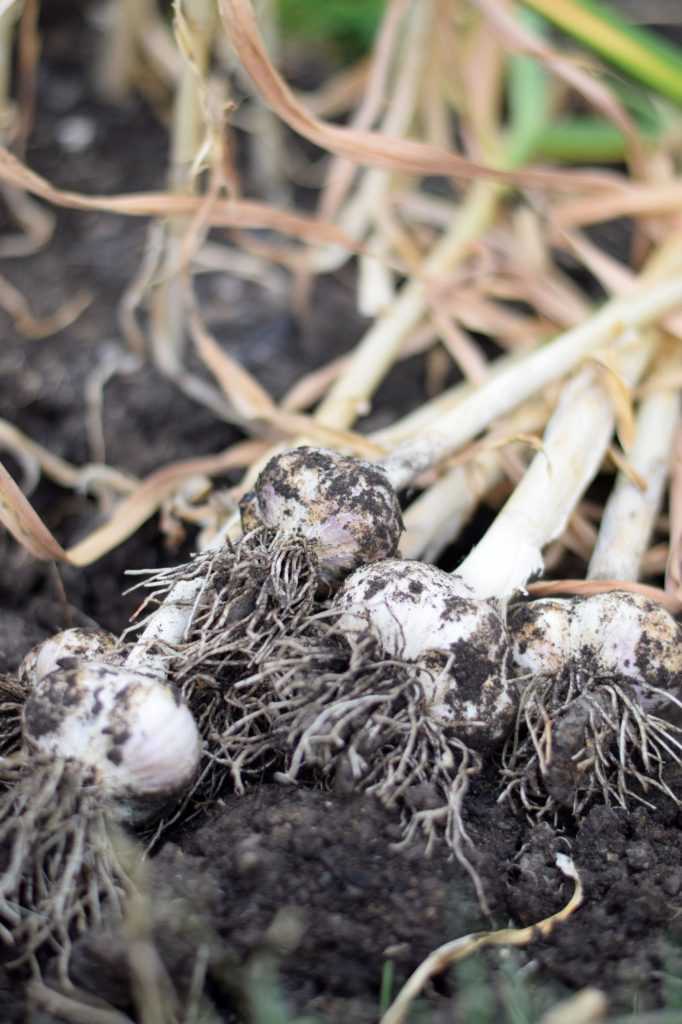
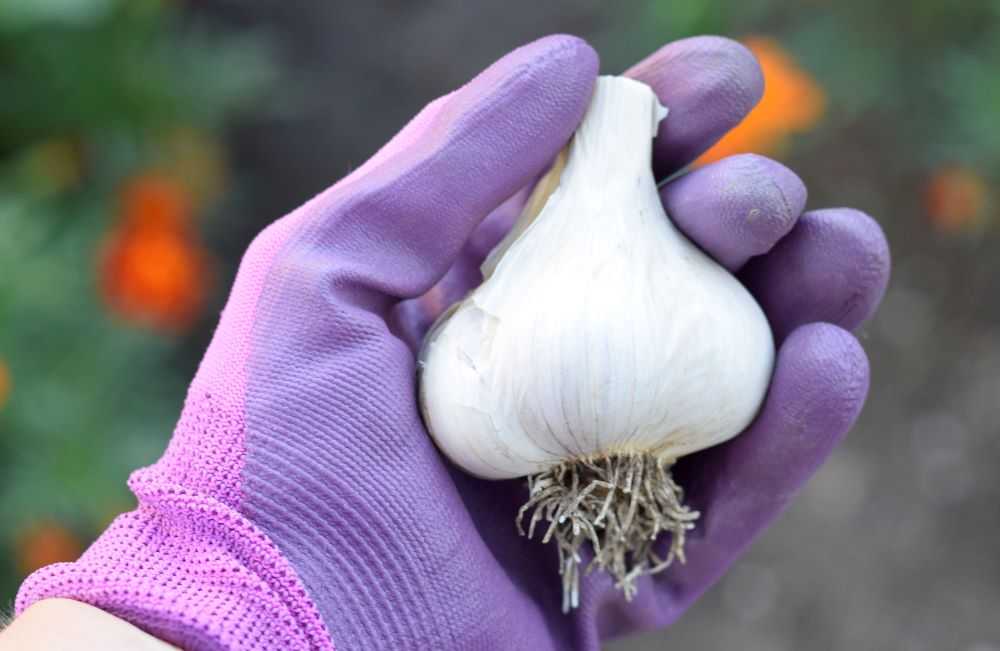
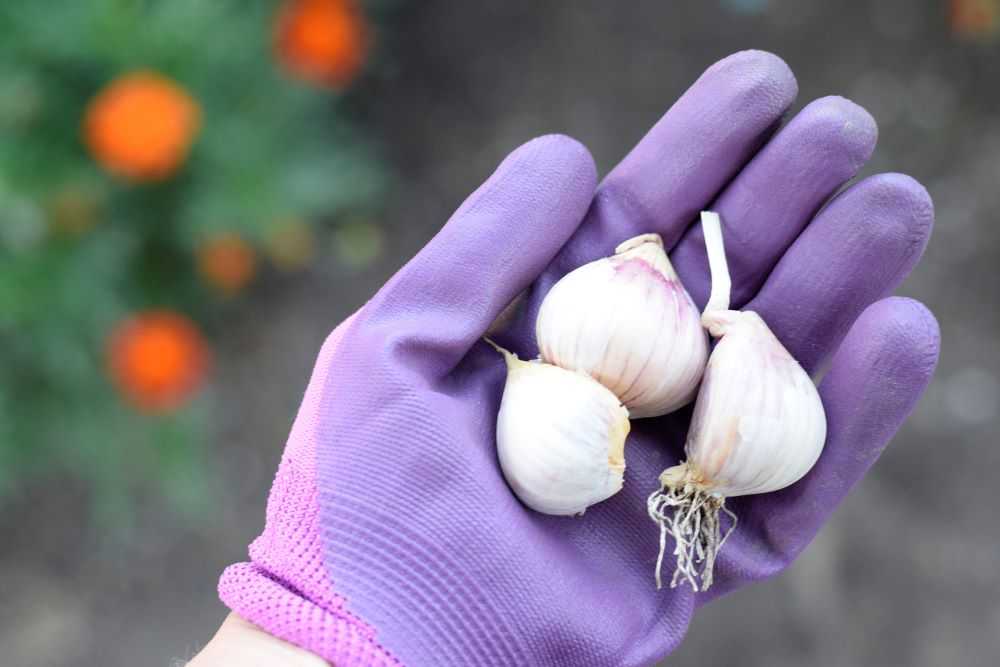
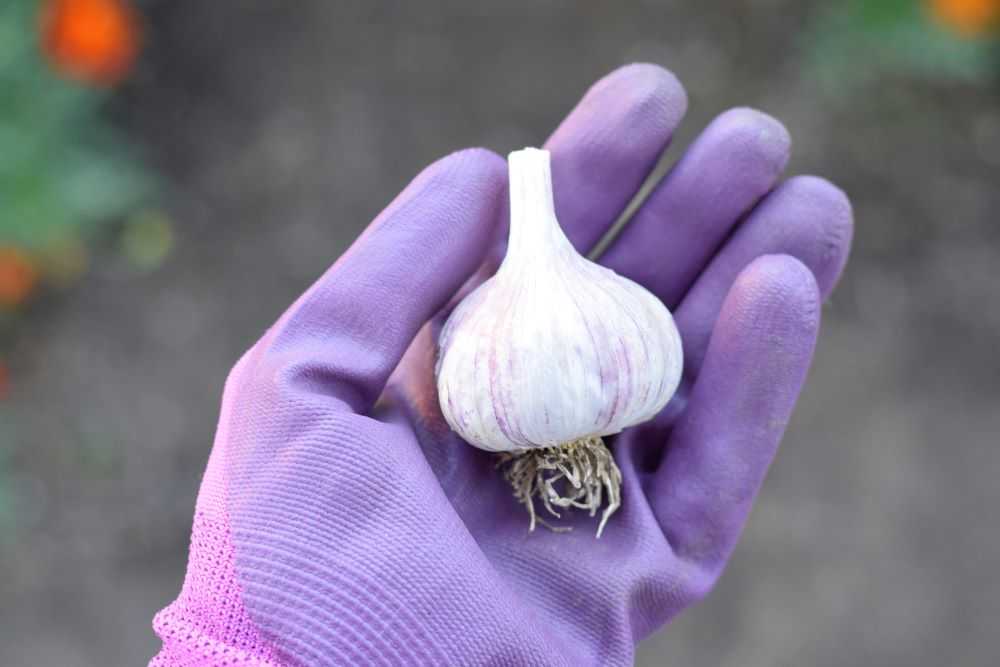
My garlic is still doing well after planting it last fall. Since we have been having mild weather this month, I was able to remove the mulch covering the garlic. The leaves greened up nicely and they are now 5-6 inches tall.
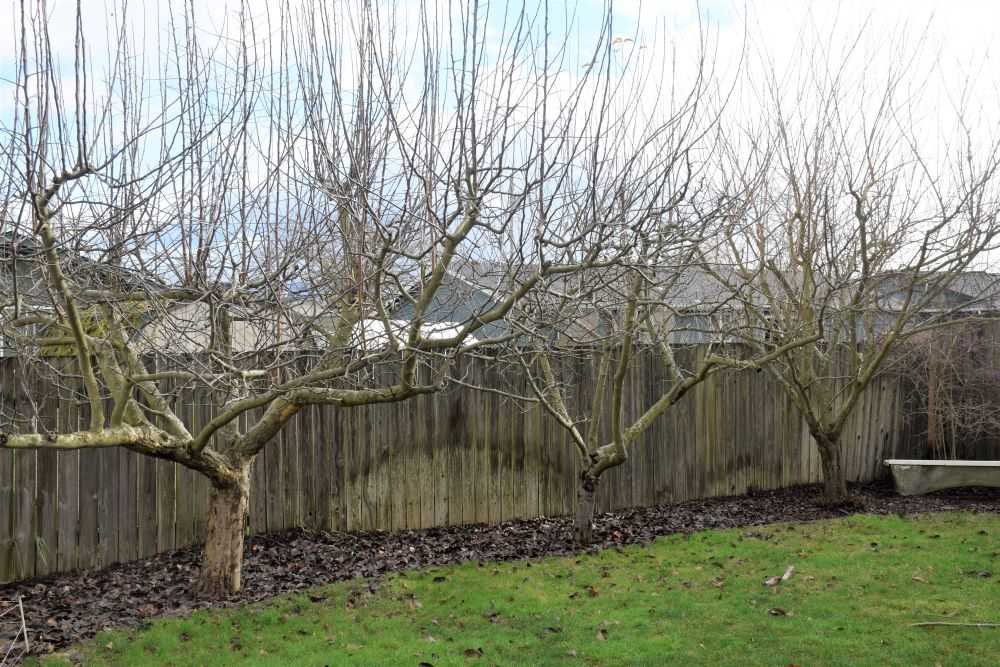
We have two apple trees, a plum tree, and two cherry trees. I have been pruning them over the last month, a little at a time between rain storms 🙂 My trees are 11 years old now and always put on a large amount of growth during the season. This makes pruning a big job. But this is what it takes to keep the trees open, healthy, and productive. I am looking forward to our fruit harvests this summer!
My fruit trees this winter before pruning. My trees usually put on a lot of growth during the season so pruning is a big job!
Strawberries
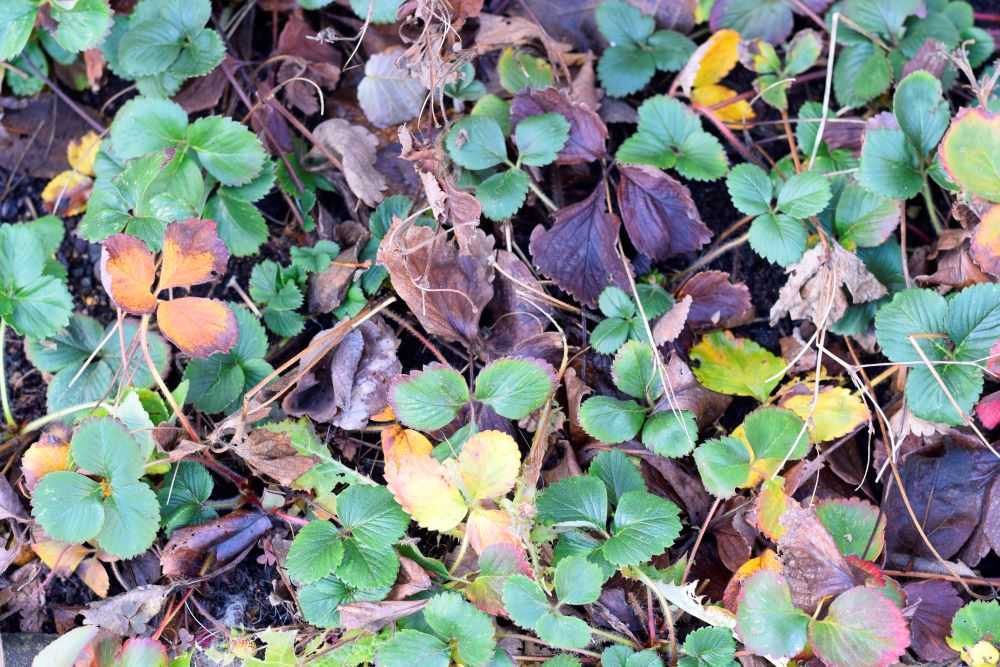
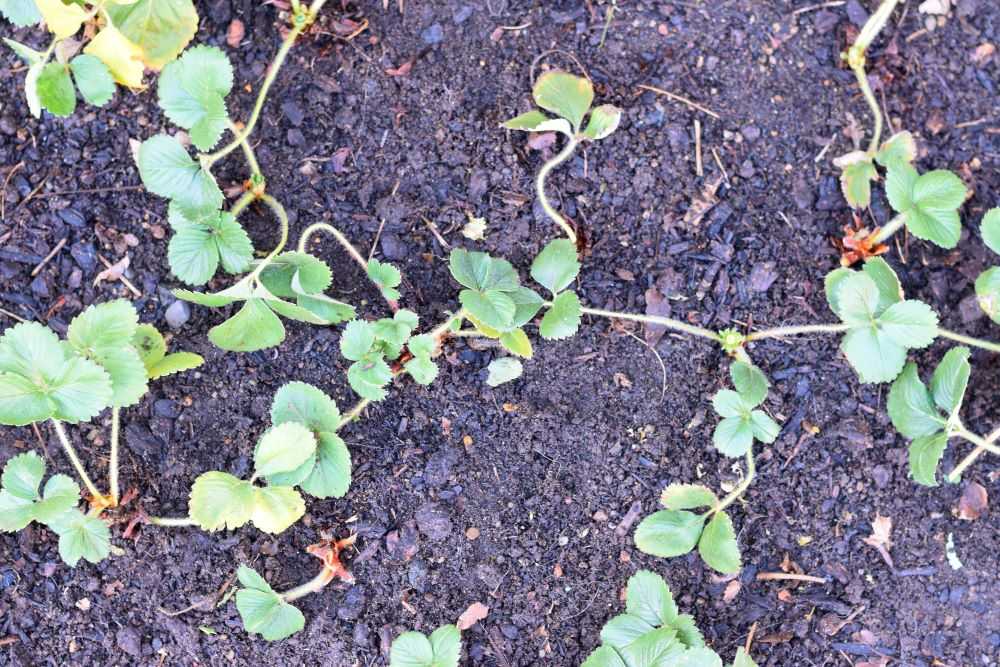
I cleaned up my strawberry patch earlier this month. It was very crowded from last year’s vigorous summer growth. I removed dead plants, dead leaves, and runners. I also adjusted the spacing on plants that were too close together. I am looking forward to a large harvest of sweet strawberries this spring!
Before pruning my strawberries were a tangled mess.Afterwards they were spaced appropriately with all dead leaves and runner removed. Now the plants will be much healthier and productive!
Flowers
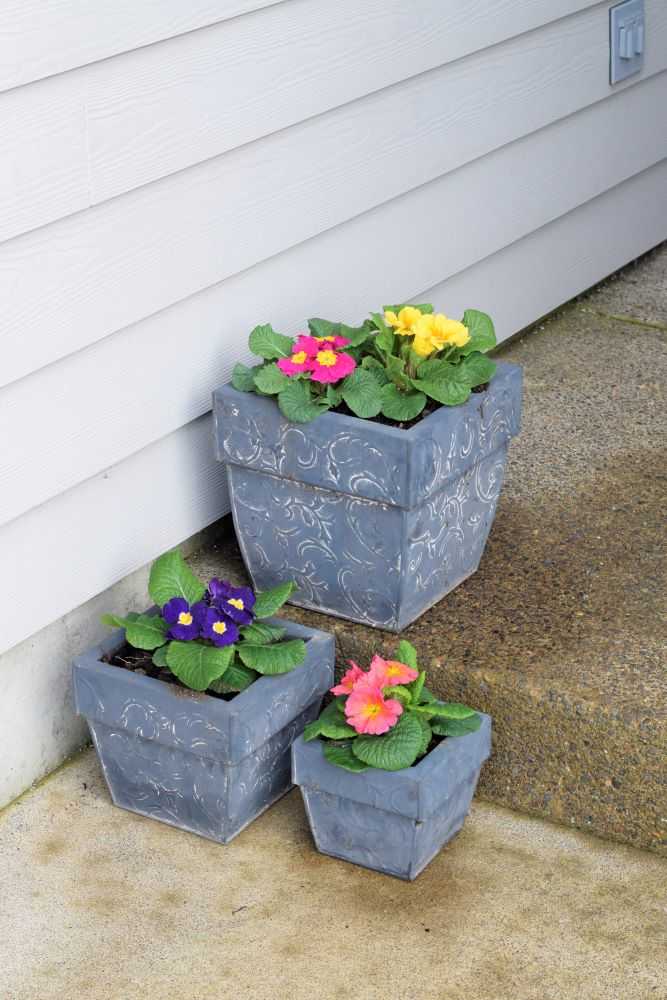
Last weekend I planted some primroses out front. Primroses are very cold hardy which makes them an excellent choice for this time of the year. I love the cheery colors!
Cheery primroses add some color to our front porch.
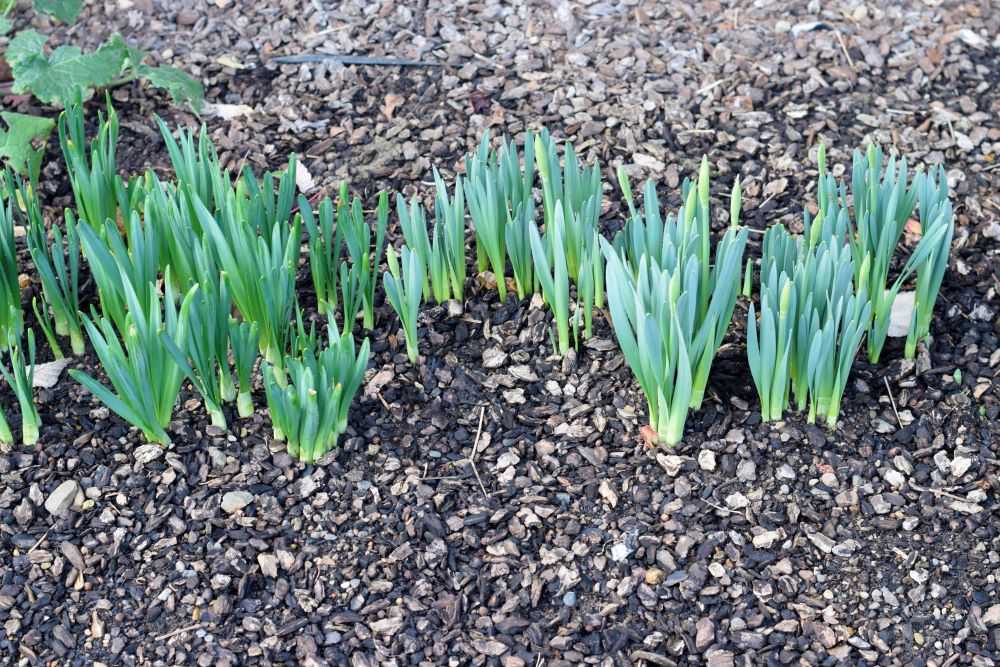
My daffodil bulbs are also starting to come up in my flower beds. This is a sign that spring is on it’s way!
Our daffodils are starting to emerge. Spring will be here soon!
Final Thoughts
Well, that’s it for January! It is hard to believe that spring will be here in only two short months 🙂 What have you been up to in your garden this month? Let me know in the comments below!
December is here already! It is definitely starting to feel like winter and the weather has been changing a lot this past month. We have had lots of rain and on clear days the temperature routinely gets down to freezing at night. Despite this, I am still working in the garden on the few sunny days we have. Here is what has been going on in the garden this month:
Getting the Garden Ready for Winter
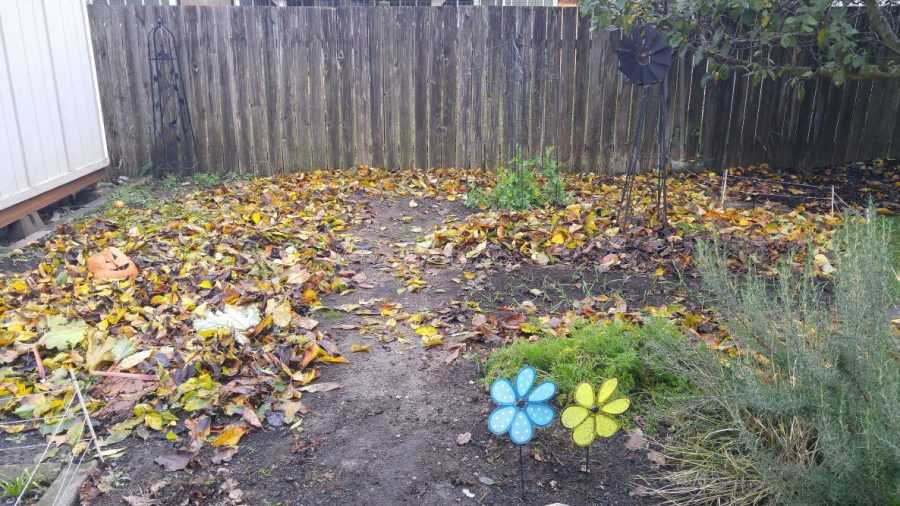
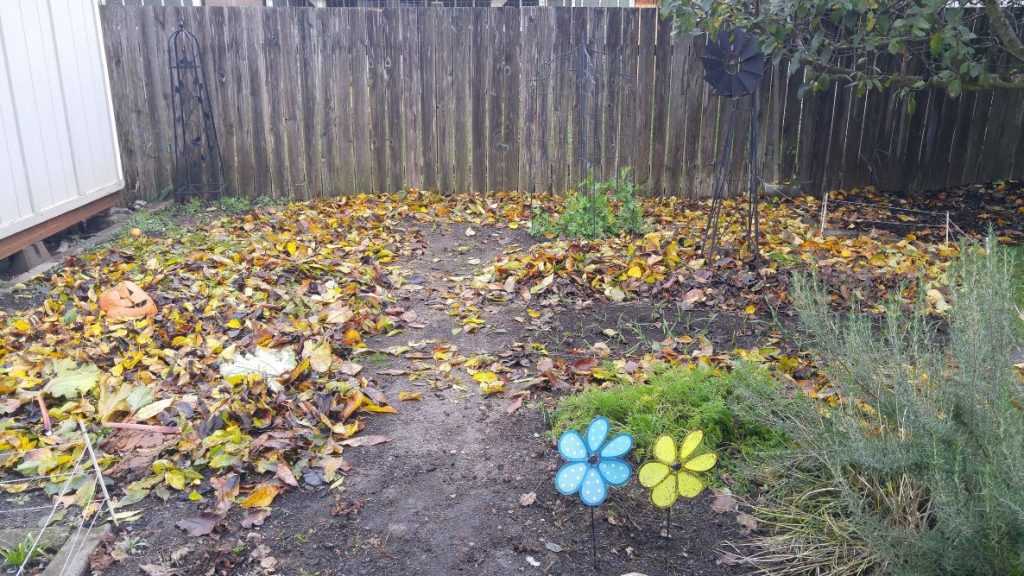
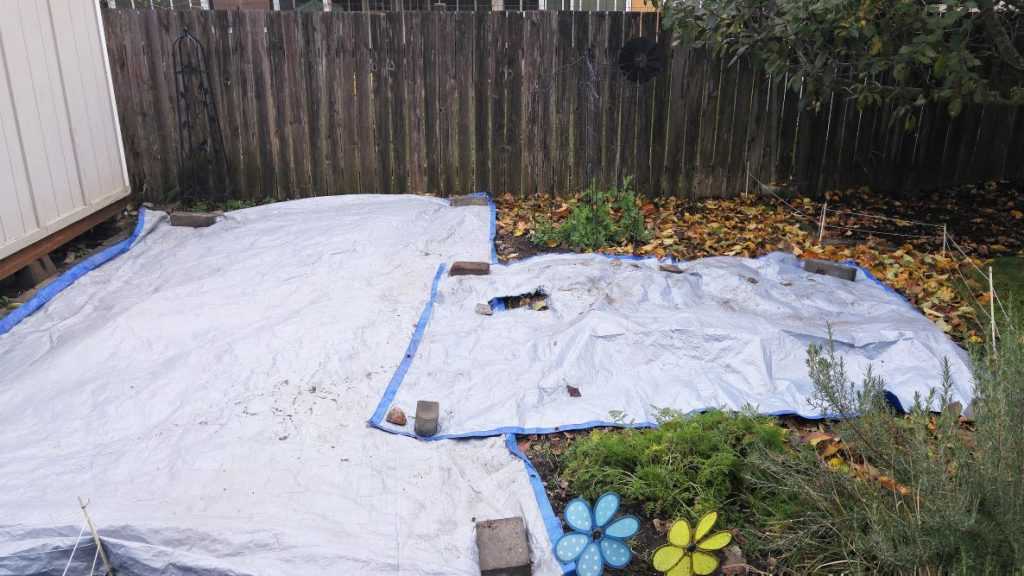
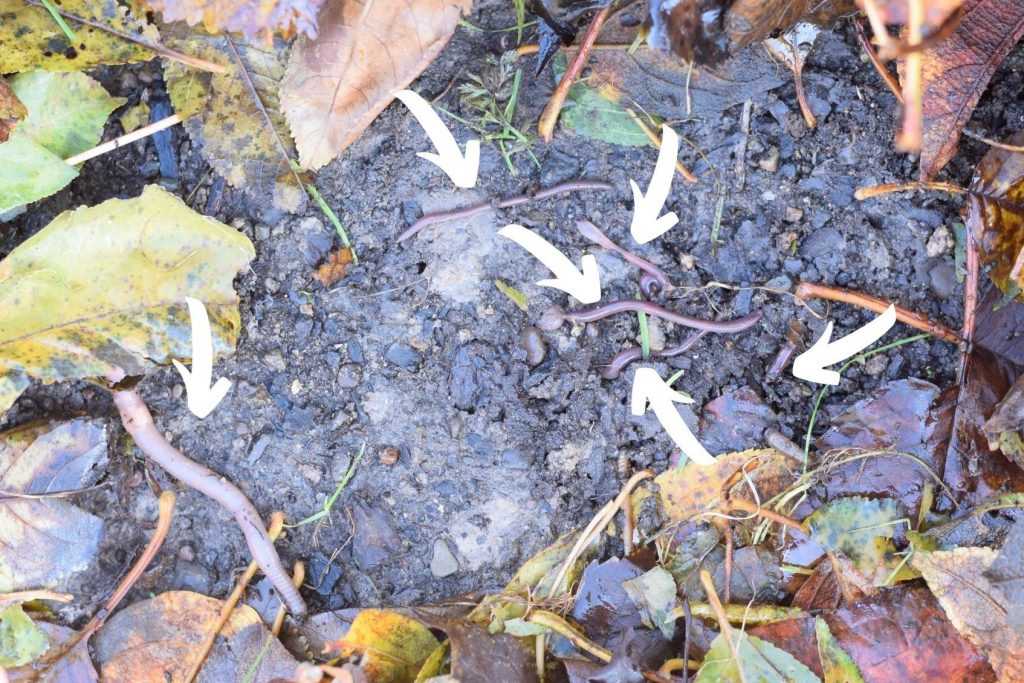
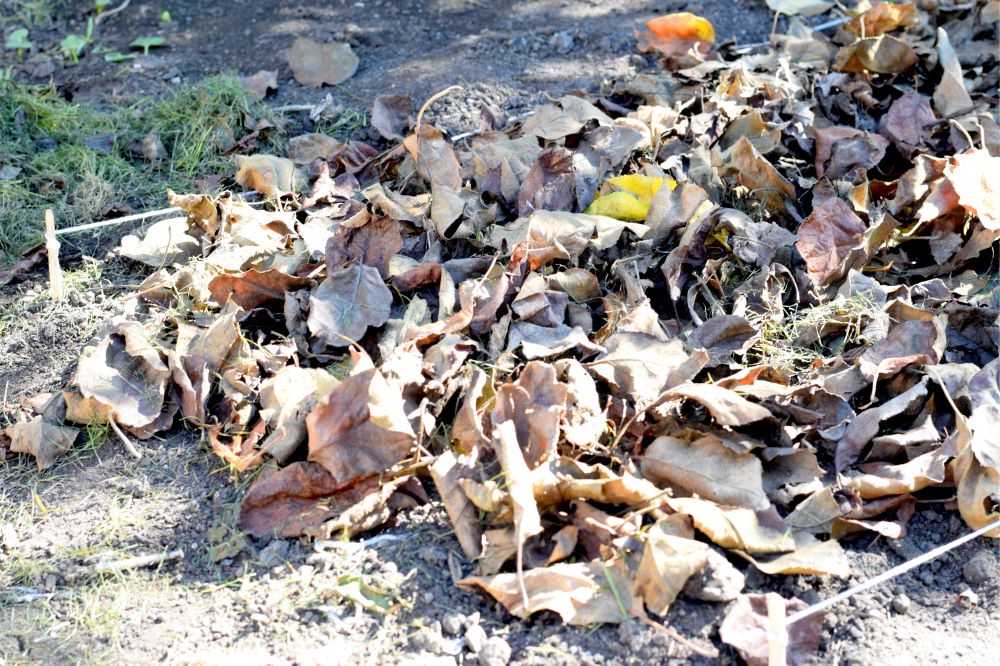
The main thing I have been working on is putting the garden “to bed” for the winter. I covered the garden with a thick layer of leaves from our trees and covered it with a tarp. The tarp helps to hold the leaves in place so they do not blow away. Also, it prevents soil erosion and leeching of nutrients from the heavy rains. The worms will be very happy and hopefully by spring most of the leaves will start to break down into the soil.
We cover our garden with a layer of leaves. They will break down over the winter and add organic matter to the soil.After the leaves are on we covered our garden area with a tarp to hold them in place.Look at all these worms! They will help to break down the leaves over time.
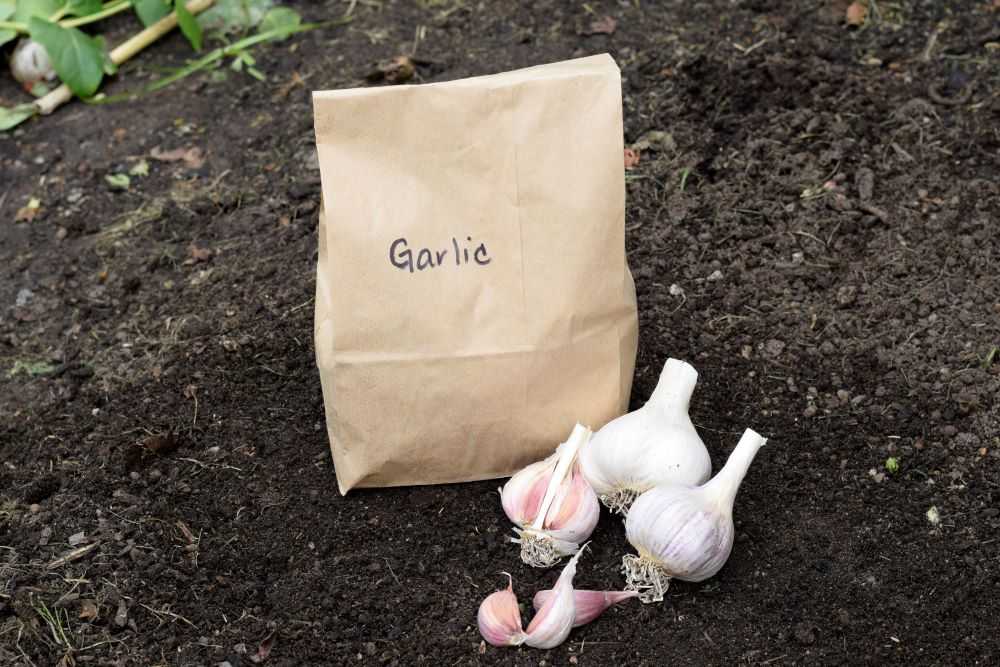
Garlic
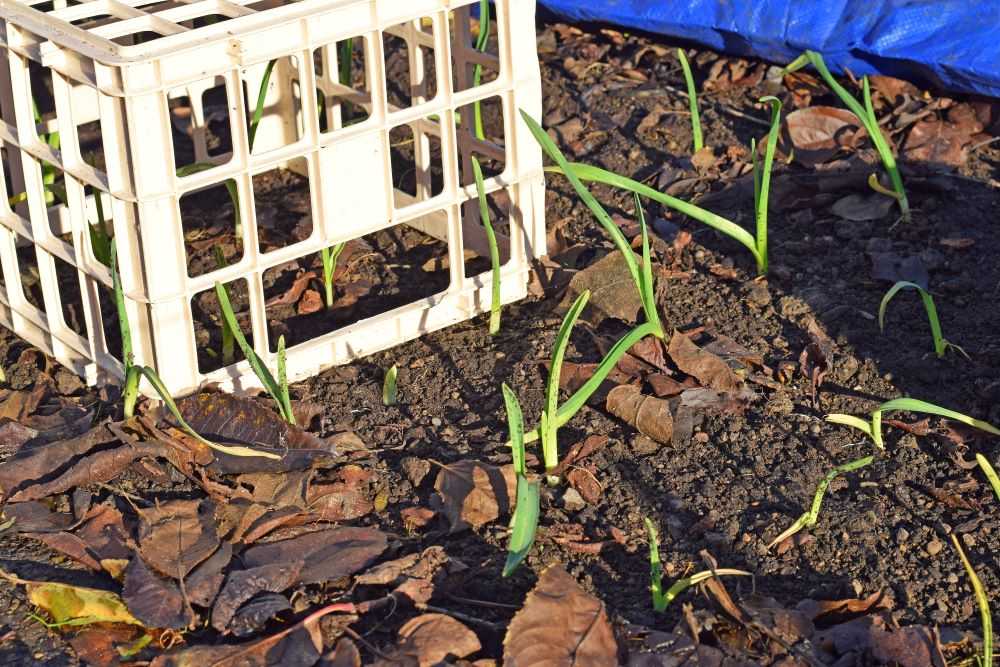
I planted our garlic at the beginning of October. We had some very nice weather and it grew about four inches tall by November. Since the weather is colder now it has slowed its growth. I mulched around the garlic shoots with leaves. Since I covered much of my garden with a tarp over the winter, I put some overturned buckets and a crate over my garlic so the tarp (and heavy rainwater) would not be sitting directly on the plants. I will uncover them in the early spring when temperature warm and growth begins.
Since I covered our garden with a tarp over the winter, an overturned crate or bucket will prevent the tarp (and heavy rainwater) from sitting directly on the plants.
Peas
My peas are still doing great! They are about 12-18 tall now and very healthy. Yesterday we had temperatures in the high 20’s and a hard frost. The peas looked fine as soon as the frost melted later in the day. Although peas should be hardy down to about 20 degrees, I will cover them with a blanket if the temperatures get down to the mid-20’s or below because I do not want to chance any damage. I am looking forward to earlier peas in the spring!
Our peas are doing great despite some heavy frosts. I am already looking forward to our peas next spring!
Carrots
Our carrots are one of the few crops still in the ground. We have just a few carrots left this season, which is a real treat. Storing them in the ground has kept them crisp and crunchy. It is nice knowing that I can go outside and dig some fresh carrots whenever I need them!
Blackberries
My blackberries have gone dormant for the winter and have lost some of their leaves. We had some strong winds that blew the canes off of their trellis so I had to go outside and carefully wrap the canes back around the wires.
Several weeks ago I decided to start a few new blackberry plants, so I allowed them to root both in a pot and in a new area in my planting bed. You can read more about propagating blackberries here.
It is very easy to propagate blackberries! Here I started one in a pot for a friend.
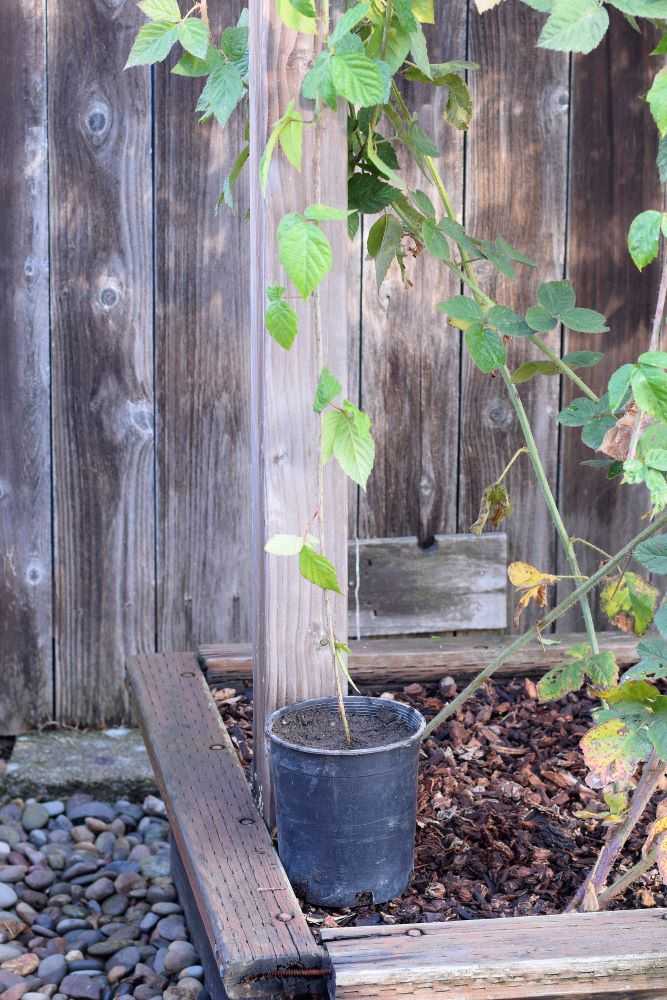
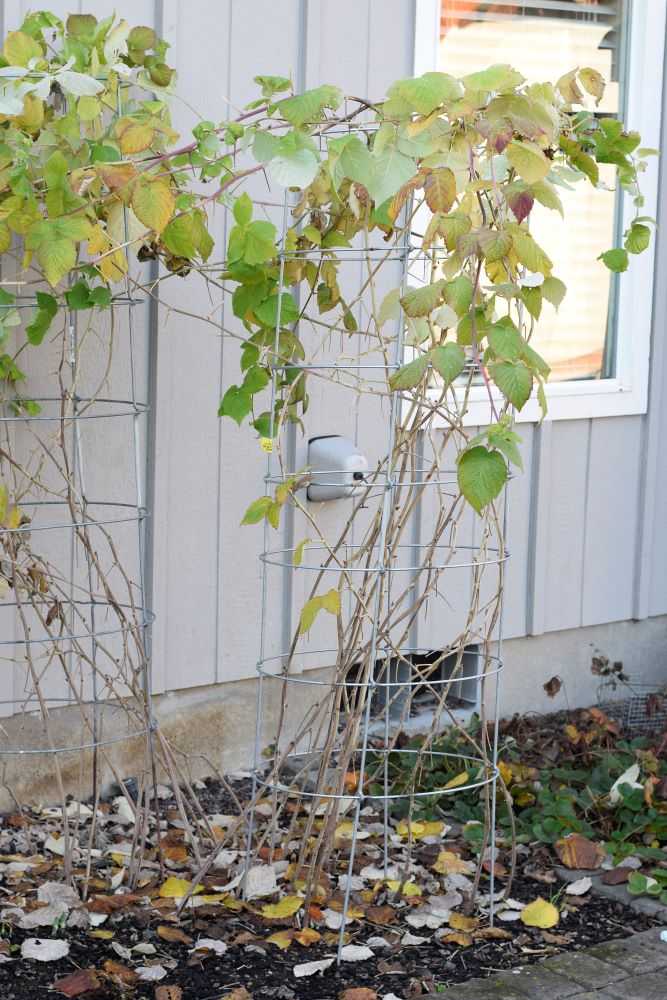
Raspberries
Our raspberries have stopped growing for the year and they have lost most of their leaves. I planted them a year and a half ago as an experiment and they took off and did much better than expected! I do not have a permanent trellis for them yet (one of my projects for next year!) so I put them in tomato cages to keep the canes off of the ground. That seems to do the job, although they do not look too pretty. I pruned away some of the excess shoots as I was putting them in the tomato cages so the plants are not overcrowded. The raspberries look very healthy and I am looking forward to a large harvest next summer!
Tomato cages are helping to keep my raspberry canes off of the ground this winter. I plan to make a permanent trellis next year.
Final Thoughts
It has been a slower month around here and nice to finish up some last gardening chores for the year. Have you been doing anything in your garden this December? Let me know in the comments below!
The weather is getting COLD! We had our first freeze here in Oregon at the end of October, which is about a month ahead of schedule. I have been preparing my garden for the winter and finishing up for the year. Here’s what’s happening in the garden this month:
Carrots
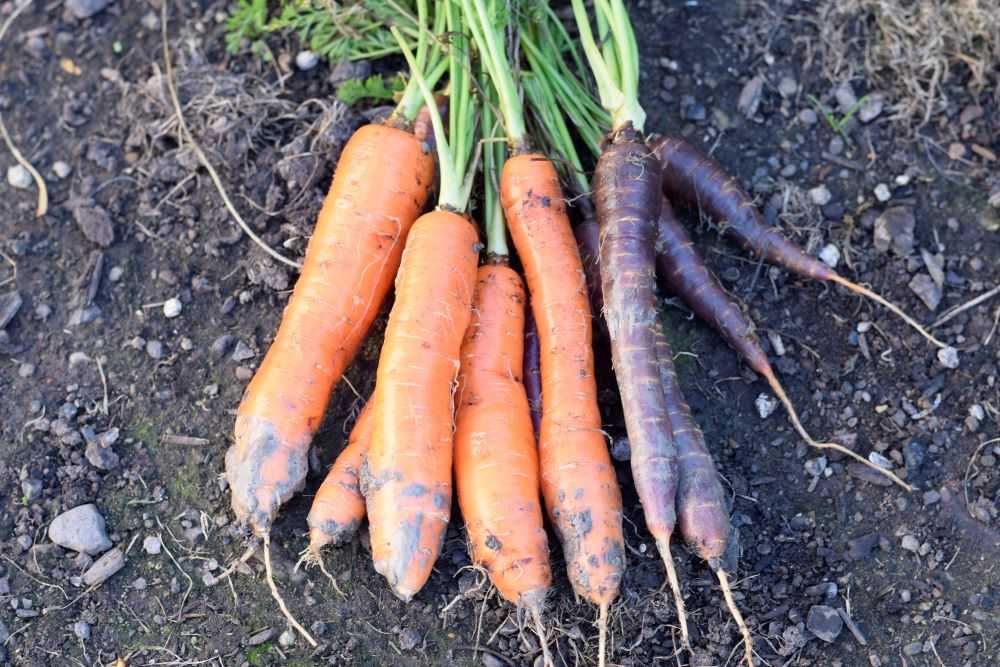
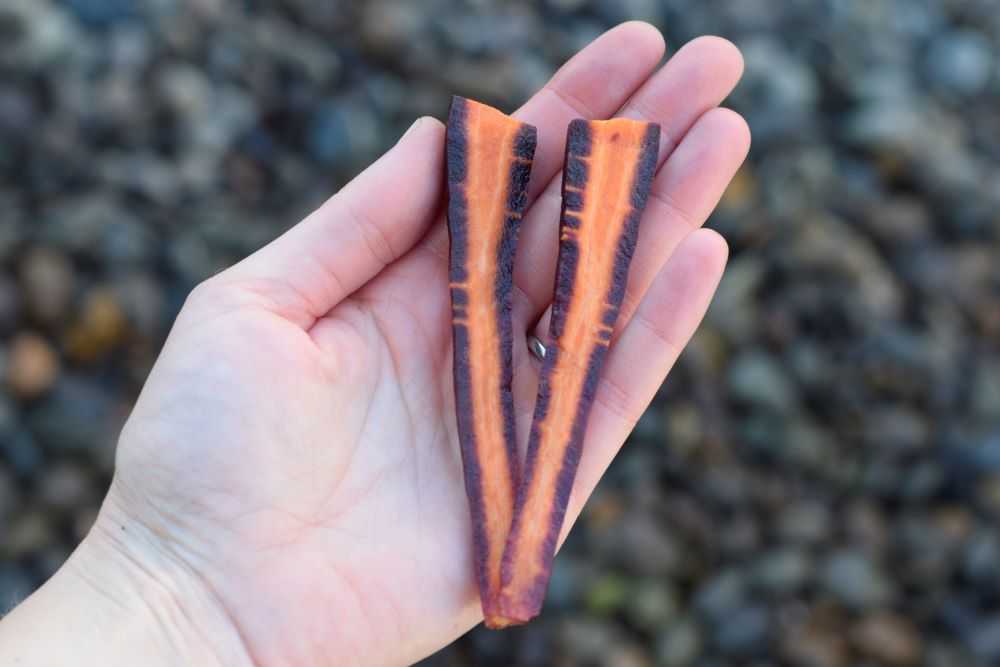
Carrots are one of the few crops still in the ground. We have quite a few carrots left this season, which is a real treat. I like to leave them in the ground because it acts like a big refrigerator, keeping them crisp and crunchy to use over the winter. Although the tops are starting to die back, the roots are big and healthy. It is nice knowing that I can go outside and dig some fresh carrots whenever I need them!
Although the tops are starting to die back, my carrots are still in the ground and doing well!Beautiful home grown freshly dug carrots! Purple Haze and Bolero are shown here.Purple Haze carrots are absolutely beautiful! They are crispy and sweet too!
Garlic
I planted our garlic at the beginning of October. We had some very nice weather and it has green shoots that are already a few inches tall! Next year I will plant it a little later to prevent this because the green shoots make the bulbs more susceptible to winter injury. I will continue to mulch around them with leaves to insulate and protect them over the winter.
My garlic is about 4 inches high now. I will mulch around the shoots to protect them over the winter.
Peas
My peas are doing great! They are about a foot tall now and very healthy. The slugs and snails have been bothering them a little so I have been putting some slug bait out to take care of the problem. I will mulch around them as soon as the weather gets colder. I am looking forward to earlier peas next year!
My peas are about a foot high now. Next spring they will have a head start and start producing earlier.
Popcorn
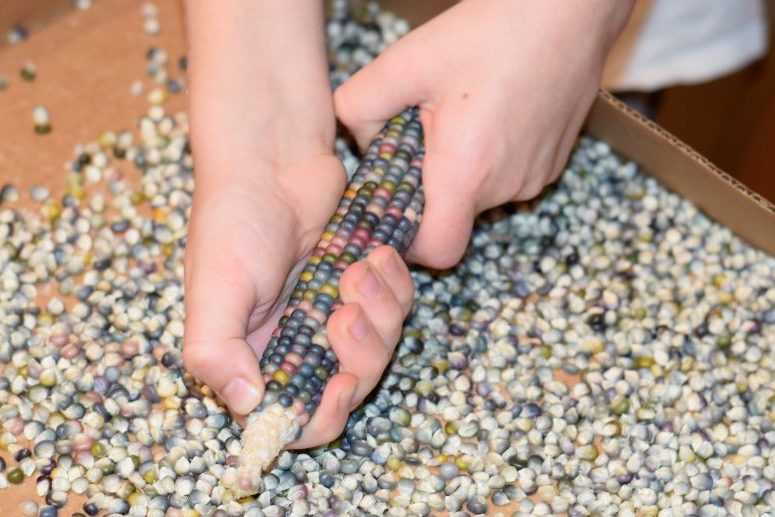
We had so much fun this year growing popcorn! We harvested it last month and then let the cobs dry in the garage for a few weeks before removing the kernels. My kids enjoyed helping with this part!
My kids enjoyed helping to remove the popcorn kernels from the cobs. We got about 4 cups of popcorn this year!
Since the seeds were still not all of the way dry yet, I spread them out on a big pan and set them on top of the cabinets where they would not be disturbed so they could continue to dry. I tested a few kernels every few days until they popped well. Then I transferred them to pint jars for longer term storage.
We got around 4 cups of popcorn kernels from our small 4 x 4 inch raised bed, which does not include the 10 or so ears that we saved for decoration around the house. It was such a fun thing to include in our garden this year!
Getting the Garden Ready for Winter
I have been starting to rake leaves and scatter them over the garden. I also spread some lawn clippings around to enrich the soil for next year. Once all of the leaves have fallen at the end of November I will cover most of the garden (but not where I have things planted) with a large tarp to help hold the leaves in place so the worms can go to work! As much as I love working in the garden, I am looking forward to a few months off!
Are you done with your gardening chores for the year? Let me know how things are going in the comments below. As always, Happy Gardening!
The mornings are cool and the leaves are turning colors. Fall is here! And that means that it is the perfect time to plant garlic in your garden!
While garlic can be planted in the fall or the spring, I usually prefer to plant my garlic in the fall. This way it can develop a good strong root system over the winter. The garlic has a longer time to grow during cool weather which may lead to larger heads. Some people think that fall planted garlic also tastes better and has a more complex flavor.
A second reason why I usually plant my garlic in the fall is because I am usually planting garlic that I grew the previous season. By planting it in the fall so I will not have to store it as long, so the garlic is less likely to sprout early or have other issues during storage.
This post will explain the different types of garlic and how to plant it step-by-step. Let’s get started!
This post may contain affiliate links, where I earn a small commission from qualifying purchases. I only provide links to products that I use personally and recommend highly.
When to Plant Garlic
Garlic should be planted in the late fall before the ground freezes for the winter. October through early November is the ideal time. It is best to err on the side of starting it too late rather than too early because too much top growth could make it more susceptible to winter injury.
What Type of Garlic to Plant
Make sure that you purchase garlic from a seed company rather than the grocery store. Grocery store garlic may be sprayed with chemicals to prevent sprouting, and it is not guaranteed to be free of disease.
There are two main types of garlic to choose from: hardnecks and softnecks. We will go through the differences below.
Hardneck Garlic
Hardneck garlic has one row of cloves around a stiff woody stem. The cloves are generally larger and there are generally 6-8 cloves per head. Some people think the flavor of hardneck garlic is superior to other types. However, hardneck garlic may not keep as well as softneck types and it is generally less hardy in warmer climates.
Hardneck garlic has one row of cloves around a stiff woody stem.
Popular hardneck varieties include: Music, German Extra Hardy, Purple Italian, German Red, Purple Glazer, and Chesnok Red.
Softneck Garlic
This type of garlic has a few rows of cloves and does not have a central stem like the hardneck garlic. The cloves are generally smaller and there are around 10-20 cloves per head. Softneck garlic can be better in warmer climates and the heads keep for 9-12 months if stored properly.
Popular softneck varieties include: Inchelium Red, Italian Late, Silver White, and Blanco Piacenza.
What Type to Choose
What variety to plant is up to you! Personally I usually plant the hardneck types because the cloves are larger and easier to peel. But depending on where you live the softenecks or hardnecks may grow better. Try a few different varieties and see what you like!
Garlic grows best in full sun. Choose a site that has loose, well drained soil and few weeds.
After I choose where I’m going to plant my garlic, I like to mark my rows with heavy cotton string (affiliate link) tied to popsicle sticks. This helps me to see the edges of the row so I plant my garlic in the correct place.
Step 2: Prepare the Soil
Garlic are heavy feeders but too much fertilizer at this point can make the plants more susceptible to winter damage. You can add a small amount of compost or fertilizer at planting time but this is not required.
If you do add fertilizer, choose one that is higher in phosphorus such as bone meal so it will help the garlic to get a good root system established. It is best to wait to add too much nitrogen until after growth starts in the spring.
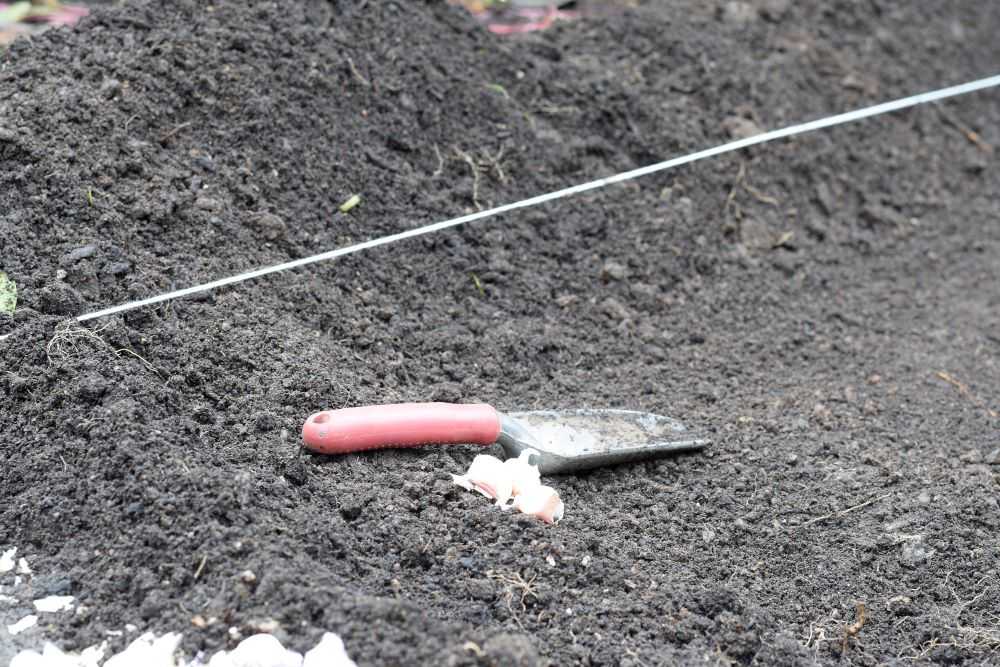
Step 3: Dig a Hole
Garlic needs to be planted 3-4 inches deep. How you dig a hole for your garlic depends on how much you have to plant. If you don’t have many cloves to plant you can just dig a small individual hole for each clove and drop it in. If you are planting your garlic in rows, you can dig a long narrow trench.
I am planting a lot of garlic this year (about 80 cloves!) so I like to plant it in a wide row about 18-24 inches wide. Instead of digging individual holes, I use a rake to move all the soil off to the sides of the row. This way I can plant the garlic all at once.
Dig a hole for your garlic. Since I have so much garlic to plant I plant it in a wide row.
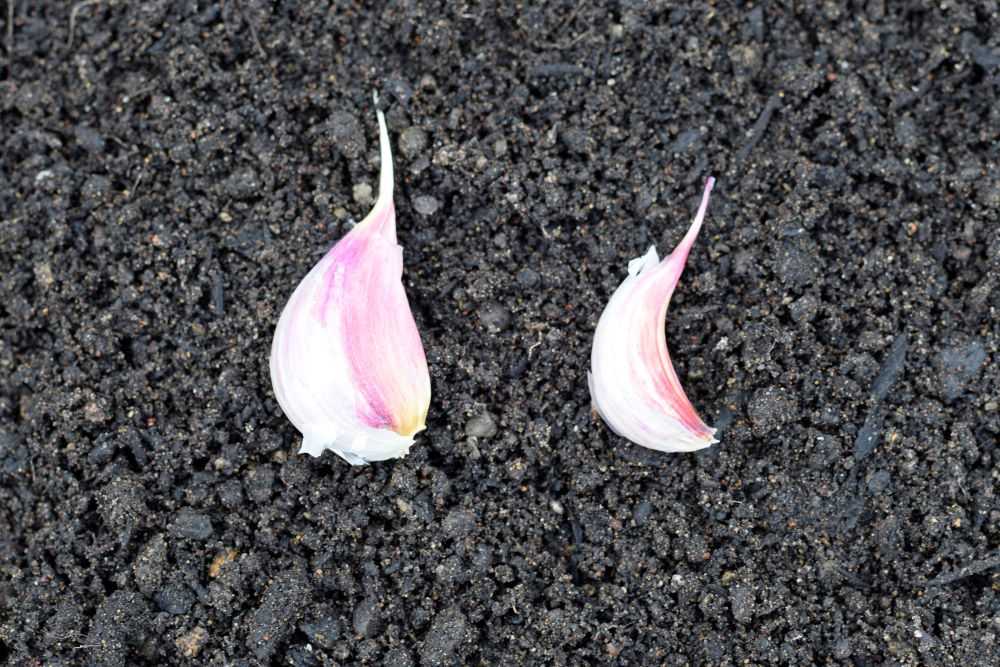
Step 4: Separate the Garlic into Cloves
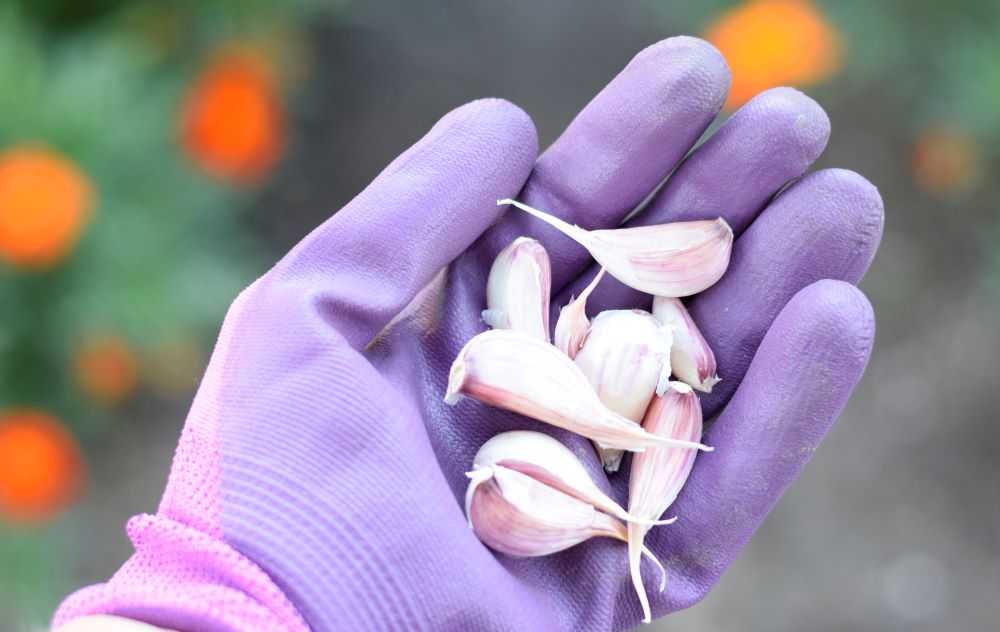
Carefully separate the garlic heads into cloves right before planting. Each of these cloves will eventually grow into a whole head of garlic. Try to keep the skins intact because they will help protect the cloves.
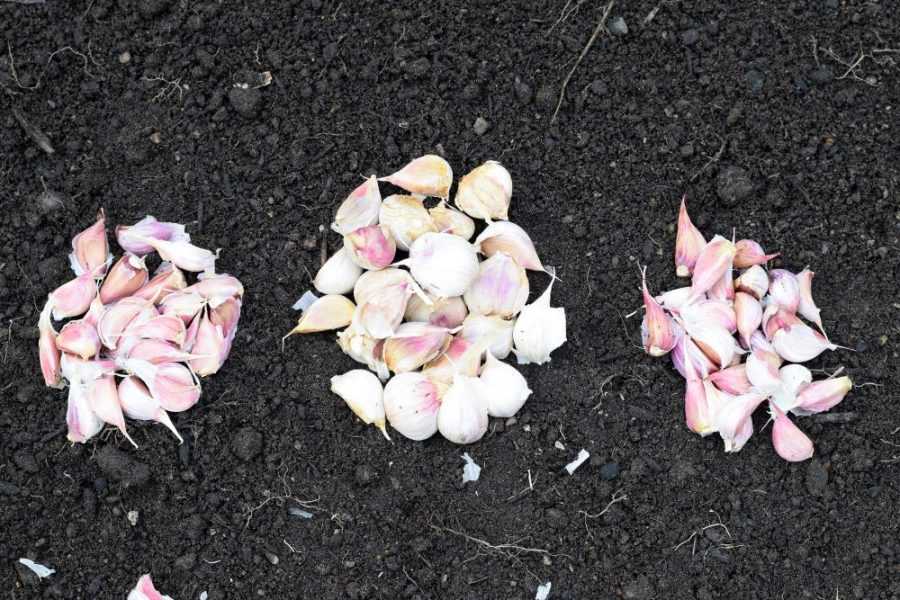
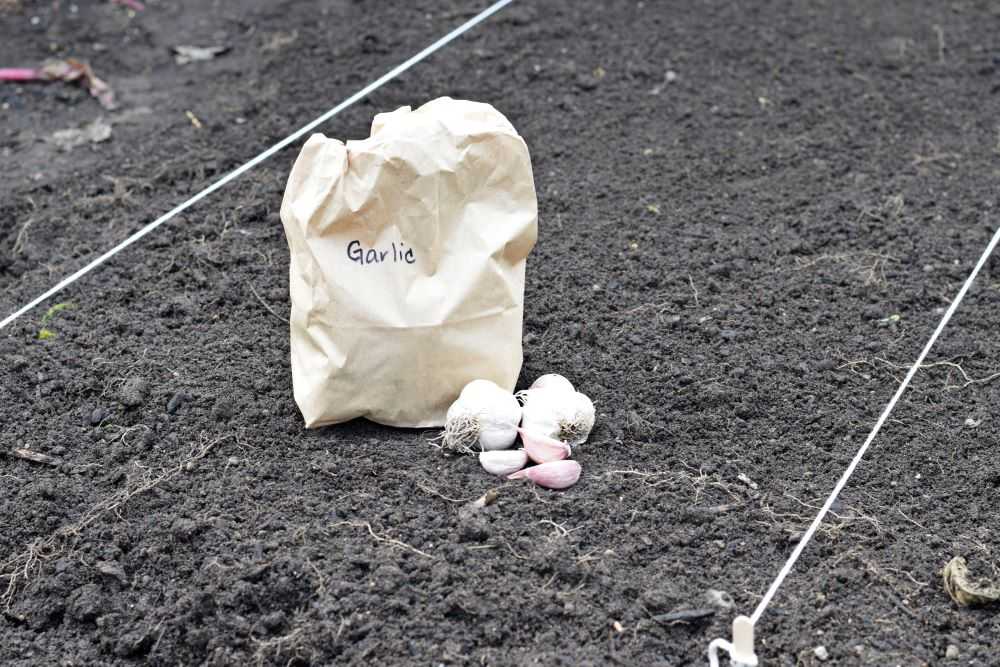
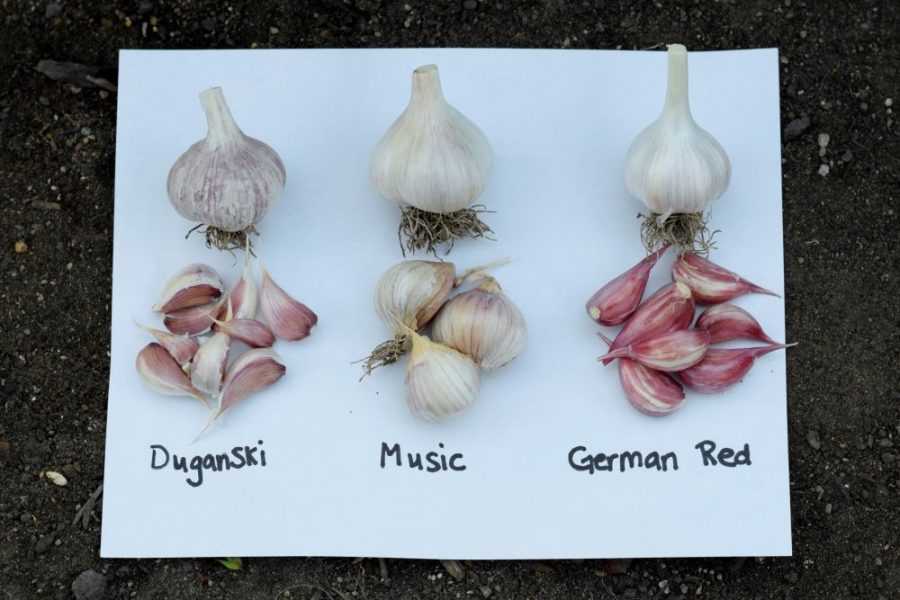
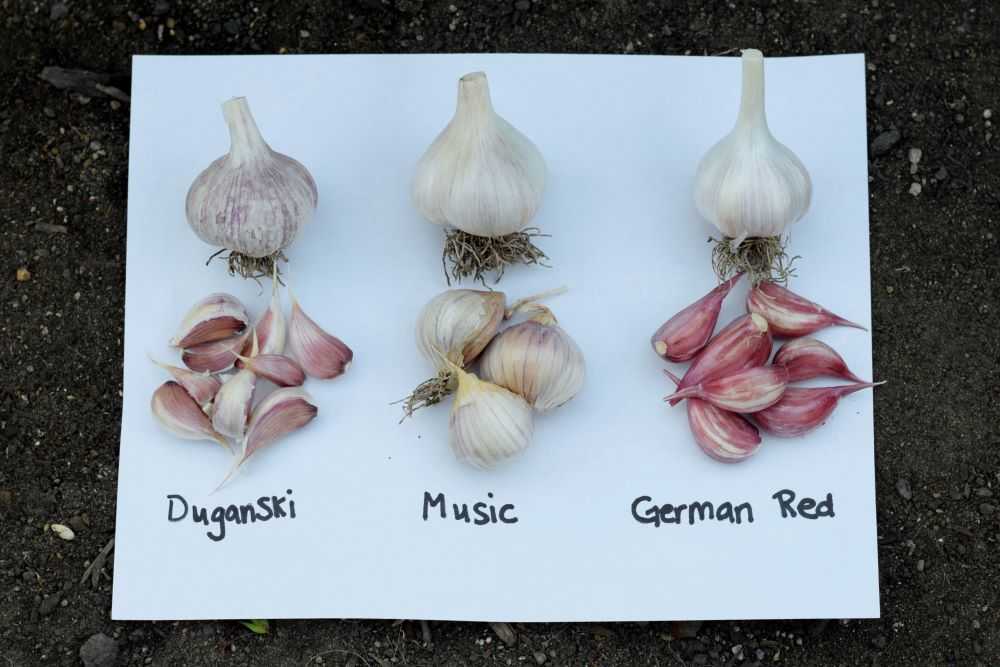
Separate the garlic into cloves right before planting. Today I am planting three varieties of garlic: Duganski, Music, and German Red.
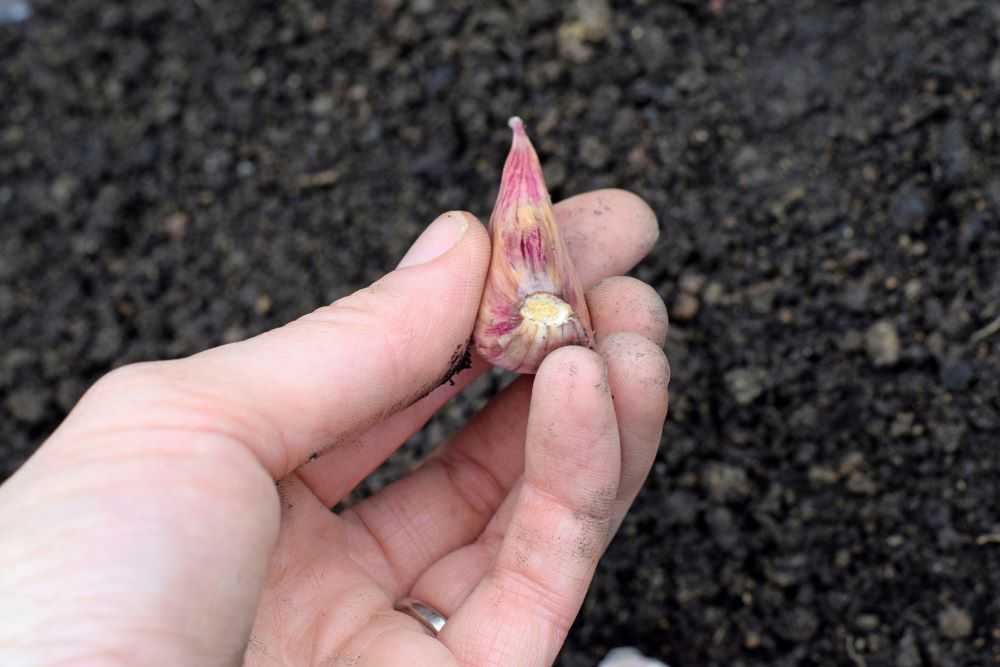
If you have more garlic than you need, select only the biggest cloves to plant and save the smaller ones for cooking. Larger cloves produce larger plants. You cannot get a big garlic plant from a puny clove!
Larger garlic cloves produce larger plants. After I have separated all of my garlic cloves, I select the biggest to plant. I will save the smaller cloves like the one on the right to use in the kitchen.
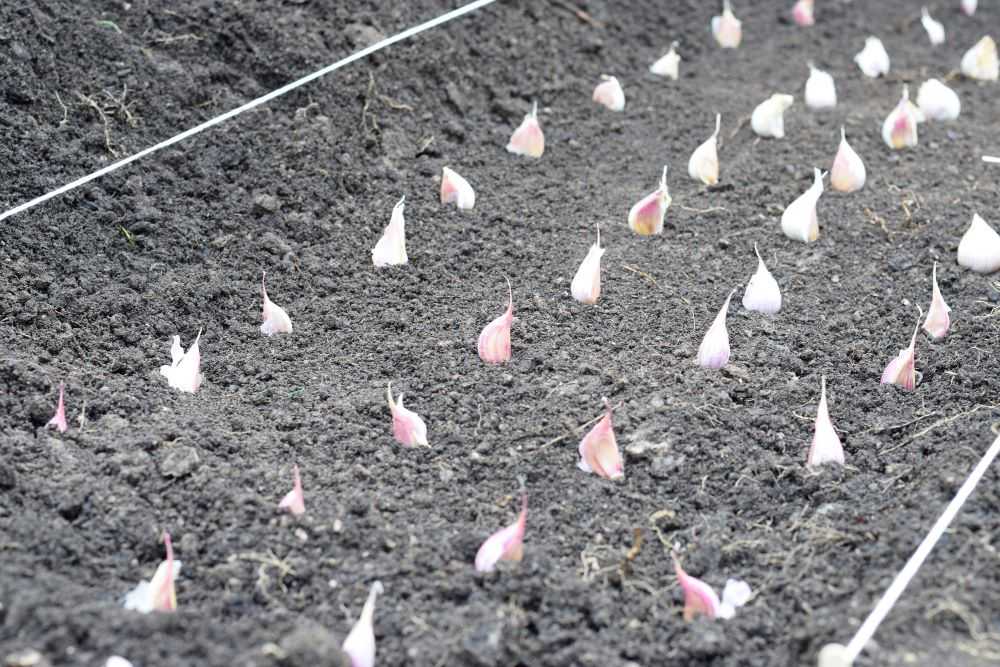
Step 5: Plant the Garlic
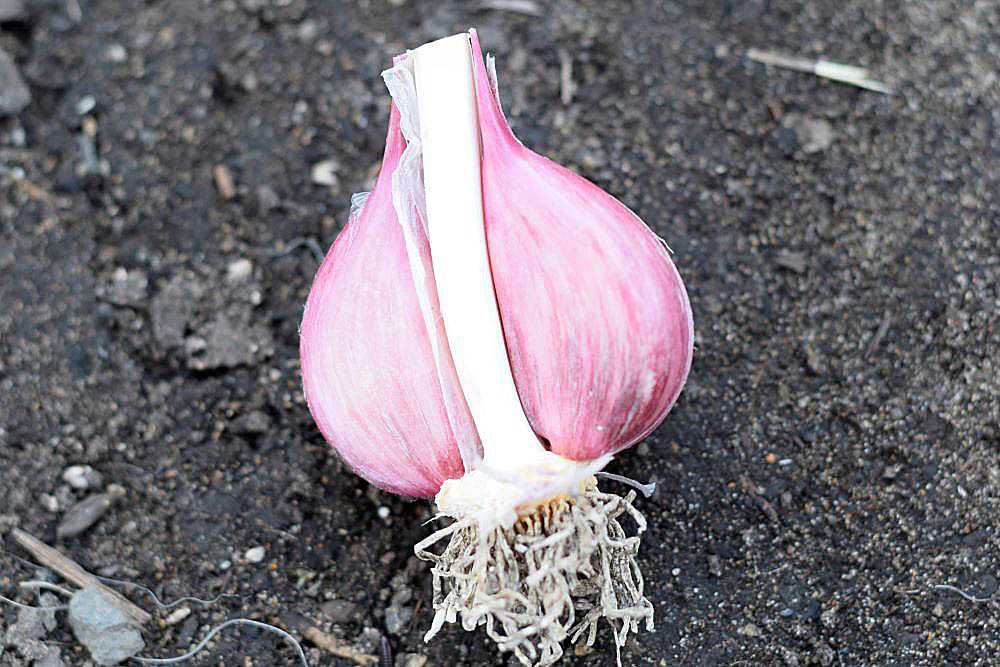
Plant the garlic cloves about 6 inches apart in all directions. Do not plant them closer than this because they will start to compete with each other for water and nutrients and not grow as big. Make sure the pointy ends of the cloves are facing upwards when you plant them.
This flat part here will form the root so make sure it is pointing down. Plant with the pointy end up!
When all the garlic cloves are placed cover them with soil. Gently pat the soil down with your hand and water the garlic lightly. Now wait for it to start growing!
Plant the garlic 6 inches apart in all directions and then cover them with soil.
Early Care
Garlic shoots should emerge in a few weeks to a few months, depending on the temperature. Water lightly because garlic does not like heavy wet soils. The fall rains will likely keep it plenty wet, and too much moisture could cause the garlic to rot in the ground if there is poor drainage.
If you see green shoots appear you can add a few inches of mulch to help protect the plants against cold winter temperatures. Clean straw or leaves works well. You can pull the mulch away when the weather warms in the spring.
Add some mulch to help protect against cold winter temperatures. Clean straw or leaves works well.
Final Thoughts
There you have it! Now that you know how to plant garlic you will be rewarded with beautiful garlic plants next spring that will be ready around July. Happy Gardening!
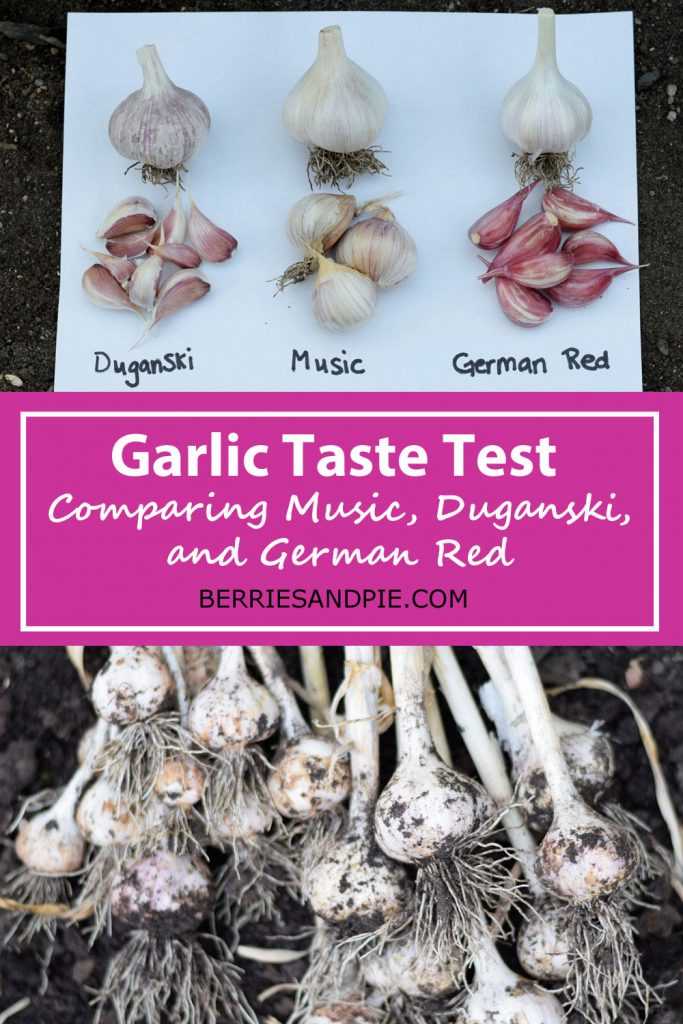
My garlic adventure started two years ago when I planted a few cloves of Duganski garlic that I bought on a whim the store. Isn’t garlic all the same? I thought. Why am I bothering to grow my own?
Then I tried the homegrown Duganski garlic in my favorite garlic roasted green beans and I was hooked. The garlic was so much more flavorful than the generic white garlic at the grocery store! And it also had bigger cloves, which meant less peeling and prep work. Yay! I have been growing my own garlic ever since.
This spring I grabbed two more varieties to try: Music and German Red. I am excited to share my thoughts with you!
GarlicVarieties
All three varieties of garlic I planted this year are a type of hardneck garlic. This means that there is a single row of cloves around a hard, woody stem.
Hardneck garlic varieties have a single layer of cloves around a hard, woody stem.
I prefer hardneck varieties because they generally have great flavor and larger cloves. There are few things I dislike more in the kitchen than peeling puny garlic cloves! Here is a summary of the three types I planted this year:
Music
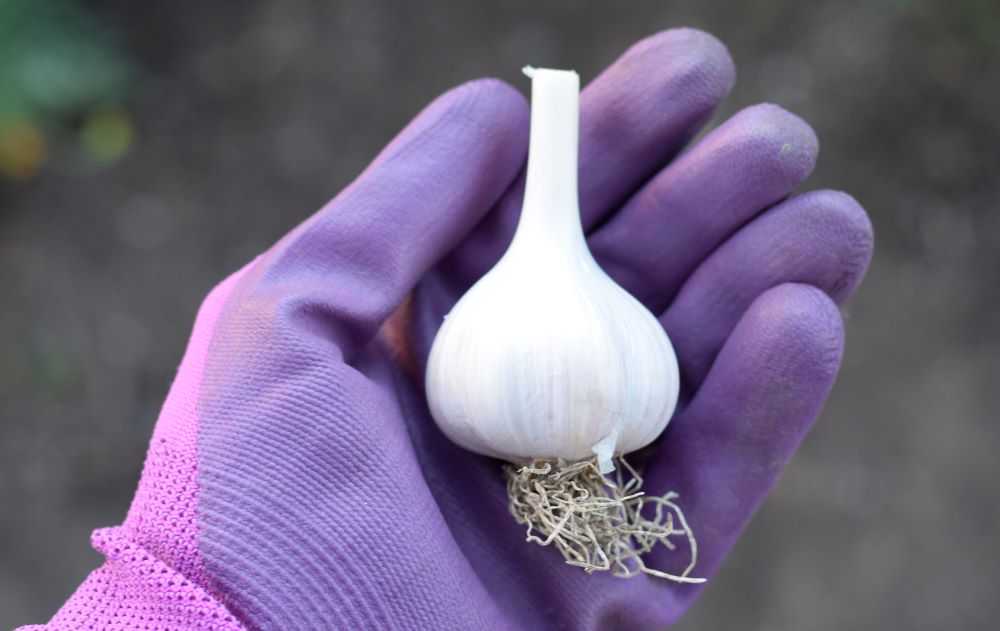
Music is a porcelain type hardneck garlic and it has silvery white skins covering the cloves. The heads were larger than the other varieties I planted this year. The cloves are gigantic and each head has only 3-5 cloves.
Music
Duganski
Duganski is a purple stripe variety and has very pretty outer skin. It has 8-9 cloves per head.
Duganski
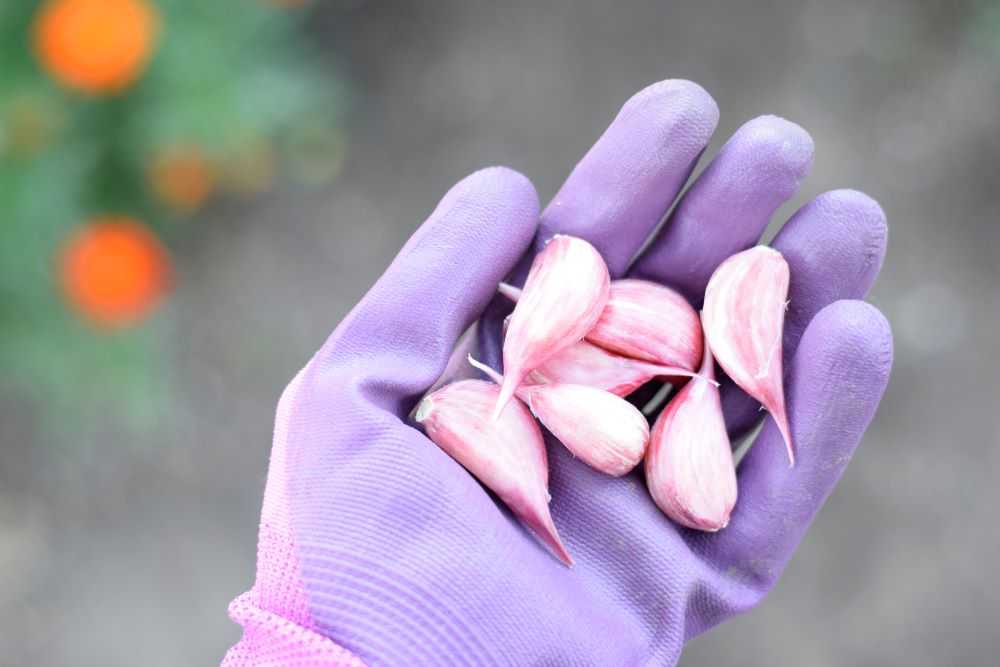
German Red
German Red is rocambole type hardneck garlic. The skin covering the cloves is a beautiful deep red color. It has 5-7 cloves per head.
German Red
Taste
All three garlic varieties have a great garlic flavor. When raw they all taste the same to me: super spicy! When cooked Music seemed the most mild tasting while Duganski and German Red retained a slightly stronger garlic flavor.
My Thoughts
I really like Music because it has such large cloves. However, I like the flavor of the Duganski and German Red slightly better, and Duganski is still my top choice for my garlic roasted green beans. Since I like variety, I will probably plant all three again next year!
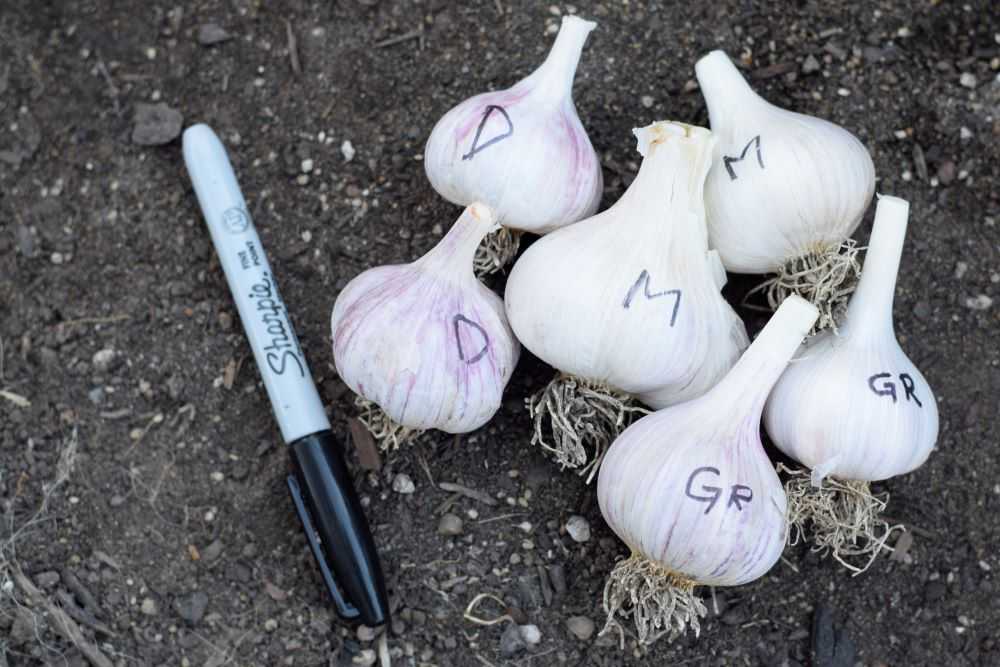
How to Save Garlic for Planting
Make sure you save some of your garlic to plant in your garden next year! After you dig your garlic let it dry for at least a couple of weeks. Then cut the stems off a little ways above the bulb. Since I have three varieties of garlic, I use a Sharpie to label the different varieties right on the bulbs. Keep your garlic in a dry place until you are ready to plant it, either in the fall or in the spring. I place mine in a small paper lunch bag and keep it in the garage until October, when I plant it out in my garden. More information on planting garlic is coming soon!
Cut the stems a little above the bulbs. Use a permanent marker to label the different varieties.
Hope you get to try one of these garlic varieties in your garden next year. Do you have another favorite type of garlic? Let me know in the comments below! Happy Gardening!
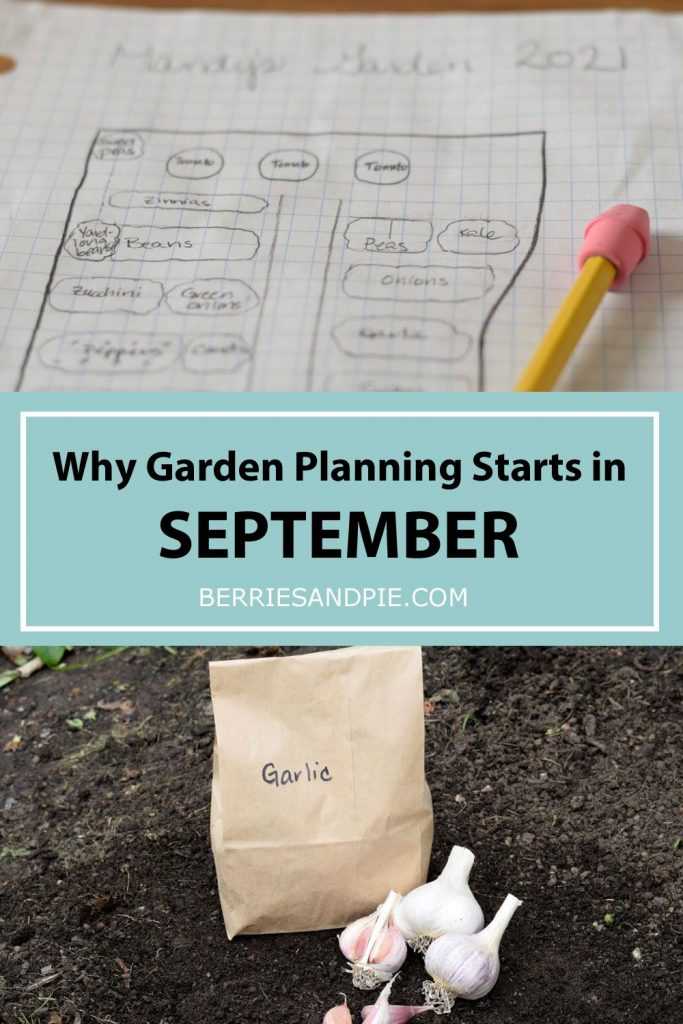
Our garden is starting to wind down for the year. The green beans are about done, and we just picked our pumpkins. So why am I already planning next year’s garden when this season has not yet finished?
Garden planning starts in September!
The main reason why I do this is so I can overwinter some of my vegetables for bigger and earlier yields next spring. Planting vegetables such as peas and garlic in the fall allows them to start growing and get a good root system developed before going dormant over the winter. In the spring they start growing as soon as the weather warms and they have a big head start on the season!
In order to plant these crops, I need to know where to put them because they will affect my garden layout in the spring. Read on to learn more about which crops overwinter well and how to start planning your garden for next year.
Crops to Overwinter
Peas (including sweet pea flowers) and garlic are the two crops that I regularly plant in the fall.
Peas
Peas are easy to start in the fall. You will be rewarded with larger and earlier crops in the spring!
The main advantage to starting peas in the fall is that you can get them growing earlier in the spring. Where I live in Oregon our late winter and early spring is usually very rainy. This makes it difficult to get seeds started because the soil is so wet that the seeds may rot. By planting peas in the fall, the plants will already be established so they can start growing as soon as the weather gets warm enough. Since peas grow best in cooler weather, you will get more peas before the hot weather comes and they stop producing.
For more information on planting fall peas click here.
Garlic
Fall planted garlic may be larger than spring garlic because it has more time to grow in cooler weather.
Garlic can be planted in the fall or in the spring. I have done both and gotten good results from each method. Since I am planting garlic that I grew the previous season, I prefer to plant it in the fall so I will not have to store it as long before putting it in the ground. This way the garlic is less likely to sprout early or have other issues during storage. Fall planted garlic can also be larger than garlic planted in the spring because it has more time to grow in cooler weather.
For more information on planting garlic click here.
Onions
Many people overwinter onions, which can help to produce larger bulbs. I have not done this yet but am eager to try! Maybe next year?
Start Planning Your Garden
A little planning can help your garden thrive. If you start with a good plan your garden will be much more productive!
I usually start by doing a rough sketch of my garden in the fall so I know where to plant these crops. While I don’t fill in all the details at this point but I have a rough idea of where I want them to go so I can get them in the ground! I usually fill in more information over the winter when I receive my seed catalogs in the mail.
A much more complete guide to garden planning is coming soon, so stay tuned!
Final Thoughts
Do I have you convinced yet? Hopefully you can try overwintering some of your vegetables for an early spring harvest. As always, Happy Gardening!